
Tired of spending $30 or more on Euro shams that don’t match your bedroom decor? Making your own European pillow sham is a satisfying project that gives you custom style at a fraction of the retail price. Whether you sew occasionally or own a serger, this guide covers everything you need—from fabric selection to the final stitch—so you can create professional-looking shams in about two hours. With standard 26×26 inch sizing and your choice of envelope or zipper closures, you’ll get a polished result that transforms your bed from ordinary to boutique-hotel elegant.
Choose the Right Fabric for Your Euro Sham
Selecting appropriate fabric is the foundation of a great Euro sham. You need material that looks beautiful and holds up to regular use.
Pick durable, decorative material that balances aesthetics with functionality. Linen, cotton, duck cloth, and high-thread-count sheets work best because they resist wrinkling and maintain structure. Avoid overly stretchy fabrics like pure silk unless you plan to line them. For a textured, high-end look, consider embroidered linen or paisley prints. If your main fabric is expensive or limited, use a coordinating solid for the back panel.
Pre-wash and iron your fabric before cutting. This critical step prevents unexpected shrinkage after sewing, which could make your sham too small for the insert. Use the same wash cycle you plan for future cleaning to ensure the fabric behaves consistently.
Consider reversible or lined designs for versatility. Make your sham reversible using two different fabrics for two looks in one. Add batting lining or iron-on interfacing for extra body and a designer feel, especially if using lightweight material. This eliminates empty corners and gives the sham a fuller, more tailored appearance.
Cut Fabric to Perfect Dimensions
Precise cutting ensures your finished sham fits your insert perfectly. The standard Euro sham measures 26×26 inches, but you need to account for seam allowances.
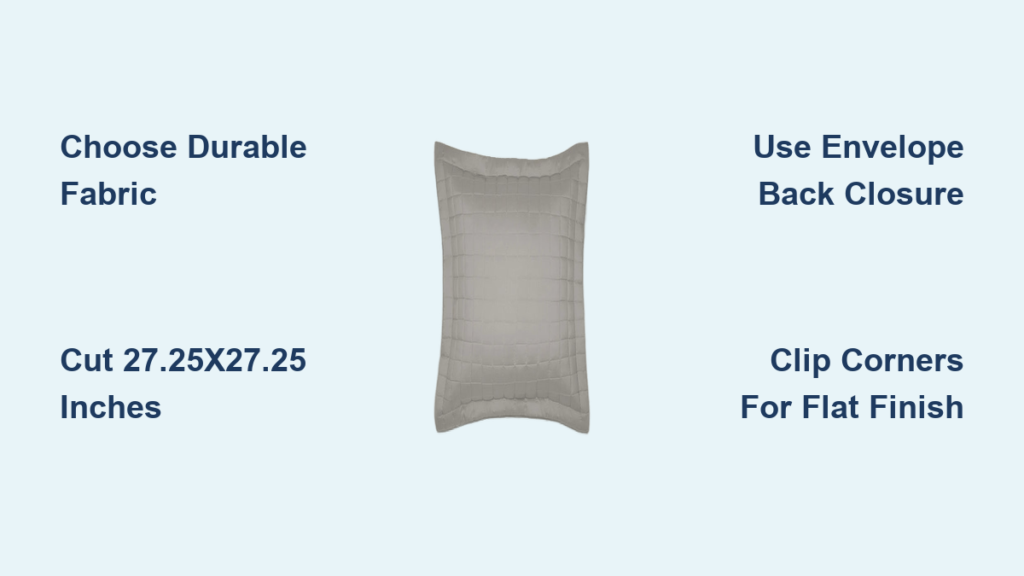
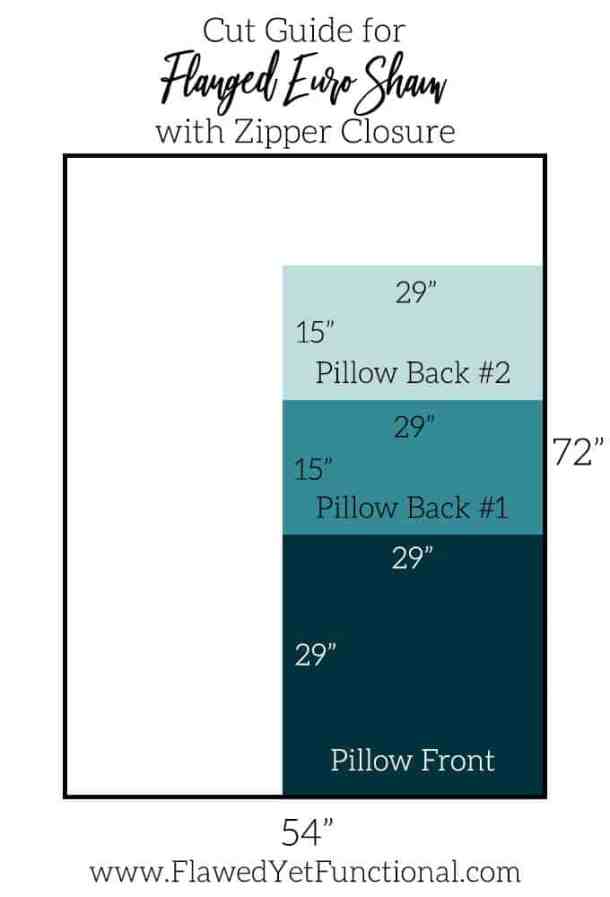
For a standard 26-inch insert, cut the front panel at 27.25×27.25 inches. This accounts for a 5/8-inch seam allowance on all sides, giving you a clean 26-inch result after sewing. Some patterns use 27×27 with a ½-inch seam, so choose one method and stick with it.
For an envelope back closure, cut one back piece at 27.25×40 inches, then slice it in half to create two overlapping panels. Each panel will measure approximately 27.25×20 inches. The overlap prevents the pillow from slipping out and creates a clean closure without zippers.
Adjust dimensions if you’re adding a flange or using a larger insert. For a 2.5-inch flange, add 5 inches total to the front panel dimensions—cut it at 29.75×29.75 inches. For 28×28 inserts, increase all dimensions by 2 inches. Always measure your actual pillow insert rather than assuming standard sizing.
Create an Envelope Back Closure
The envelope back is the most beginner-friendly closure option and can be completed in under two hours. This method requires no special feet or zippers.
Hem the back panels first. Fold one long edge of each back panel ½ inch toward the wrong side and press. Fold again ½ inch, pin in place, and stitch along the inner fold to create a clean double-fold hem. Repeat for the second panel. These hems will face inward and overlap in the center.
Layer the pieces correctly for assembly. Place the front panel right side up on your work surface. Lay one back panel on top, right side down, aligning the top, left, and right edges. Position the second back panel opposite the first, overlapping the hemmed edges in the center. Pin all four sides securely to prevent shifting during sewing.
Sew around the perimeter using a 5/8-inch seam allowance. Backstitch at both start and end points for durability. Clip the corners diagonally to reduce bulk, then turn the sham right side out. Use a chopstick or turning tool to push out the corners sharply. Press the seams flat with an iron for a crisp, professional finish.
Install an Invisible Zipper for a Pro Finish
An invisible zipper creates a sleek, seamless look that rivals high-end bedding. This method takes longer but yields more refined results.
Prepare the zipper before sewing. Use a 20 to 21 inch invisible zipper. Open the zipper fully and press it lightly with an iron to flatten the coils, being careful not to melt the plastic. Pin one side of the zipper tape to the right side of one back panel, aligning the top edge exactly.
Sew using a zipper foot attached to your machine. Keep the needle on the left side of the foot and stitch close to the coil. Backstitch at both ends to secure. Flip the fabric, align the second back panel, pin the other side of the zipper tape, and sew from the opposite direction.
Complete the remaining seams after both zipper sides are attached. Close the zipper partially first. With right sides together, pin and sew the three remaining sides using a 5/8-inch seam allowance. Trim seam allowances to ¼ inch to reduce bulk. Turn right side out, press, and enjoy your clean zipper-close finish.
Add a Flange for Designer Style
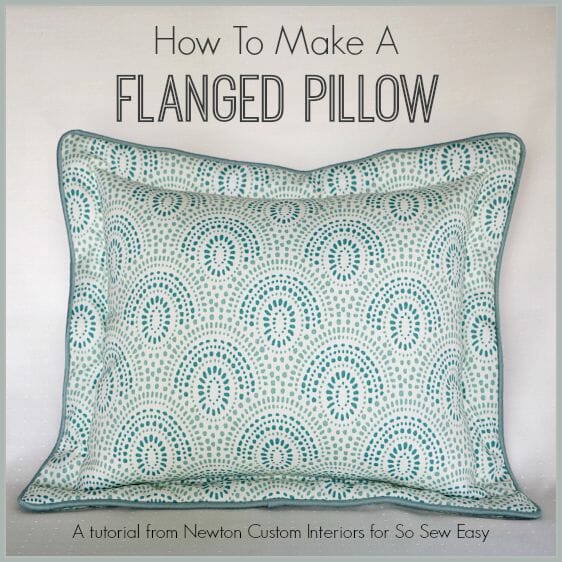
A flange is a decorative border that frames the sham and adds visual interest. This optional detail elevates your creation from simple to sophisticated.
Cut the front panel larger to accommodate the flange. For a 2.5-inch flange, cut the front at 29.75×29.75 inches. Mark the flange line with fabric markers or pins after assembly. Use painter’s tape on your sewing machine bed to mark the exact stitching distance—this ensures consistent results all around.
Prevent flanges from drooping by adding support. Fuse iron-on interfacing or buckram to the back of the front panel before sewing. Cut strips slightly wider than the flange width and press in place. Alternatively, use a narrower 1.5-inch flange, which stands upright more naturally and appears more polished.
Sew the flange seam after turning the sham right side out. Fold the excess fabric along the flange line, pin in place, then stitch 2.5 inches from the outer edge, catching all layers. This secures the flange and creates a continuous decorative border.
Avoid These Common Mistakes
Even experienced sewers encounter issues with Euro shams. Learning these pitfalls saves time and materials.
Do not make the sham too loose. One maker discovered her 26-inch finished sham was several inches too large for her 26-inch insert—her daughter confirmed it was “a couple of inches too big all around.” For a tighter, more professional fit, aim for a 24 to 25 inch finished size. This creates a fuller appearance that looks intentional rather than sloppy.
Clip corners to reduce bulk and prevent puffy dog ears. After sewing, trim each corner diagonally at a 45-degree angle, being careful not to cut through the stitches. This removes excess fabric and helps corners lie flat when turned.
Finish seams to prevent fraying over time. Apply fray-check to raw edges, use a zig-zag stitch, or invest in a serger for clean, durable seams. If you plan to make multiple bedding pieces, a serger pays for itself quickly.
Test fit the pillow insert before finalizing. Slide it in to check fit and fullness. If it’s too tight or loose, adjust before committing. This step is especially important when lining with batting or using thick fabric.
Style Your Bed Like a Pro
Now that your Euro shams are complete, proper placement maximizes their visual impact. A well-layered bed creates depth and sophistication.
Layer in the correct order for the most polished look. Start with a smooth duvet pulled up to the headboard. Fold the top edge of the flat sheet back a few inches. Place sleeping pillows against the headboard, then layer Euro shams in front of them. On a king bed, use three Euro shams to fill the width. Finish with smaller square pillows and a bolster in front for textural interest.
Mix textures and colors to create visual depth. Combine linen Euro shams with knit or velvet accent pillows. Use neutral shams as a backdrop for bolder front pillows. Coordinate colors with your duvet or throw blanket for a cohesive look that pulls the entire room together.
Add monograms for personalized elegance. Embroider a monogram at the bottom edge of the front panel using an embroidery machine or iron-on transfer. Pre-iron only the area to be monogrammed to avoid creating wrinkles in the finished sham.
Cost Comparison: DIY vs Store-Bought
Making your own Euro shams saves significant money while giving you complete design control.
A pre-made Euro sham from retailers like Hobby Lobby costs $30 or more. Using repurposed sheets or fabric remnants, your cost drops to $5 to $10 per sham. This represents a 70 to 85 percent savings. Even when adding a zipper and interfacing, you’ll save substantially compared to retail prices.
Time investment varies by method. An envelope back takes 1 to 1.5 hours for a pair. A zipper closure requires 1.5 to 2 hours due to the additional steps. Adding a flange adds 20 to 30 minutes. Beginners can complete a basic sham in under two hours, and once you master the technique, seasonal matching sets become quick projects.
Frequently Asked Questions About Making Euro Shams
What is the standard size for a European pillow sham?
The standard Euro sham size is 26×26 inches to fit a standard square pillow insert. Some luxury bedding uses 28×28 inches. Always measure your actual pillow insert before cutting fabric to ensure a proper fit.
What fabric works best for Euro shams?
Linen, cotton, duck cloth, and high-thread-count sheets are ideal choices. These fabrics hold their shape, resist wrinkling, and look polished. Avoid overly stretchy or delicate fabrics unless you plan to add lining for support.
Which closure is easier for beginners?
The envelope back closure is the most beginner-friendly option. It requires no special machine attachments and can be completed in about an hour. The zipper closure offers a more professional look but requires a zipper foot and more advanced sewing skills.
How do I prevent my flange from drooping?
Add iron-on interfacing or buckram to the back of the front panel before assembly. Alternatively, use a narrower 1.5-inch flange instead of a wider 2.5-inch flange, as smaller flanges stand upright more naturally.
How much money can I save making Euro shams DIY?
Pre-made Euro shams cost $30 or more at retail. DIY versions using repurposed materials cost $5 to $10 each, saving 70 to 85 percent per sham.
Key Takeaways for Making Your Own Euro Shams
Creating European pillow shams is a rewarding project that combines functionality with custom style. Choose durable fabrics like linen or cotton, pre-wash everything to prevent shrinkage, and cut precisely using the 27.25×27.25 inch dimensions for a standard 26-inch insert. The envelope back closure works best for beginners, while invisible zippers offer a polished alternative for experienced sewers. Adding flanges, testing fit before final stitching, and clipping corners are details that separate amateur results from professional-looking finished pieces. With savings of up to 85 percent compared to retail prices and endless design possibilities, DIY Euro shams are a smart upgrade for any bedroom. Start with one sham to practice your technique, then create matching sets for every season.


