
Creating a custom floor pillow lets you design the perfect seating for your space without spending the $100+ that store-bought versions often cost. Whether you need a cozy reading nook cushion, a soft play area mat, or a stylish boho-chic lounge seat, making your own floor pillow gives you complete control over size, firmness, fabric, and style. With basic sewing skills and a few materials, you can build a durable, washable pillow that lasts for years while saving 60–75% compared to retail prices. This guide covers everything from selecting materials and cutting precise shapes to stuffing, tufting, and adding professional finishes like piping and zippers.
Choose the Right Fabric
Your fabric choice directly impacts how long your floor pillow lasts and how comfortable it feels. Upholstery fabric and heavy cotton canvas work best for high-traffic areas because they resist wear and hold their shape well over time. These sturdy fabrics do not stretch excessively, which keeps your pillow looking neat even after repeated use. If you prefer a luxe look, velvet or faux leather adds elegance and wipes clean easily, making either option perfect for modern or glam interiors. Quilting cotton works fine for beginner projects or occasional use, though you may want to add a lining for extra durability. Avoid thin or loosely woven fabrics entirely since they can tear under pressure or let stuffing poke through.
Cut Fabric to Exact Dimensions
Precision during cutting prevents lopsided or uneven shapes. For a standard 31-inch square pillow, cut two 32-inch by 32-inch panels to account for the half-inch seam allowance on each side. A rotary cutter with a self-healing cutting mat ensures straight, clean edges. For round pillows, create a homemade compass by tying a pen to an 11-inch string, pinning the center of your fabric, and rotating to draw a 22-inch diameter circle. Always pre-wash your fabric before cutting to prevent unexpected shrinkage after construction. When working with large pieces, look for 60-inch-wide fabric to avoid having to seam multiple panels together.
Use Bias-Cut Strips for Piping
Piping creates a sharp, finished edge that elevates your pillow’s appearance, especially on curved designs. Cut 1.5-inch-wide strips on the bias (diagonal to the grain) so they bend smoothly around corners without puckering. Attach piping to both the top and bottom panels before joining the side gusset. To join piping ends cleanly, cut both at a 45-degree angle and overlap them by 1 to 2 inches. Unwrap one end, trim the cord to match the other, fold the fabric under, and wrap it around the opposing end before sewing. This technique creates a seamless join that will not pucker or gap.
Select the Best Stuffing
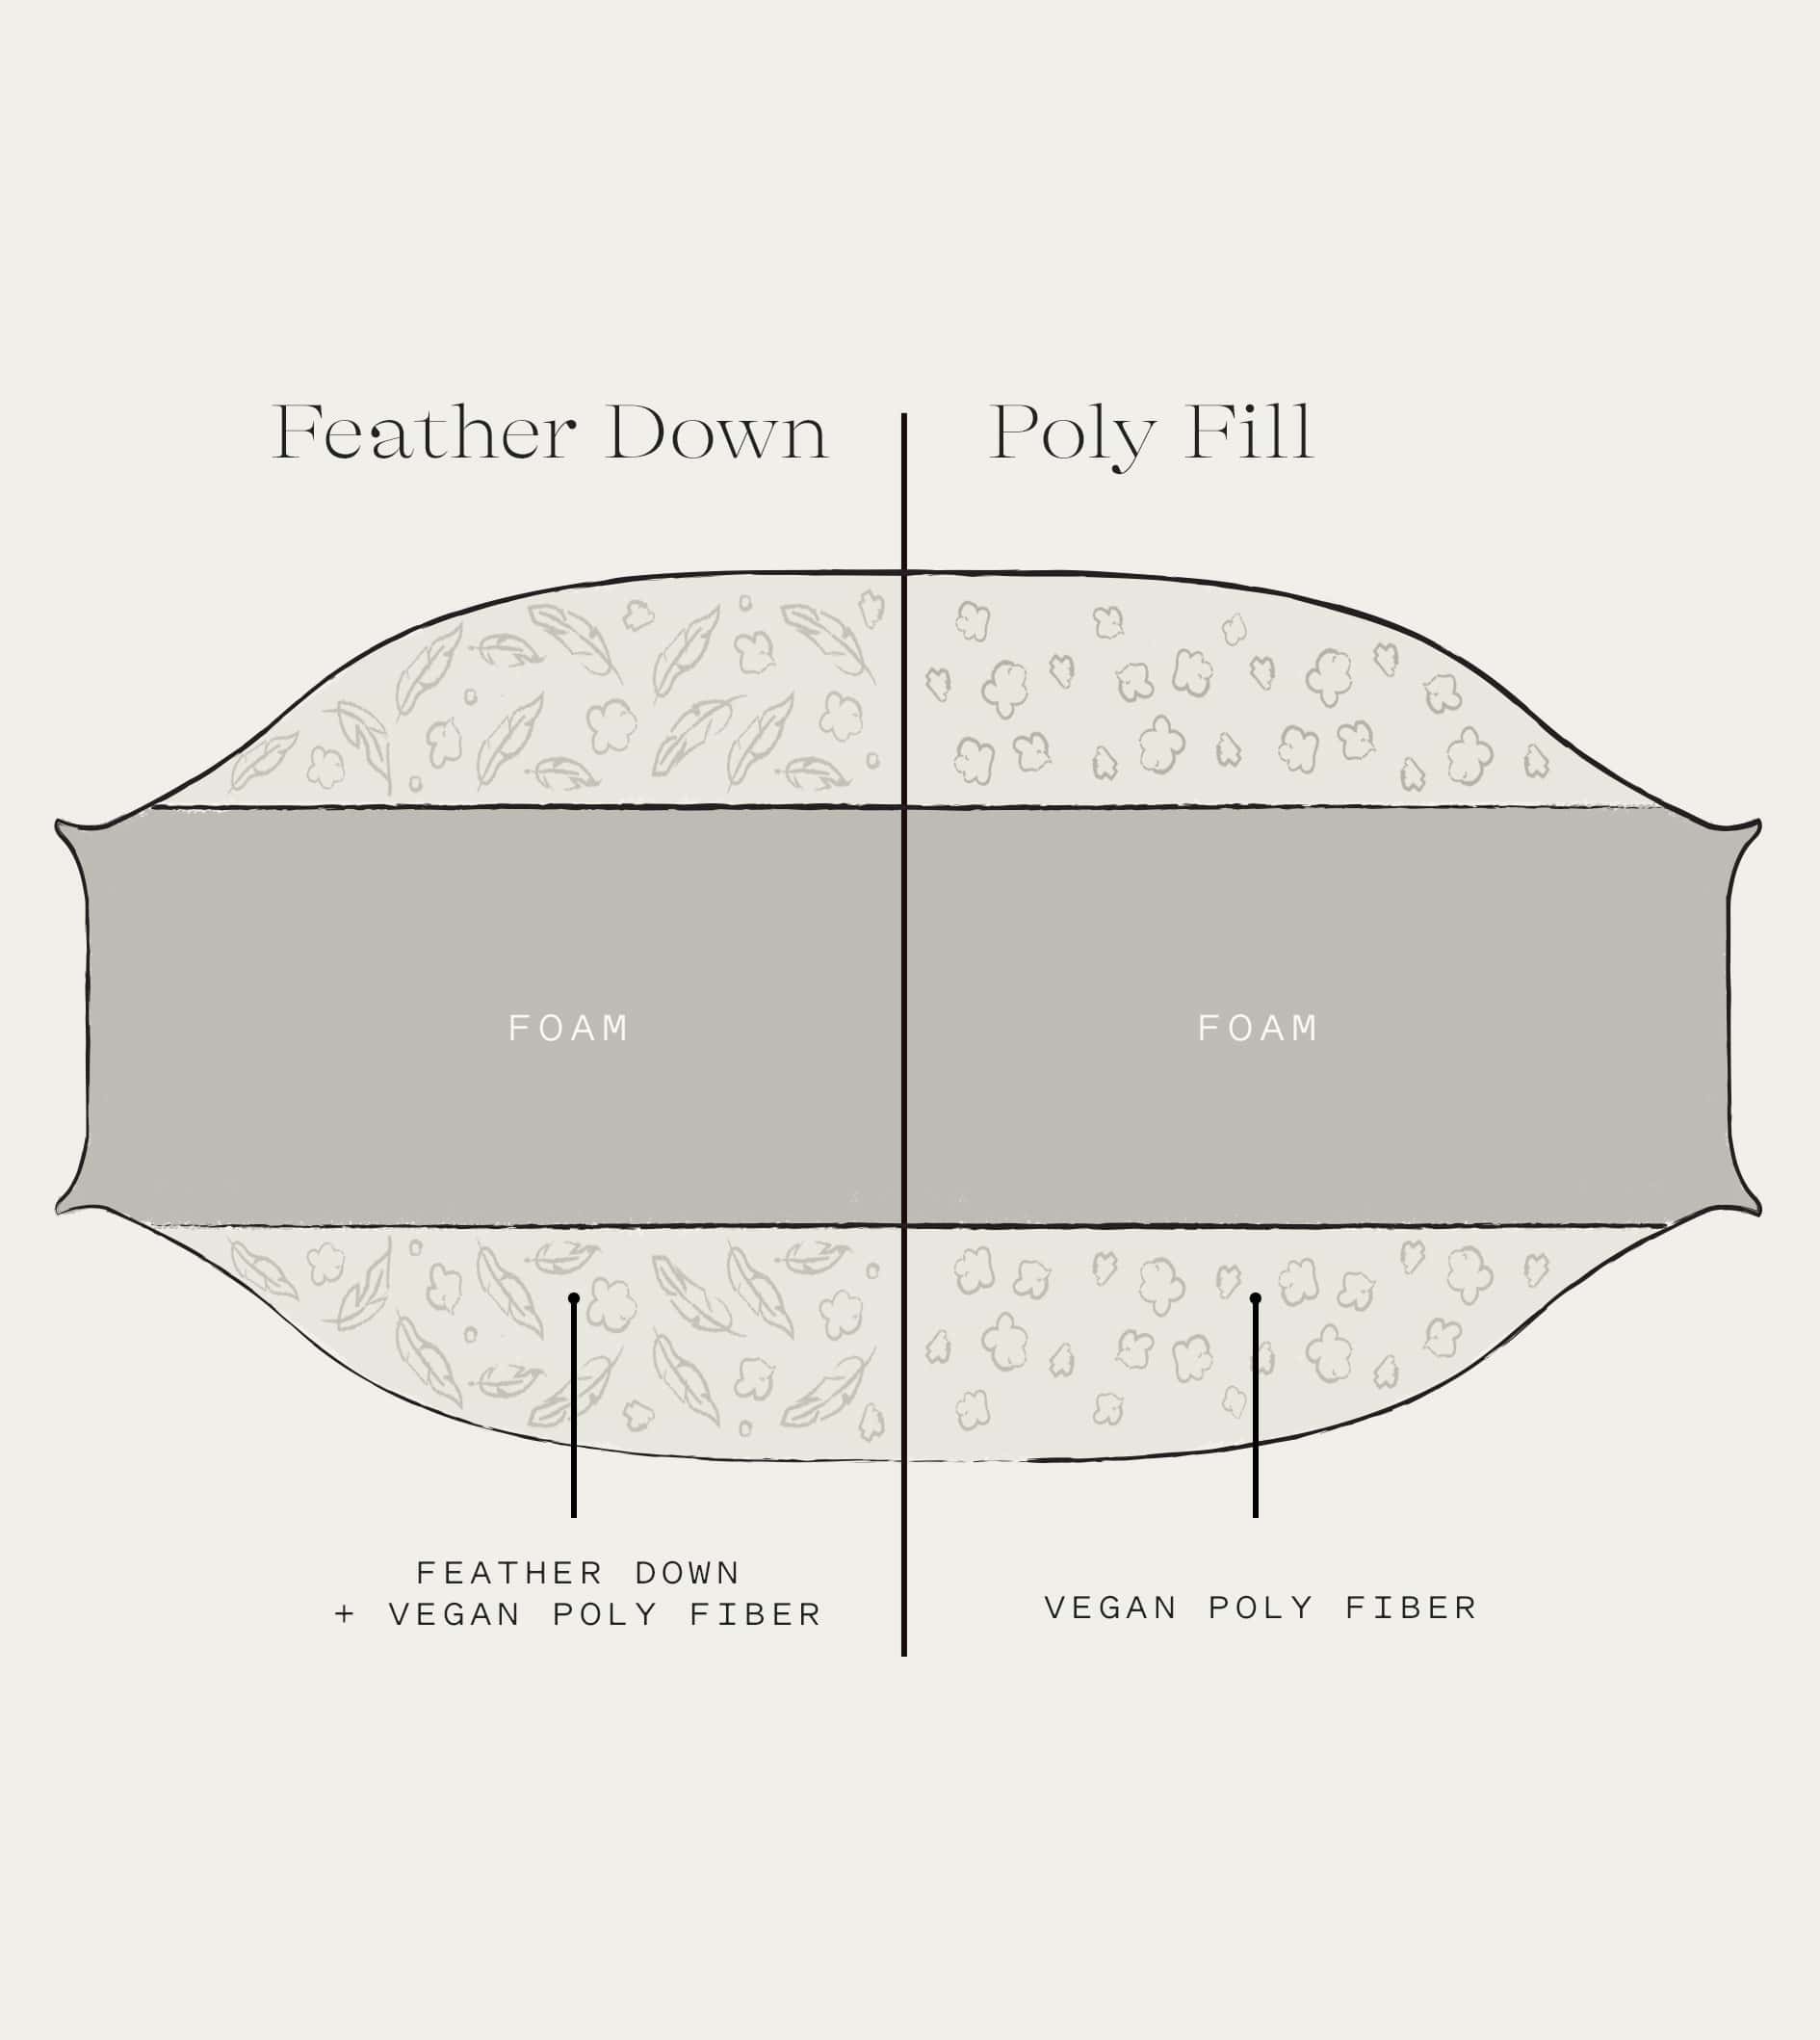
The filling defines how your floor pillow feels when you sit or lounge on it. Polyester fiberfill is affordable, moldable, and beginner-friendly, but choose a high-denier option (15 or higher) for better resilience and shape retention. Shredded foam or bagged foam inserts provide firmer, more structure-retaining support, making them ideal for adult seating or pouf-style pillows. Avoid loose Styrofoam beads in flat floor pillows since they shift easily and create uneven support. Reserve bead fill for deep poufs where movement is less noticeable.
Overstuff for Long-Lasting Shape
All fill materials compress over time with use, so planning ahead matters. Overstuff by 15-20% to compensate for this compression and keep your pillow feeling full for years. A 31-inch square pillow typically needs 5-6 pounds of fiberfill, which is more than half of a standard 10-pound bag. As you stuff, push material firmly into corners and edges using your fists or a dowel to prevent sagging. For round or pouf styles, shake the pillow periodically during stuffing to help the fill settle evenly. If reusing old pillow stuffing, mix it with fresh fiberfill to restore volume and firmness.
Mix Scraps for Eco-Friendly Weight
Reduce waste while improving your pillow’s stability by blending fabric scraps into the fill. Cut leftover fabric pieces into small strips and layer them inside with the fiberfill. This adds slight weight that helps the pillow stay in place during use and supports sustainability. Avoid using very soft or dusty materials that may degrade quickly or cause allergic reactions.
Build the Pillow Shell
Strong construction ensures your floor pillow holds up to daily use. Regular sewing thread can snap under the stress that floor seating endures, so use extra-strong nylon upholstery thread (like Coats & Clark Tex 70) for all seams. Replace pins with Wonder Clips because they grip thick fabric layers better and will not shift during sewing. For heavy fabrics like faux leather, a walking foot or Teflon foot on your machine prevents drag and skipped stitches.
Assemble Using the Boxing Method
For square or rectangular pillows, a gusset (boxing) panel creates the depth that makes floor pillows comfortable. Cut a 7-inch by 64-inch strip, sew the short ends together to form a loop, then pin it between the top and bottom panels with right sides together. Sew around the perimeter with a half-inch seam, leaving a 6-inch gap in one side for turning and stuffing. Reinforce the start and end points with reverse stitching to prevent seam failure under pressure.
Reinforce Seams with French Seams
For washable or high-use pillows, French seams encase raw edges and dramatically boost durability. First, sew with wrong sides together using a 5/8-inch seam. Trim excess fabric to a quarter-inch, then fold so right sides face outward and sew again with a half-inch seam. This double layer resists fraying and is ideal for cotton or linen covers that will be laundered frequently.
Add Professional Details

Install a Zipper for Removable Covers
A hidden invisible zipper in the side or bottom panel allows easy removal for cleaning or refilling. Cut the side gusset shorter by the zipper length, then sew the zipper between two split pieces of fabric using a zipper foot. Attach the completed unit to the pillow. This upgrade proves especially valuable for families or pet owners who need frequent washing.
Attach Handles for Portability
Cut an 8-inch-wide fabric strip with a length equal to the side panel height plus 1 inch. Fold it in half lengthwise, then fold each long edge toward the center. Topstitch both sides to create a flat strap. Pin the handle to the inside of the gusset before assembly so it gets sandwiched between the side and top/bottom panels. This secures it firmly and hides all raw edges.
Finish with Piping or Tufting
Piping elevates the look significantly on large pillows. Sew it to the top and bottom panels before attaching the gusset. For a classic upholstered style, button tufting adds depth and secures inner layers. Use fabric-covered buttons made from leftover material. Mark five points per side (center and 8 inches from each corner). Thread a long needle with doubled thread, pierce through matching points, and secure with three-twisted granny knots. Offset the exit hole slightly to lock the thread in place, creating deep dimples and a polished, high-end finish.
Shape and Close the Pillow
Turn and Stuff Through the Opening
After sewing, turn the pillow right side out through the 6-inch gap. Use a blunt tool like a chopstick to push out corners and curves completely. Insert stuffing gradually, checking firmness as you go. For poufs, use a cardstock funnel to direct foam chunks or beads into tight spaces. Shake the pillow to settle the fill evenly before final closure.
Close with an Invisible Hand Stitch
Fold the seam edges inward on both sides of the gap. Use a ladder (blind) stitch to sew the opening closed from the inside, working your way along the entire opening. Pull tight after each stitch so the seam disappears. Bury thread ends within the pillow. For extra strength, double the thread and knot every few inches. Avoid machine stitching the opening unless appearance does not matter since visible seams detract from the finish.
Secure End Caps on Poufs
For geometric poufs, end caps are gathered rather than flat. Trace a circle, sew a long running stitch around the edge, knot one end, and pull to gather the fabric. Secure the drawstring with thick embroidery thread. Repeat on the opposite end. This creates a clean, rounded closure that hides the seam completely.
Customize Design and Shape
Make Round or Hexagon Pillows
For a 22-inch round pillow, cut two circles and a 7-inch by 69-inch side strip (circumference equals pi times 21 inches plus seam allowance). Attach piping to the circles first, then sew the side strip to the bottom and finally the top, leaving a gap for turning. For hexagon pillows, cut six identical diamond-shaped panels and sew them in a ring before attaching top and bottom. Use bias piping on all corners for smooth curves.
Try Convertible Floor Cushions
Cut a 60-inch by 70-inch piece of durable fabric, fold in half with selvage edges together, and sew three sides. Turn, stuff, and close. When folded, it serves as a large seat; when unfolded, it becomes a soft mat for play or lounging. Add an internal zippered compartment along the fold for storing books, blankets, or toys.
Create Themed Kids’ Pillows
Use animal-shaped templates (like turtles or cats) from free patterns available online. Cut two identical shapes and a narrow side strip. Sew with a half-inch seam, leave a gap, turn, and stuff. Embroider eyes or add felt ears for character. Choose bright, washable fabrics and double-stitch all seams for safety and durability.
Maintain and Extend Lifespan
Spot Clean or Machine Wash Safely
If your pillow has a zipper, remove the cover and machine wash cold, then air dry. For fixed covers, spot clean with mild soap and a damp cloth. Never soak the entire pillow because moisture can clump fiberfill or degrade foam. For faux leather or suede, wipe with a damp microfiber cloth and avoid harsh chemicals.
Reinforce Weak Points
Check seams monthly for signs of stress. Re-stitch any loose areas immediately. For tufted pillows, tug gently on buttons to ensure knots remain tight. If handles loosen, re-baste and topstitch them securely. For poufs, shake weekly to redistribute filler and prevent flat spots from forming.
Store Properly Between Uses
Avoid stacking heavy items on top of your floor pillow. Store flat or gently folded in a dry, ventilated area. If used outdoors, bring it inside after use to prevent mildew. Use a cotton storage bag rather than plastic to allow airflow and prevent odor buildup.
Frequently Asked Questions About Making Floor Pillows
What is the best fabric for a durable floor pillow?
Upholstery fabric and heavy cotton canvas offer the best durability for floor pillows. These materials resist wear, hold their shape, and withstand daily use. Velvet and faux leather provide luxury looks while remaining easy to clean.
How much stuffing do I need for a 31-inch floor pillow?
A 31-inch square pillow needs approximately 5-6 pounds of polyester fiberfill. This accounts for the 15-20% overstuffing recommended to maintain shape over time as the fill compresses with use.
Can I wash a floor pillow with fiberfill stuffing?
You can wash it if you install a removable cover with a zipper. Remove the cover and machine wash cold, then air dry. For pillows without removable covers, spot clean only to avoid damaging the internal stuffing.
What is the easiest shape for a beginner to make?
A square pillow using the boxing method offers the simplest construction for beginners. The straight edges and straightforward gusset assembly require basic sewing skills and produce reliable results.
How do I keep my floor pillow from sliding around?
Mixing fabric scraps into the fill adds weight that reduces sliding. You can also add a non-slip backing fabric or place the pillow on a rug with good grip. Handles provide additional anchoring points when weighted down.
Key Takeaways for Making Your Own Floor Pillow
Making a floor pillow is a rewarding DIY project that combines function, comfort, and creativity while saving 60-75% compared to buying retail. Choose durable fabrics like upholstery canvas or heavy cotton, and select high-denier fiberfill or foam for stuffing that holds its shape over time. Reinforce seams with French seams or double stitching, and add practical features like zippers for removable covers and handles for easy portability. Overstuff your pillow by 15-20% to compensate for compression, and always pre-wash fabric before cutting to prevent post-construction shrinkage. With proper care including periodic fluffing, spot cleaning, and proper storage, your handmade floor pillow can last for several years of regular use.


