
Tired of neck strain during long soaks? A bath pillow can transform your tub into a personal spa without the high price tag. The good news: you do not need to buy one. Learning how to make a bath pillow is simple, affordable, and customizable to your comfort needs. Whether you are a renter avoiding permanent fixtures, a craft lover upcycling old towels, or just want a washable, hygienic option, DIY solutions deliver real results.
From pool noodles to sewn fabric designs and folded towels, there are multiple proven ways to build a bath pillow that fits your tub, budget, and skill level. Each method uses accessible materials and delivers measurable comfort. In this guide, you will learn step-by-step how to create your own bath pillow using one of three reliable methods, choose the best materials for durability and support, attach it securely, and keep it mold-free with proper care.
Pool Noodle Bath Pillow: No-Sew Solution Under $6
Turn a foam pool noodle into a functional, removable headrest in minutes. This method requires no tools and no sewing skills, making it perfect for beginners or anyone needing a quick fix.
Why Use a Pool Noodle
A pool noodle offers buoyant, lightweight support ideal for casual soakers. It is waterproof by design, making it naturally resistant to mold when dried properly. When paired with strong suction cups, it stays in place and supports the head and neck effectively.
Gather Your Supplies
You will need a few basic items to complete this project. The total cost stays under $6 when using budget-friendly options.
• Standard or extra-large pool noodle (white or neutral color recommended)
• Heavy-duty suction cups with metal hooks (rated 5 lbs or higher; use 2 to 3)
• Sharp scissors
• Permanent marker
• Tub cleaner and sponge
Pro Tip: Avoid neon-colored noodles if you want a discreet look. White or gray blends best with bathroom decor.
Cut and Fit the Noodle to Your Tub
Follow these steps to customize the fit.
- Measure your tub by laying the noodle horizontally across the back where your head rests.
- Mark the cut line using a permanent marker where it needs trimming to fit snugly.
- Cut carefully through the foam using scissors. For curved tubs, shorten slightly for flatter contact.
Visual Cue: After cutting, the noodle should span from one side of the tub to the other without overhang.
Install the Suction Cups
Proper installation ensures your pillow stays secure during use.
- Insert metal hooks into the foam underside, placing one near each end (2 to 3 inches from edges).
- Press firmly onto a clean, dry tub surface. Hold each cup in place for 10 to 15 seconds to create a strong seal.
- Test stability by leaning back gently. Adjust hook positions if needed.
Warning: Only use on smooth, non-porous surfaces like acrylic, fiberglass, or porcelain. Textured finishes reduce adhesion and can cause the pillow to fall.
Cost and Real-World Performance
This method delivers solid results at an affordable price point.
• Total cost: Under $6
• Support level: Moderate, ideal for light lounging
• Durability: Lasts 6 to 12 months with regular drying
• Removability: Fully detachable, perfect for travel or storage
User Insight: While not as plush as memory foam, this method provides noticeable comfort and is praised for its simplicity.
Sewn Fabric Bath Pillow: Custom Comfort That Lasts

Build a durable, personalized bath pillow with full control over shape, firmness, and appearance. This method requires basic sewing skills but delivers superior comfort and longevity.
Choose Your Materials
Selecting the right fabrics and fillings determines your pillow performance. Take time to evaluate options based on your priorities.
Outer Fabric Options
The right fabric affects drying time, mold resistance, and comfort.
• Mesh: Quick-drying, mold-resistant, promotes airflow
• Microfiber: Soft texture, durable, requires waterproofing
• Vinyl-coated fabric: Fully waterproof, easy to clean
• Terry cloth: Luxurious feel, use with waterproof liner
Recommendation: Use mesh or vinyl for the outer shell. Add terry cloth as a removable inner liner for softness.
Filling Types
The filling provides the actual support for your head and neck.
• Memory foam scraps: High support, molds to head shape
• Polyester fiberfill: Plush, lightweight, easy to sew
• Water-resistant foam: Long-lasting, ideal for wet areas
• Buckwheat hulls: Firm, natural support (requires complete moisture barrier)
Expert Tip: Combine fillings by using memory foam on the bottom and fiberfill on top for hybrid comfort.
Build the Pillow Step by Step
Follow these sequential steps to create your custom pillow.
- Cut fabric to measure two identical pieces (standard size: 12 by 6 inches to 14 by 8 inches).
- Sew three sides together with right sides facing using waterproof thread.
- Turn right-side out so outer fabric faces outward.
- Insert filling by pre-cutting foam to fit snugly or stuffing fiberfill evenly to avoid clumping.
- Close the opening using hand-stitching for permanent closure or install a zipper or Velcro for washable design.
- Attach suction cups by sewing them securely to the back or gluing with E6000 adhesive (cure 24 hours before use).
- Add waterproofing by spraying outer fabric with Scotchgard or inserting a plastic liner inside before closing.
Design Hack: Create a dual-sided pillow with one firm side and one soft side for adjustable comfort.
Customization Ideas
Make your pillow uniquely yours with these enhancements.
• Aromatherapy insert: Add a small pouch of dried lavender inside the pillow
• Accessory pocket: Sew an external pocket for loofahs or bath salts
• Contoured shape: Cut foam to match your tub curve for better ergonomics
• Decorative fabric: Use patterned material to match your bathroom
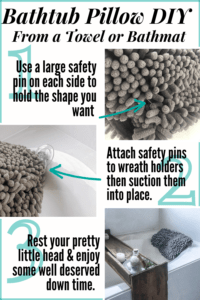
Towel-Based Bath Pillow: Zero Tools Required
Make an instant, hygienic bath pillow using only a towel and safety pins. This method takes under 5 minutes and requires no special skills or purchases.
What You Will Need
Gather these simple supplies from your existing bathroom items.
• One plush bath towel or memory foam-backed bath mat
• 2 to 3 heavy-duty fabric safety pins
• Suction cup wreath holders (plastic with metal hook, 2 units)
Best Choice: Thick, absorbent towels or shag bath mats offer superior cushioning.
Assemble in 5 Minutes
This quick method delivers immediate results.
- Fold the towel into a rectangle (approximately 12 by 16 inches) using 2 to 4 layers for desired thickness.
- Secure with safety pins on both ends to hold the shape.
- Attach suction cups by hooking wreath holders onto the safety pins.
- Mount to tub by pressing suction cups firmly onto a clean, dry surface.
Pro Tip: Use dark-colored towels to hide water spots and wear over time.
Why This Method Works
The towel approach offers unique advantages for specific needs.
• Fully machine washable: Unpin, unfold, and launder after each use
• No permanent changes: Ideal for renters or shared bathrooms
• Reconfigurable: Remake with different towels for varying firmness
• Zero cost: Uses items you already own
User Feedback: Loved for its hygiene and ease, especially by parents and frequent bathers.
Waterproofing Your DIY Bath Pillow
Prevent mold, mildew, and material breakdown with smart moisture protection. This step is essential for longevity and hygiene.
Use Internal Barriers
Create a moisture barrier between filling and water.
• Plastic or vinyl sheet: Line the inside before inserting filling
• Sealed foam: Wrap memory foam in cling film or waterproof fabric
Critical: Never leave untreated foam in standing water. It absorbs moisture rapidly and becomes a mold breeding ground.
Apply External Protection
Treat surfaces that contact water regularly.
• Waterproof spray: Apply Scotchgard to microfiber or terry cloth
• Removable cover: Design with a zippered terry cloth or mesh sleeve for easy washing
Dry Completely After Every Use
Proper drying prevents the most common failure in bath pillows.
• Hang towel pillows to air dry in a well-ventilated area
• Remove pool noodles and sewn pillows from tub after bathing
• Never store in a damp cabinet
Failure Risk: Leaving any pillow wet for more than 24 hours invites mold growth that can ruin the pillow and create health concerns.
Secure Suction Cup Mounting

Strong adhesion ensures your pillow stays put even when you shift position during relaxation.
Choose the Right Suction Cups
Not all suction cups perform equally. Select wisely.
• Load rating: Minimum 5 lbs per cup
• Type: Heavy-duty bath-rated or wreath holder style
• Quantity: Two (one on each end of the pillow)
Avoid: Cheap novelty cups lose grip quickly and fail under pressure.
Maximize Adhesion
Follow these steps for reliable attachment.
- Clean the tub surface with mild soap and water, then dry completely.
- Wet the cup slightly before pressing on.
- Press firmly and hold for 10 to 15 seconds to remove air pockets.
- Test before use by leaning gently to confirm stability.
Troubleshoot Common Slippage
Address issues quickly to maintain secure mounting.
| Issue | Fix |
|---|---|
| Cup will not stick | Clean tub, re-wet cup, press harder |
| Falls during use | Replace worn cups every 6 to 12 months |
| Poor grip on texture | Use only on smooth, non-porous surfaces |
Alternative: For steel tubs, consider magnetic mounts (not applicable to most acrylic models).
Care and Maintenance by Type
Keep your bath pillow clean, fresh, and long-lasting with proper upkeep. Different materials require different approaches.
Towel Pillow Care
This method offers the easiest maintenance.
• After use: Unpin, unfold, hang to dry
• Wash: Machine wash warm with mild detergent, tumble dry low
• Frequency: Every 1 to 2 weeks or immediately if soiled
Pool Noodle Care
Simple cleaning extends the life of foam pillows.
• Clean: Wipe with disinfectant or soapy water
• Dry: Remove from tub and store in a dry place
• Replace: When foam feels waterlogged or degrades
Sewn Pillow Care
Protect your investment with proper handling.
• With removable cover: Machine wash cover regularly
• Without cover: Spot clean only with damp cloth and mild soap
• Never machine wash a filled pillow unless designed for it
• Dry: Air dry completely, do not use a dryer
Longevity Tip: Replace suction cups annually for reliable hold.
Upgrade Your Bath: Add a DIY Bathtub Tray
Pair your bath pillow with a handmade tray for a full spa experience. This companion project completes your bathroom upgrade.
Materials Needed
Gather these supplies for the tray build.
• 1 by 10 by 6 foot wood board (tray base)
• 1 by 3 by 8 foot board (side supports)
• Half-inch diameter by 36-inch wooden dowel (front brace)
• E6000 glue
• Sanding block
• Fusion Hemp Oil or wood conditioner
• Wood stain and sealant
Build the Tray
Follow these steps for a sturdy, attractive tray.
- Cut boards to match your tub width.
- Glue side supports using E6000 and reinforce with tape during 72-hour cure.
- Add front brace by gluing dowel across the front edge.
- Sand and finish by smoothing edges and applying oil, stain, and sealant.
- Cure fully and wait 72 hours before first use.
Feature Hack: Use a wire brush drill bit to carve a tablet holder into the surface.
Use It For
Your tray serves multiple purposes during bath time.
• Candles and greenery
• Wine glass or beverage mug
• Bath salts, soap, loofah
• Book or tablet
Safety Note: Glue-only assembly prevents scratches on tub surfaces.
Choose the Right Method for You
Match your needs to the best DIY approach. Each method serves different priorities.
Pick the Pool Noodle If
This method works best for specific situations.
• You want a quick, low-cost fix
• You are testing bath pillow comfort before committing
• You rent and cannot make permanent changes
• You value easy setup and removal
Pick the Sewn Pillow If
This approach suits dedicated bathers.
• You take frequent baths
• You want long-term durability
• You love custom colors and shapes
• You have basic sewing skills
Pick the Towel Method If
This option works for immediate needs.
• You want zero-cost, immediate relief
• You prioritize hygiene and washability
• You have no tools or materials on hand
Frequently Asked Questions About Making a Bath Pillow
Can I use a regular towel as a bath pillow without any modifications?
Yes, you can fold a plush bath towel into a rectangle (2 to 4 layers thick), secure it with safety pins, and attach suction cup wreath holders to the pins. This creates an instant, machine-washable bath pillow at zero cost.
How do I prevent my DIY bath pillow from getting moldy?
The key is complete drying after every use. Remove the pillow from the tub immediately after bathing, hang it in a well-ventilated area, and never store it while still damp. Using waterproof fabrics, applying Scotchgard spray, or inserting a plastic liner also helps.
What is the cheapest way to make a bath pillow?
The pool noodle method costs under $6 total. The towel method costs nothing if you already have a spare towel and safety pins. Both provide immediate comfort without special skills or tools.
How long do DIY bath pillows last?
Pool noodle pillows last 6 to 12 months with proper care. Towel-based pillows last indefinitely when washed regularly. Sewn fabric pillows last 1 to 2 years or longer with proper drying and maintenance.
Can I use hot glue to attach suction cups to a sewn pillow?
Hot glue fails in wet environments. Use E6000 industrial adhesive for permanent bonding, or sew suction cup straps directly to the pillow. Allow glue to cure fully (24 hours) before exposing to water.
Do suction cups work on all tub types?
Suction cups only work on smooth, non-porous surfaces like acrylic, fiberglass, and porcelain. They fail on textured, matte, or porous finishes. Clean the surface thoroughly and wet the cup slightly before pressing to maximize adhesion.
Key Takeaways for Making Your Own Bath Pillow
Creating a bath pillow at home delivers spa-level comfort without the retail markup. The pool noodle method provides an affordable entry point under $6, the sewn fabric approach offers customization and durability for dedicated bathers, and the towel technique delivers instant results with zero investment.
Regardless of which method you choose, prioritize three critical factors. First, select materials that resist moisture and dry quickly to prevent mold. Second, use heavy-duty suction cups rated for at least 5 lbs to ensure secure mounting. Third, establish a drying routine that removes all moisture after every single use.
Pair your bath pillow with a DIY bathtub tray to complete the spa experience. Add candles, a good book, and your favorite bath salts, and your ordinary bathroom transforms into a personal retreat. Start with whichever method matches your skills and budget, and enjoy the comfort you have created with your own hands.


