
You just painted your bedroom walls a soft, elegant shade, yet the last thing you want is for your bed to ruin it. Every time you shift in bed, the headboard rubs against the wall and leaves ugly scuffs or deep dents. If you are wondering how to protect wall from headboard contact, you are not alone in this struggle. This common issue affects renters and homeowners alike, but simple solutions exist.
This guide breaks down effective methods ranging from invisible DIY fixes to decorative upgrades. You will learn which techniques work best for fresh paint, noisy apartments, or bold interior designs. We will show you how to protect wall from headboard friction using proven strategies backed by material science. No more guessing about the best way to keep your walls flawless.
Attach Foam Pipe Insulation to Bed Frames
One of the most effective ways to stop damage is adding cushioning directly to the bed frame. This method creates an invisible barrier that moves with your bed.
Cut Foam to Fit Contact Zones
Use foam pipe insulation to create custom bumpers for your specific frame. Measure and cut four sections to cover the primary contact points where the headboard meets the wall.
- The top horizontal edge
- The bottom edge
- Both vertical corners
A utility knife works perfectly for cutting the foam lengthwise so it wraps flat against the back of the headboard. These areas are where most rubbing occurs during sleep.
Glue Foam with Heavy-Duty Adhesive
Apply high-strength construction adhesive like Gorilla Glue to the flat side of each foam piece. Press the foam firmly onto the back of the headboard to ensure full surface contact.
Hold the foam in place for 30 seconds to prevent slipping. Let the adhesive cure for at least four hours before moving the bed. This creates a permanent barrier that requires no reapplication.
Pro Tip: Choose black or white foam based on your headboard color to make repairs less visible if exposed.
Apply Self-Adhesive EVA Foam Pads

For a quick solution without mess, EVA foam pads offer targeted protection at key pressure points. These are ideal for renters who need temporary fixes.
Place Pads on High-Impact Corners
Use 3-inch by 1.2-inch self-adhesive EVA pads to cover sharp corners or protruding screws. These packs often contain 20 pieces and cost very little.
Simply peel and stick them where contact occurs on the back of your headboard. These rubber-like pads absorb shock and reduce noise effectively. They prevent paint scuffing from metal brackets or rough wood edges.
This method works best for light use or temporary setups. One pack can cover multiple furniture legs and headboard spots easily.
Customize Size for Larger Areas
Cut larger strips from bulk EVA sheets if standard pads are too small for your needs. Stick them along the entire top rail or bottom edge for broader coverage.
While not as seamless as pipe insulation, this method requires zero drying time. It is also easily replaceable if the adhesive wears out over time.
Watch For: Adhesive may weaken on dusty surfaces. Clean the headboard surface with rubbing alcohol first for the best hold.
Install 3D Anti-Collision Wall Panels
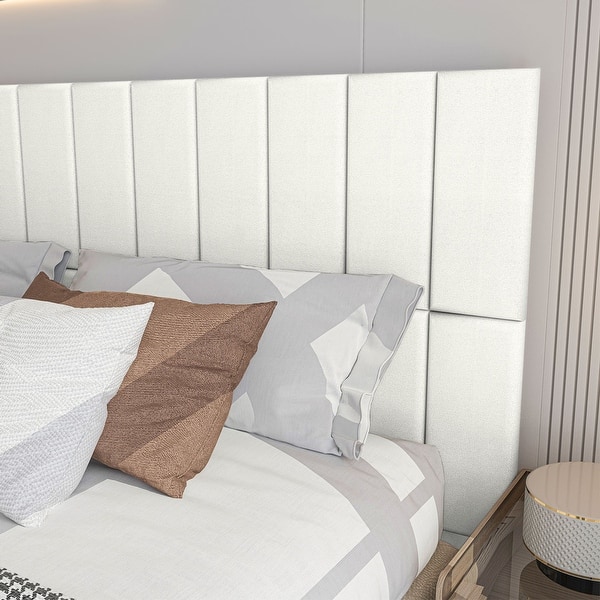
Turn protection into a design feature with peel-and-stick wall padding. These panels absorb impact while elevating your room aesthetic.
Choose Panel Type by Room Need
| Use Case | Recommended Panel | Why It Works |
|---|---|---|
| Noise Reduction | Tatami Soundproof Mat | Dampens bed movement sounds |
| Decorative Upgrade | 3D Upholstered Panels | Adds texture and color |
| Full Coverage | Roll Format Padding | Covers tall or wide zones |
| Thermal Control | Felt Insulation Panels | Regulates temperature and sound |
Panels come in various sizes including rolls up to 78.7 inches long. You can match colors like blush pink or light gray to your bedroom palette.
Mount Panels Without Damage
Clean the wall with mild soap and water before starting. Let the surface dry completely to ensure strong adhesion.
Peel off the backing and press the panel firmly into place. Start from one edge and smooth outward to avoid air bubbles.
Most adhesives are strong yet removable, making them ideal for rentals. Test in a hidden spot first if you have older or textured paint.
Design Hack: Arrange multiple panels in a geometric pattern to create a modern headboard backdrop.
Use Wall-Mounted Headboards

Eliminate the gap entirely by fixing the headboard directly to the wall. This structural change stops movement at the source.
Select a Mountable Design
Products like the HMstone Queen Boho Headboard combine style and function. These units often feature fluted wood panels and built-in lighting options.
Since the headboard attaches to the wall, there is no rubbing from the bed frame. This solution works best with platform beds that do not rely on the headboard for support.
Secure with Proper Anchors
Drill into wall studs using the included mounting hardware. Use heavy-duty anchors rated for the headboard weight if studs are unavailable.
Warning: Never mount a headboard without proper anchoring. A falling unit can cause injury or major wall damage.
This approach is ideal for permanent setups and modern bedrooms wanting a clean look.
Prevent Damage at Key Contact Points
Focus your protection efforts where wear happens most frequently. Targeting specific zones maximizes the effectiveness of your solution.
Target Top and Bottom Rails
These horizontal edges press into the wall when the bed shifts during sleep. Wrap both with foam pipe insulation or cover them with long EVA strips.
Even slight compression prevents paint transfer and scuff marks. Look for smudges or discoloration at these levels to confirm contact zones.
Shield Vertical Corners
The upper corners of the headboard often dig into the wall during vigorous movement. Attach corner guards made from folded EVA foam or L-shaped pipe insulation pieces.
Pro Tip: Painted drywall dents easily. A 1 cm thick cushion reduces impact force by over 80 percent based on foam density ratings.
Match Solution to Your Situation
Pick the right method based on your lifestyle and room type. Different scenarios require different approaches to how to protect wall from headboard friction.
For Freshly Painted Walls
You have invested time and money into a perfect finish. Do not risk it with inferior protection methods.
Best Choice: Foam pipe insulation glued to the headboard. It is invisible and keeps new paint flawless.
Avoid peel-and-stick wall panels immediately after painting. Adhesives can pull fresh paint off before it fully cures.
For Maximalist Decor Styles
Turn protection into a bold statement piece. Use this opportunity to add texture and color to your room.
Best Choice: 3D self-adhesive wall panels in bold colors or fluted textures. Arrange them behind the bed like art.
Pair with a minimalist metal frame to let the wall padding shine as a focal point.
For Apartments and Rentals
You need non-destructive fixes that will not void your deposit. Leaving no trace is your top priority.
Best Choice: Headboard-mounted solutions like foam or EVA pads. They leave no mark when removed.
If allowed, use removable wall panels on well-cured paint. Avoid drilling unless your landlord approves.
For Noisy Bedrooms
If thumping keeps you or neighbors awake, sound matters greatly. You need materials that dampen vibration.
Best Choice: EVA foam pads or tatami-style mats. Both reduce vibration and impact noise significantly.
Felt panels also provide acoustic insulation, making them ideal for upstairs bedrooms.
Compare Costs and Longevity
Know what you are paying for and how long each solution lasts. Budgeting helps you choose the right path.
Budget Under $20
- EVA Foam Pads (20-pack): Lasts 6 to 12 months.
- Foam Pipe Insulation + Glue: Permanent with proper installation.
- Single 3D Panel: Good for small areas or accent zones.
These options offer immediate relief without breaking the bank.
Mid-Range ($20–$70)
- Padding Rolls: Covers 4+ square feet for full-height protection.
- Thick Cushion Panels: Durable, stylish, and long-lasting.
- Felt Insulation Panels: Premium option with thermal and noise control.
Invest here if you plan to stay long-term or value room comfort.
High Investment: Replace the Headboard
- Wall-Mounted Units: One-time cost with lifetime protection when installed correctly.
Consider this if you are updating furniture anyway. It is more than a fix, it is a redesign.
Maintain and Inspect Regularly
Even the best protection fails if ignored. Regular checks ensure your walls stay safe.
Check for Wear Every 3 Months
Inspect foam pads and glued insulation for signs of wear. Look for compression, peeling edges, or cracks.
Replace EVA pads annually or sooner if they look flattened. Reapply adhesive to foam strips if they feel loose.
Clean Without Damaging
Wipe wall panels and foam surfaces with a damp cloth. Avoid harsh cleaners that degrade adhesive or fabric.
Use a fabric-safe cleaner for upholstered panels to maintain appearance. This keeps your protection hygienic and effective.
Reapply After Moving the Bed
Check that all protectors are still secure if you pull the bed forward. Reattach any shifted pieces before pushing the bed back.
Frequently Asked Questions About Protecting Walls from Headboards
What is the cheapest way to stop headboard scratches?
The most affordable method is using a 20-pack of self-adhesive EVA foam pads. These cost around $4.76 and stick directly to high-contact points on the back of your headboard.
Will foam pipe insulation damage my paint?
No, foam pipe insulation attaches to the headboard, not the wall. This means it protects your paint without sticking to it or causing peeling upon removal.
How do I stop my bed from making noise against the wall?
Use EVA foam pads or tatami-style soundproof mats. These materials absorb the shock of movement and dampen the sound of the frame hitting the wall.
Can I use wall panels if I rent my apartment?
Yes, provided you use peel-and-stick panels designed for removal. Always test a small area first and ensure your paint is fully cured before applying any adhesive to the wall.
How often should I replace wall protection pads?
Inspect your pads every three months. Replace EVA pads annually or immediately if they appear compressed, cracked, or loose to maintain effective protection.
Key Takeaways for How to Protect Wall from Headboard

Protecting your walls does not require expensive renovations or complex tools. Simple solutions like foam pipe insulation or EVA pads can prevent significant damage. The key is to identify your specific needs, whether for noise reduction or aesthetic enhancement.
Focus on high-contact zones like corners and rails for the best results. Match your solution to your living situation, whether you are a renter or a homeowner. Act before damage occurs to save time and money on repairs.
Your walls and peace of mind will thank you for taking these proactive steps. Choose the method that fits your budget and start protecting your space today.



