
Nothing elevates a room like fresh, custom throw pillows, but buying new ones every season gets expensive. The solution is to make your own envelope pillow case. This no-zipper pillow cover uses overlapping back flaps to neatly hide the pillow insert, offering a clean, professional look with easy removal for washing. In this guide, you will learn exactly how to make an envelope pillow case using foolproof measurements and step-by-step sewing techniques.
Choose Your Construction Method
There are three main ways to build an envelope pillow case, each with distinct advantages depending on your fabric, skill level, and design goals.
Three-Piece Method (Best for Beginners)
This method uses one front panel and two separate back panels that overlap in the center. It offers maximum design flexibility and is perfect for mixing fabrics or creating reversible covers.
Why choose it:
– Easy to cut and sew
– Allows for reversible or contrast-back designs
– Works with standard 45″ fabric width
– Ideal for beginners and frequent makers
One-Piece Wrap-Around Method
This method uses a single long fabric piece folded to create overlapping back flaps, resulting in fewer seams and faster construction.
Why choose it:
– Fewer seams mean faster construction
– Great for quick, matching sets
– Minimal fabric waste
Limitation: Requires wider fabric, which may not fit larger pillows on standard bolt widths.
Asymmetrical Back Flaps (For Lumbar Pillows)
This method is designed for long, narrow pillows like 12×20 or 18×36. It uses two flaps of different widths for balanced coverage and prevents gaping on elongated shapes.
Why choose it:
– Prevents gaping on long pillows
– Looks tailored and secure
– Works with standard fabric widths
Cut Fabric to Exact Pillow Size
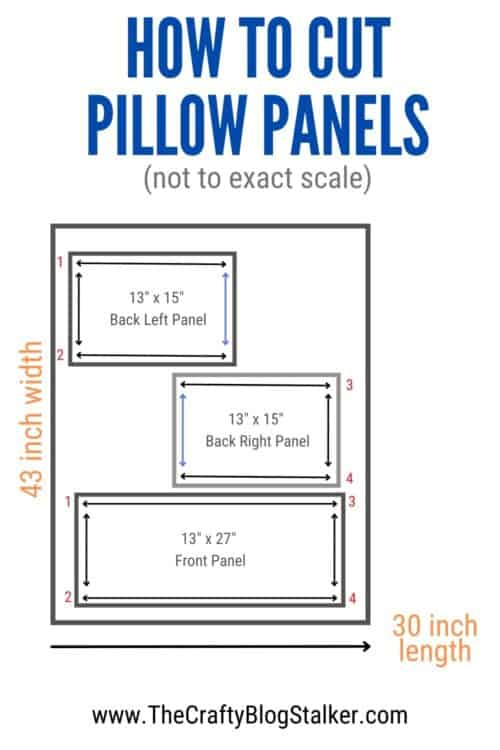
Always start by measuring your actual pillow insert because standard sizes vary. Then apply the correct formula based on your chosen method.
Standard Pillow Sizes and Measurements
| Pillow Size | Front Panel | Each Back Panel | Overlap |
|---|---|---|---|
| 14×14″ | 14.5×14.5″ | 14.5×10″ | ~4″ |
| 16×16″ | 16.5×16.5″ | 16.5×11.5″ | ~5″ |
| 18×18″ | 19×19″ | 19×13.5″ | ~4.5″ |
| 20×20″ | 21×21″ | 21×13.5″ | ~6″ |
| 24×24″ | 25×25″ | 25×16″ | ~7″ |
Formula for three-piece construction:
– Front panel equals pillow size plus 1 inch for a half-inch seam on each side
– Each back panel equals the same height as the front panel, with width calculated as front height divided by two, plus 3 inches
Example for an 18×18″ pillow: Front panel cuts to 19×19″, each back panel cuts to 19×13.5″
One-piece cutting formula:
– Width equals pillow width multiplied by 2, plus 5 to 8 inches for overlap
– Height equals pillow height plus 1 inch for seams
Example for an 18×18″ pillow: Cut one piece 41 inches wide by 19 inches high
Prep Fabric Before Cutting
Skipping fabric preparation leads to shrinkage and shifting after your project is complete. Follow these essential steps before cutting.
Pre-Wash Your Fabric
Wash and dry your fabric exactly as you will care for the final pillow. This prevents post-sewing shrinkage and color bleeding. Iron the fabric thoroughly before cutting to ensure accurate measurements.
Use Sharp Tools
A rotary cutter with a self-healing mat and grid ruler produces straight, precise cuts. Use fabric scissors only for cutting fabric, never for paper. Mark cut lines with a washable fabric pen or chalk for visibility.
Hem Back Panels for a Clean Finish
This step creates a polished edge on the overlapping back flaps for a professional appearance.
Fold and Sew Double Hem
- Take each back panel and fold one long edge a quarter inch toward the wrong side. Press.
- Fold again a quarter inch to hide the raw edge completely. Press.
- Pin or clip the hem in place.
- Sew along the inner fold with a quarter-inch seam allowance.
- Optional: Add a second row of stitching an eighth inch from the first for extra durability.
Pro Tip: Use a quarter-inch presser foot for consistent results. The hemmed edge will face inward when assembled.
Alternative Finishes
- Zigzag stitch along the raw edge
- Pinking shears to reduce fraying on cotton
- Serger finish for stretch or delicate fabrics
Assemble With Proper Overlap
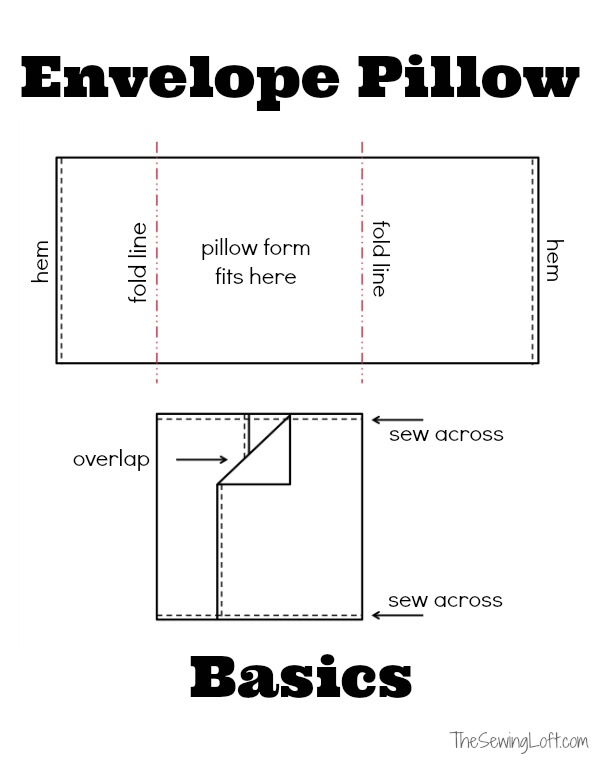
Getting the overlap right ensures the pillow stays hidden and secure when in use.
Three-Piece Assembly Steps
- Place the front panel right side up on your work surface.
- Place the first back panel right side down, aligning one long edge with the top of the front panel.
- Place the second back panel right side down, aligning the opposite edge with the bottom.
- Overlap the flaps by 4 to 6 inches in the center. The hemmed edges should meet but not overlap each other.
- Pin all edges securely.
Critical detail: The top flap should lay over the bottom when closed. Flip the orientation of your panels if the opening faces the wrong direction.
One-Piece Assembly
- Lay the fabric right side down on a flat surface.
- Bring the left side toward the center, stopping at half the pillow width minus half an inch from center.
- Fold the right side over it, overlapping by 3 to 5 inches.
- Pin both the top and bottom edges.
- Test fit by sliding the pillow through the opening to confirm full coverage.
Sew the Outer Seam
This single seam encloses the entire pillow, so doing it right ensures strength and clean corners.
Sew With Half-Inch Seam Allowance
- Backstitch at the start to secure the seam.
- Sew continuously around all four sides.
- At each corner, stop a half inch before the corner, lower the needle, lift the foot, rotate the fabric 90 degrees, lower the foot, and continue sewing.
- Backstitch at the end to secure.
Stitch settings:
– Use a stitch length of 2.5 to 3.5 millimeters for durability
– Choose cotton or polyester thread, matching or contrasting as desired
– Backstitch at each corner for reinforcement
Important: Do not stitch across the back opening. Only the side seams are sewn in this step.
Finish Seam Allowance
Clean inner edges prevent fraying and make turning the cover right side out much easier.
Clip and Trim Corners
Trim the seam allowance to a quarter inch or an eighth inch. Clip diagonally into the corners, cutting just shy of the stitching line. This removes bulk and helps corners pop out cleanly when turned.
Choose a Finish
- Zigzag stitch all inner edges
- Use pinking shears for cotton fabrics
- Serger edges for stretch or luxury fabrics
Turn, Push, and Press
This step transforms a lumpy sewn bag into a crisp, polished pillow cover.
Turn Right Side Out
- Reach through the back opening and pull the cover through carefully.
- Use a point turner, chopstick, or capped pen to push out the corners. Start with the broad end and refine with the tip.
- Roll seams gently between your fingers to flatten them.
Press Like a Pro
Iron the entire cover with a hot iron and steam. Focus on creating crisp edges, sharp corners, and flat hems. Press the back flaps so they lie flat when overlapped.
Pro Tip: Pressing makes a huge difference in the final appearance. Never skip this step.
Insert Pillow Form
Now for the satisfying final step that completes your project.
How to Insert
- Open the envelope flaps.
- Karate-chop the center lightly to create space for the insert.
- Insert the pillow corner-first to ensure full corner fill.
- Tuck the inner flap behind the outer flap for a clean back finish.
For down inserts: Fluff gently after insertion to achieve maximum fullness.
Test fit tip: If the cover feels tight, remove the insert and check your seam allowance. Next time, add a half inch to the cutting size.
Customize Your Design
Make your pillow stand out with these easy upgrades.
Mix and Match Fabrics
- Use a bold print or seasonal fabric for the front
- Choose a neutral solid for the back to extend the life of your cover
- Create a reversible design using two different prints and flip for a new look
Add Piping for Polish
- Buy pre-made piping or make your own bias tape.
- Attach to the right side of the front panel before assembly.
- Use a zipper foot to stitch close to the cord.
- Miter the corners by trimming and overlapping the ends.
Pro Tip: Slightly overlap the piping ends at the bottom and trim excess after sewing.
Try Topstitching
Sew a half inch from the outer edge using contrasting thread. Use a 3.0-millimeter stitch for a bold look, and double-stitch for added durability.
Personalize With Appliqué
Cut shapes with a Cricut machine or by hand. Iron on or hand-stitch before assembly. This works great for monograms or holiday themes.
Fix Common Mistakes
Avoid frustration with these quick fixes for frequent issues.
Gaping Back Flaps
- Cause: Not enough overlap between panels
- Fix: Increase back panel width by 1 to 2 inches on your next project
Bulky Corners
- Cause: Unclipped seam allowance creating excess fabric
- Fix: Trim and clip corners before turning right side out
Misaligned Flaps
- Cause: Panels placed on wrong sides during assembly
- Fix: Double-check that right sides face the correct direction and overlap direction is correct
Wavy Edges
- Cause: Fabric stretched during sewing
- Fix: Pin thoroughly and use a walking foot on slippery or thick fabrics
Sewn Flaps Shut
- Cause: Mistakenly stitching across the back opening
- Fix: Only sew the outer perimeter. The center opening must remain open for pillow insertion.
Hand-Sew a No-Machine Version
No sewing machine is no problem. You can still create a beautiful envelope pillow case by hand.
Use Backstitch for Strength
- Cut fabric using the same formulas provided earlier.
- Hem back panels with a hand-folded double hem.
- Use a double-threaded needle and knot securely.
- Sew the outer seam with a tight backstitch every eighth inch.
- Reinforce corners with extra stitches.
Time required: 30 to 45 minutes for hand-sewn versions. This method works well for travel projects, gifts, or situations without access to power.
Care for Long-Lasting Use
Keep your pillow cover looking fresh with proper care practices.
Washing Instructions
- Turn the cover inside out before washing
- Machine wash on gentle cycle with cold water
- Use mild detergent
- Air dry or tumble dry on low heat
- Iron after drying for a crisp finish
Storage Tips
Remove the insert when not in use and store in a cool, dry place. Swap covers seasonally to refresh your decor without replacing the entire pillow.
Frequently Asked Questions About Envelope Pillow Cases
What is the ideal overlap for an envelope pillow case?
Aim for 4 to 6 inches of overlap to fully conceal the pillow insert and prevent it from slipping out. Larger or frequently used pillows benefit from 6 or more inches of overlap.
Do I need a zipper for an envelope pillow case?
No. The envelope design uses overlapping flaps to secure the insert without any visible closure. This makes removal easy for washing and eliminates zipper complications.
Can I make an envelope pillow case without a sewing machine?
Yes. Use a strong backstitch and reinforce stress points, especially at corners. The project takes 30 to 45 minutes by hand and produces excellent results.
What fabric is best for beginners?
Quilting cotton or 100 percent cotton is ideal for beginners. These fabrics are stable, easy to press, and have minimal slippage during sewing.
How do I make a reversible envelope pillow?
Use two different fabrics. Layer them right sides together during assembly, sew as usual, and turn right side out through the envelope opening. No hemming is needed for back panels because the raw edges are enclosed inside.
Can I use this method for rectangular or lumbar pillows?
Yes. Use asymmetrical back flaps with different widths for long pillows. The short flap should measure front width divided by 3, plus 2 inches. The long flap should measure front width divided by 3, multiplied by 2, plus 5 inches.
Key Takeaways for Making Envelope Pillow Cases
You now have everything needed to create professional-quality envelope pillow cases at home. The three-piece construction method offers the best balance of simplicity and design flexibility for most projects. Always measure your actual pillow insert, add 1 inch for seams when cutting the front panel, and ensure 4 to 6 inches of overlap on back panels. Pre-washing fabric prevents shrinkage headaches later, and pressing every step dramatically improves your final results.
Start with a simple 18×18 pillow using cotton fabric. Once you master the technique, try reversible designs, add piping, or experiment with different fabrics for seasonal swaps. With just fabric, thread, and about 30 minutes, you can keep your home looking fresh, cozy, and uniquely yours.


