
You’ve found the perfect pillow form, but the store-bought covers just do not fit right. Making a rectangular pillow cover at home gives you complete control over the fit, fabric, and style. This envelope-style closure method creates a polished, professional look without zippers or buttons, and the cover removes easily for washing. Whether you are refreshing your couch cushions or crafting a personalized gift, this step-by-step guide walks you through measuring, cutting, and sewing a custom cover that fits perfectly.
This guide covers the two-piece envelope back technique, which uses overlapping panels to hide the opening and keep your pillow insert secure. You will work with a ½-inch seam allowance, double-fold hems, and basic sewing skills. By the end, you will have a durable cover that rivals anything from a home goods store, with endless possibilities for customizing colors, fabrics, and finishes.
Measure and Cut Your Fabric

Accurate measurements are the foundation of a well-fitting pillow cover. Taking time to measure your pillow form correctly prevents gaps, bunching, and frustration later.
Measure Your Pillow Form First
Grab a measuring tape and record the exact width and height of your pillow form. Common rectangular sizes include 24″×13.5″, 18″×14″, or 14″×20″. Write down these numbers before purchasing fabric.
Add ½ inch to both measurements for your seam allowance. For example:
- Pillow measures 24″×13.5″
- Cut front panel: 24.5″×14″
Skip adding seam allowance only if you prefer a looser drape or plan to use a no-sew method.
Cut the Front Panel to Size
Lay your fabric flat on a cutting mat. Use sharp scissors or a rotary cutter to cut one rectangle matching your adjusted dimensions. Ensure grain lines run parallel to the pillow edges for stability.
If your fabric has a pattern, center the design on the front panel before cutting.
Calculate Back Panel Dimensions
The back uses two overlapping panels for the envelope closure. Divide your pillow width by three to determine the sizes:
For a 24″ wide pillow:
- 24 ÷ 3 = 8″ (base unit)
- Smaller back panel: 8 + 2 = 10″ wide
- Larger back panel: (8 × 2) + 5 = 21″ wide
- Height matches pillow height: 13.5″
Cut two pieces: one 10″×13.5″ and one 21″×13.5″. This creates a 5″ overlap, enough to hide the opening completely.
Prepare the Envelope Back Panels
Hemmed edges give your pillow cover a clean, finished appearance and prevent fabric from fraying over time.
Fold and Press Double-Fold Hems
Take both back panel pieces. On one short end of each, fold ½ inch toward the wrong side of the fabric. Press firmly with a hot iron set to the cotton setting.
Fold another ½ inch to encase the raw edge completely. Press again to create a crisp, durable hem.
Pin or clip the folded edge in place if the fabric tends to shift.
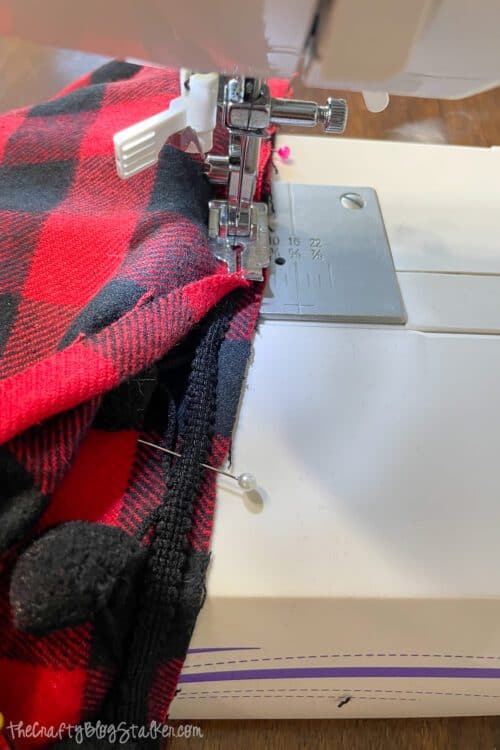
Sew the Hems Securely
Sew along the inner folded edge using a straight stitch. Use matching thread and a 2.5 mm stitch length. Backstitch at the start and end of each seam to lock it in place.
Repeat this process for both back panels. For heavier fabrics, use a slightly longer stitch length (3.0 mm) for more flexibility.
Layer and Pin All Panels Together
Proper alignment during assembly prevents shifting and ensures even seams throughout.
Position the Larger Back Panel First
Place the 21″ back piece on your work surface with the right side facing up. Smooth out any wrinkles or folds.
Add the Smaller Back Panel
Place the 10″ back piece right side up on top, overlapping the larger piece by 4 to 5 inches. Align the top edges and one side edge precisely.
The overlap should cover approximately two-thirds of the larger panel, creating the envelope flap that hides the opening.
Place the Front Panel on Top
Lay the front panel on top with the right side facing down (wrong side visible). All three pieces should now be stacked with all raw edges flush on all four sides.
Pin Around the Entire Perimeter
Insert pins or fabric clips every 3 to 4 inches around all edges. Pay extra attention to corners and the overlap area where layers meet.
Use fabric clips instead of pins for slippery fabrics like satin, silk, or linen blends.
Sew With Reinforced Seams
A strong, consistent seam ensures your cover withstands regular use and washing.
Set Your Seam Allowance
Configure your sewing machine to maintain a ½-inch margin from the edge. Use the machine guide or a seam gauge for accuracy.
Begin sewing at one corner and backstitch immediately to secure the starting point.
Stitch Around All Four Sides
Sew continuously around the entire perimeter without stopping. Backstitch again at each corner and when completing the final corner to lock the seam.
Reinforcing corners prevents stress tears, which are common wear points on pillow covers.
Add a Second Line of Stitching
Run a second line of stitching ¼ inch inside the first seam. This double-stitching technique significantly strengthens the perimeter and gives a professional finish.
This step is especially important for heavy pillow inserts or high-use cushions like those on a couch.
Finish Seams to Prevent Fraying
Raw seam allowances unravel over time. Choose one finishing method based on your fabric type.
Use Pinking Shears
Trim the outer seam allowance with pinking shears after sewing. The zigzag edge resists fraying effectively.
This method works best for cotton, canvas, and blends that do not fray easily. Avoid using pinking shears on loosely woven fabrics like rayon or silk.
Apply a Zigzag Stitch
Set your machine to zigzag stitch (width 3.0, length 2.0). Sew along the edge of the seam allowance, going slowly around corners.
Trim excess fabric close to the stitch after finishing. This method works well for knits, silks, and stretch fabrics.
Trim Corners Diagonally
Before turning the cover right side out, snip each corner at a 45-degree angle, stopping just shy of the seam. This reduces bulk and helps corners lie flat after turning.
Turn and Shape the Cover
Now you see the finished product take shape as you flip it right side out.
Turn Right Side Out
Reach through the envelope opening and pull the entire cover through. Start from the center and work outward. The hemmed edges stay in place naturally.
Push Out Corners Gently
Use a chopstick, knitting needle, or turning tool. Begin with the blunt end to push corners into shape, then switch to the pointed end for precision.
Work slowly and avoid piercing the fabric by pushing too forcefully.
Press Flat With an Iron
Lay the cover on your ironing board. Use steam if your fabric allows it. Press all sides flat, focusing on:
- Corners (flatten without crushing the fabric)
- Seam lines (smooth for even appearance)
- Hemmed edges (ensure no raw fabric is visible)
Iron on the reverse side if your fabric is prone to shine or scorching.
Customize Your Design and Fit
Add personal touches to make your pillow cover unique.
Use Contrasting Back Fabric
Cut the back panels from a different color or pattern than the front. This adds visual interest and helps you identify the back from the front.
Choose a coordinating solid color if your front fabric is busy or patterned.
Add Decorative Topstitching
Sew a straight line 1 to 3 inches from the edge on the front panel. This creates a framed look.
Use contrasting thread for a bold effect or matching thread for subtle definition.
Apply Bias Binding
Wrap the outer edge with contrasting bias tape for a modern finish. Miter the corners for a clean appearance.
Use a longer stitch length (3.0 mm) when sewing binding to achieve smoother curves.
Ensure a Snug Fit
A cover that fits slightly snugly prevents the pillow form from shifting or “floating” inside. If your insert moves around, reduce the seam allowance by ¼ inch on your next project.
Troubleshoot Common Issues
Address problems before they become permanent.
Fix Gaping at the Closure
If the back flaps do not overlap enough, increase the overlap by 1 to 2 inches when cutting your next cover. Alternatively, attach velcro strips to the inner edges for added security.
This issue commonly affects square pillows with limited fabric.
Reduce Bulky or Puffy Corners
Excess fabric or thick seams cause bulging. Trim corners more closely (without cutting through stitches) and consider pressing seams open before turning.
Prevent Misaligned Layers
If edges do not match after sewing, pin more frequently during assembly. Use clips instead of pins for slippery fabrics.
Also verify that all panels were cut to the correct dimensions before sewing.
Hide Visible Raw Edges
Incomplete hems or incorrect folding cause raw edges to show. Re-fold and restitch hems before final assembly, or use bias binding to cover mistakes.
Never skip pressing—ironing ensures clean, flat results.
Final Inspection Checklist
Before declaring your cover complete, verify each item:
- Pillow form fits snugly with no gaps or stretching
- Envelope overlap measures at least 4 inches
- All hems are sewn and invisible from the front
- Seams are reinforced with backstitching at corners
- Corners are sharp and flat
- Edges are finished (pinking shears or zigzag stitch)
- No loose threads or skipped stitches
- Cover looks polished on both sides
If all boxes are checked, insert your pillow form and enjoy your handmade creation.
Frequently Asked Questions About Making a Rectangular Pillow Cover
What is the best fabric for a beginner pillow cover project?
Cotton is ideal for beginners because it is easy to cut, sew, and press. Canvas offers durability for high-use items, while linen provides a rustic look but wrinkles easily. Avoid slippery fabrics like satin or silk until you have more experience.
How much extra fabric should I buy for a pillow cover?
Purchase at least ½ yard extra to account for pattern matching, mistakes, or fabric shrinkage. If using directional patterns, buy 1 yard extra to ensure the design flows correctly.
Can I make a pillow cover without a sewing machine?
Yes, you can use fabric glue or fusible bonding tape for a no-sew version. However, these methods are less durable and may not hold up to washing. A sewing machine produces the most professional, long-lasting results.
How do I calculate the size for a 14″×20″ pillow form?
Add ½ inch seam allowance: cut the front panel at 14.5″×20.5″. For the back, divide 14 by 3 (approximately 4.7″), then calculate smaller back at 6.7″ wide and larger back at 14.3″ wide, both at 20.5″ tall.
Why does my pillow form keep slipping out of the cover?
The overlap is likely too small. Increase your back panel overlap to at least 5 inches, or add velcro tabs to secure the inner edges. A slightly tighter fit also prevents movement.
Key Takeaways for Making Rectangular Pillow Covers
Precise measurements with proper seam allowance ensure a snug, professional fit. The ½-inch seam allowance is standard and reliable across all pillow sizes. Double-folded hems on back panels create a clean envelope closure that hides raw edges completely. Backstitching at corners significantly improves durability and prevents stress tears. Edge finishing with pinking shears or zigzag stitching extends the life of your cover by preventing fraying. Pressing after turning gives a polished, store-bought appearance that elevates any room.
Once you master this technique, you can create covers for any pillow size by adjusting your measurements. Pre-cut and label your fabric pieces before starting to speed up the process. Practice on a small pillow first if you are new to sewing, then scale up to larger cushions.


