
Nothing transforms a living room faster than fresh, custom sofa pillow covers. Whether you’re refreshing tired cushions or matching a new color scheme, making your own covers lets you control the fabric, fit, and finish without paying designer prices. The best part? You do not need advanced sewing skills. With basic tools and precise measurements, you can create professional-looking covers in under an hour.
This guide walks you through every step: choosing the right fabric, measuring your inserts, selecting closures, and building durable, washable covers that look store-bought or better. You will learn beginner-friendly envelope styles, zippered finishes for longevity, and pro tips to avoid common mistakes like puckered hems or tight fits.
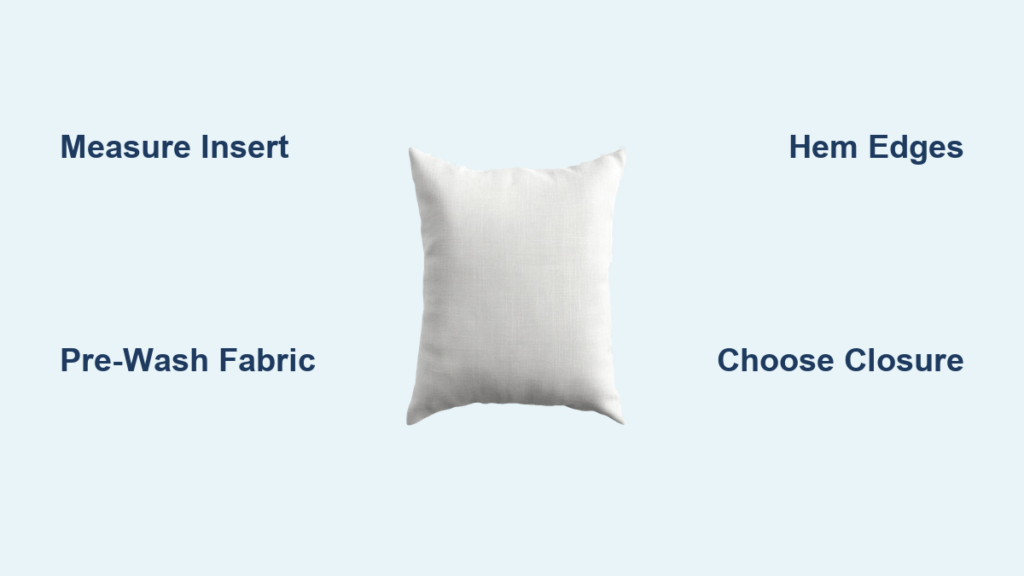
Choose the Right Fabric for Your Sofa Pillow Cover
Your sofa gets daily wear, so your pillow cover fabric must balance beauty and durability. The right choice depends on your lifestyle, aesthetic preferences, and how much maintenance you want to handle.
Match Fabric to Use Case
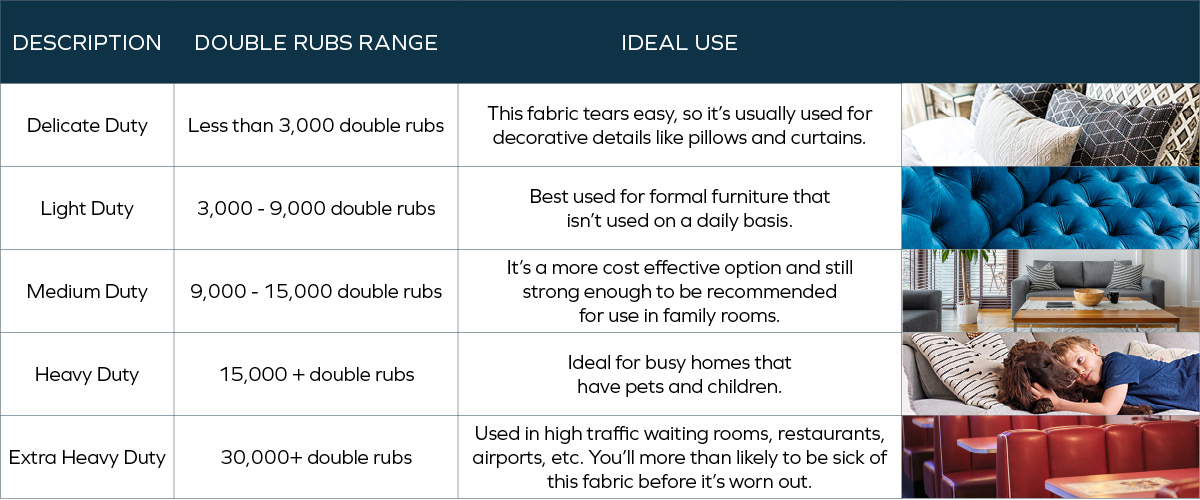
Cotton and linen work well for low-traffic living rooms, offering a soft, breathable feel with a clean, modern look. Denim and polyester blends stand up to pets and kids, resisting stains and fading. For a luxe touch, velvet adds richness but requires careful nap alignment. Faux leather or vinyl creates a sleek, modern finish and wipes clean, but needs venting grommets to prevent air pockets. Avoid silk unless the pillow is purely decorative.
Always pre-wash your fabric. This prevents shrinkage after sewing, which can cause puckering or a too-tight fit.
Pre-Wash and Press
Lay your fabric flat and wash it as you will wash the finished cover, usually cold, gentle cycle. Tumble dry or air dry, then iron smooth. This step ensures your final measurements stay accurate and gives you a truer sense of how the fabric drapes and feels.
Cut Along the Grain
Misaligned grain causes twisted covers. To find the grain, tear the fabric (cotton tears cleanly) or align the selvage edge with your cutting mat grid. Cut your pieces parallel to this line for straight, stable results.
Measure Your Pillow Insert Correctly

Accurate measurements are the foundation of a well-fitting cover. Never guess at dimensions; always measure your actual insert for precise results.
Use Actual Insert Dimensions
Remove your pillow form and measure it with a tape measure. Standard sizes include 16-inch, 18-inch, 20-inch, and 22-inch squares, with Euro sizes at 26 inches. Rectangular inserts come in 12-inch by 18-inch or 16-inch by 26-inch. Write down the exact width and height.
Size Cover Slightly Smaller
For a plump, snug fit, your cover should be equal to or up to 1 inch smaller than the insert. Foam and fiberfill inserts need a tighter cover. Down-filled forms require slightly looser covers to allow fluffing.
Example: For an 18-inch by 18-inch insert, cut the cover at 17.5-inch by 17.5-inch if using a zippered style.
Select the Best Closure Type
The closure you choose affects both the look and functionality of your cover. Consider how often you will remove it for washing.
Envelope Closures for Beginners
Envelope backs are ideal for quick swaps and no-zipper sewing. Two styles exist: one-piece and two-piece.
One-piece envelope uses a single rectangle that folds over itself. It is easy, fast, and great for interchangeable covers. Two-piece envelope uses two overlapping panels with clean hems. It offers a more tailored back and better durability. Both are fully removable and machine washable, perfect for homes with kids or pets.
Zipper Closures for Professional Finish
A centered or invisible zipper provides a seamless, permanent look. It is best for high-use sofas. This method requires a zipper foot and basting tape but yields the most polished result. Use a number 5 coil zipper cut to match your pillow width.
If using vinyl or faux leather, add grommets near the zipper to release trapped air.
VELCRO or Hand-Stitched Options
VELCRO sew-on tape is super easy to open and close. It is ideal for kids rooms or frequent cleaning. Ladder stitch creates a completely hidden closure, best for decorative pillows where removal is rare.
Cut Fabric to the Correct Size
Using the right formulas ensures your cover fits perfectly. Different closure types require different cutting calculations.
One-Piece Envelope Formula
Use this reliable formula for envelope-style covers.
Width equals insert width. Length equals (2 times insert height) plus 8 inches for overlap plus 2 inches for double hem, which equals (2 times H) plus 10 inches.
Example: 18-inch pillow results in 18-inch by 46-inch cut (2 times 18 equals 36, plus 10 equals 46).
Some sources use 5-inch overlap. Adjust based on your fabric stretch. Use 8 inches for full coverage.
Two-Piece Envelope Panels
Front panel cuts to exact insert size, for example 26-inch by 26-inch. Back panels use one piece at width times two-thirds of height and another at width times one-half of height. This creates a 4-inch overlap for easy access.
Example: 26-inch pillow results in back panels of 26-inch by 17-inch and 26-inch by 13-inch.
Zippered Cover Dimensions
Cut both fabric pieces to insert size minus one-half inch per side. Example: 20-inch insert requires cutting 19.5-inch by 19.5-inch pieces. Use a magnetic seam guide to maintain consistent one-half inch allowances.
Sew an Envelope Cover Step by Step
The one-piece envelope method is perfect for beginners and takes only 15 to 30 minutes to complete.
Hem the Short Edges
Fold each short end (width side) one-half inch toward the wrong side. Press with an iron. Fold again one-half inch to hide the raw edge. Pin or clip in place. Topstitch one-half inch from the edge using a straight stitch. Backstitch at start and end.
The hem should look clean and even with no bulk.
Fold and Pin for Overlap
Lay the piece right side up. Fold one end toward the center, about halfway. Then fold the opposite end over it like an envelope. The total folded width should match your insert (for example, 18 inches). Pin the side edges to secure.
Sew the Long Edges
With right sides together, stitch both long sides using a one-half inch seam allowance. Backstitch at both ends. Use a strong thread and consistent speed.
Finish and Insert the Pillow
Trim corners diagonally to reduce bulk. Optionally, zigzag stitch or serge raw edges to prevent fraying. Turn right side out through the back opening. Use a point turner or chopstick to push out corners. Press flat. Insert the pillow form. Use a karate chop motion to settle the fabric if it is tight.
Build a Two-Piece Envelope Cover
This method creates a cleaner, more tailored look with hemmed back panels.
Cut and Hem Back Panels
Cut two back pieces using the two-thirds and one-half height rule. On each, fold one long edge 1 inch inward. Press, fold again 1 inch, and hem with a straight stitch. This creates a clean, finished edge.
Assemble the Panels
Place the front panel right side up. Lay the larger back panel on top, right side down, covering the top half. Place the smaller back panel over the bottom half, overlapping in the center. Align all edges. Pin around the perimeter.
Sew the Perimeter Seam
Stitch all four sides with a 1-inch seam allowance. Backstitch. Trim corner excess (not the stitches) to reduce bulk.
Turn and Press
Turn right side out through the overlapping back opening. Use a point turner for crisp corners. Press flat. Insert pillow.
Install a Zipper for Professional Results
A zipper closure provides the most polished, permanent finish. This method takes 30 to 60 minutes.
Prepare Fabric and Zipper
Cut two fabric pieces one-half inch smaller than the insert. Place right sides together. Mark a line 1.25 inches from one edge. This is your zipper placement.
Baste the Zipper in Place
Apply one-quarter inch basting tape to the wrong side of the fabric, aligned with your mark. Peel and stick a number 5 coil zipper (teeth facing out) to the tape. Use double-sided tape on the zipper flanges to hold it securely. Baste one side first, leaving 1 to 2 inches extra at both ends.
Flip the fabric, reposition the zipper, and baste the opposite side. Keep folds aligned.
Sew with Zipper Foot
Switch to a zipper foot. Sew as close to the teeth as possible. Use a 4mm stitch length and shift the needle right if needed. Maintain a one-half inch seam allowance along the sides.
Close and Trim
Zip the closure fully. Reposition the slider to the center. Peel adhesive from the inside corners. Splay the fabric outward and sew the remaining one-half inch seam. Trim excess zipper ends.
Add two one-quarter inch grommets near the zipper on the back for vinyl covers. This lets air escape and cushions rebound.
Use VELCRO for Easy Access
This method takes as little as 10 minutes and is great for beginners.
Cut and Hem Ends
Cut fabric with width equal to insert plus 1 inch. Length equals (2 times height) plus 3 inches. Fold short ends 1 inch inward and press.
Attach VELCRO Strips
Cut two VELCRO strips to match insert width. Pin the hook side (rough) to the wrong side of one end. Pin the loop side (soft) to the right side of the other end.
Sew and Close
Stitch around all edges of both strips to secure. Fold fabric right sides together, VELCRO facing inward. Position strips a few inches below the top edge. Clip and sew long sides with one-half inch allowance.
Turn right side out through the VELCRO opening. Push out corners with a pencil. Insert pillow and seal.
Finish with Invisible Hand Stitch
This technique creates a seamless, boutique-quality closure.
Sew Perimeter, Leave Opening
Cut two pieces to insert size plus 1 inch (for one-half inch seams). Place right sides together. Sew around all edges with one-half inch allowance, leaving a 2-inch gap. Backstitch at start and end.
Trim and Turn
Diagonally clip all four corners. Turn right side out. Use a chopstick to push out corners. Press flat. Fold in one-half inch at the opening.
Close with Ladder Stitch
Thread a needle, double the thread, and knot the end. Insert the needle into the fold of one side. Then into the opposite fold. Alternate sides, pulling taut each time. The seam pulls closed invisibly. Knot and hide the thread inside.
Customize Your Sofa Pillow Cover Design
Once you master the basics, customization options open up endless design possibilities.
Mix Fabrics and Textures
Pair a velvet front with a cotton back for luxury and breathability. Or use denim front with a patterned back for reversible style. Mixing textures adds visual interest and practical benefits.
Add Embellishments
Piping or cording inserted between layers creates a tailored edge. Tassels or fringe attached to corners add boho flair. Contrast stitching using gold or white thread on dark fabric makes a statement. Ribbon trim sewn along edges or crisscrossed across the front creates unique dimension.
Try Patchwork or Monograms
Combine fabric scraps for a unique, eco-friendly look. Use fabric paint or iron-on letters to add names or seasonal motifs. Patchwork works especially well for seasonal rotations.
Maintain and Wash Your Covers
Proper care extends the life of your custom covers.
Remove Insert Before Washing
Always take out the pillow form before cleaning. Machine wash cold on gentle cycle. Use mild detergent. Tumble dry low or air dry to prevent shrinkage.
Clean Faux Leather Differently
Wipe vinyl and faux leather with a damp cloth. Never submerge these materials. Spot clean stains immediately to prevent setting.
Prevent Fraying
Use zigzag stitches or serged edges on cotton and linen. French seams work well for sheer or lightweight fabrics. This prevents unraveling during washing.
Avoid Common Mistakes
Learning what goes wrong helps you prevent these issues in your own projects.
Cover Too Tight or Too Loose
Incorrect sizing causes fit problems. Follow the formula precisely. The cover should be snug but not strained. For tight fits, stretch fabric during insertion.
Puckered Hems
Inconsistent pressing leads to puckering. Iron every fold thoroughly. Press, do not just iron.
Twisted Fabric
Grain misalignment causes twisting. Cut along the selvage or torn edge to ensure straight grain.
Zipper Will Not Lie Flat
Poor basting causes zipper problems. Use basting tape and a zipper foot. Sew slowly for accuracy.
Shrinkage After Wash
Unwashed fabric shrinks after first cleaning. Always pre-wash before cutting.
Final Tips for Successful Pillow Cover Projects
Success comes from attention to detail throughout the process.
Label pieces during cutting to avoid mix-ups. Test fit the insert before final stitching. Keep seam allowances consistent; one-half inch is standard. Press after every step. It is the secret to a professional finish. Use directional fabrics wisely. Velvet and prints must face the same way. Document your design with notes for future matching sets.
Making a sofa pillow cover is a low-cost, high-impact project. With the right prep and technique, you can create durable, stylish covers that elevate your space. Whether you choose an envelope, zipper, or VELCRO closure, the key is precision: measure twice, cut once, and press often.
Frequently Asked Questions About Making Sofa Pillow Covers
What is the easiest closure method for beginners?
The one-piece envelope closure is the easiest method for beginners. It requires no zippers or special feet. Simply hem the short edges, fold like an envelope, and sew the sides. Most beginners complete this in 15 to 30 minutes.
How much smaller should a pillow cover be than the insert?
A pillow cover should be equal to or up to 1 inch smaller than the insert for a plump, professional look. Foam and fiberfill inserts need tighter covers. Down-filled inserts can be slightly looser to allow fluffing.
Can I use any fabric for sofa pillow covers?
Not all fabrics work well. Cotton and linen are ideal for decorative use. Denim and polyester blends handle high traffic. Avoid silk for daily-use pillows. Always pre-wash fabric to prevent shrinkage after sewing.
How do I prevent my zipper from puckering?
Use basting tape to secure the zipper before sewing. Switch to a zipper foot for smooth stitching. Sew slowly and keep the fabric flat. Use a magnetic seam guide to maintain consistent seam allowance.
How often should I wash my sofa pillow covers?
Wash covers based on use and household needs. Remove inserts before washing. Machine wash cold on gentle cycle. Air dry or tumble dry low to prevent shrinkage.
Key Takeaways for Making Sofa Pillow Covers
Making custom sofa pillow covers transforms your living space without breaking the budget. Choose fabric based on your lifestyle. Cotton and linen suit low-traffic areas. Denim and polyester handle pets and kids. Always pre-wash fabric to prevent post-sewing shrinkage.
Measure your pillow inserts accurately. Cut covers equal to or 1 inch smaller than the insert for a snug fit. Use the correct formulas for your chosen closure type. Envelope backs work best for beginners. Zippered closures offer professional results.
Press thoroughly at every step. Consistent seam allowances and proper grain alignment prevent twisting and puckering. Test fit before final stitching. With practice, you can complete a cover in under an hour.
Now go refresh that couch, one pillow at a time.


