
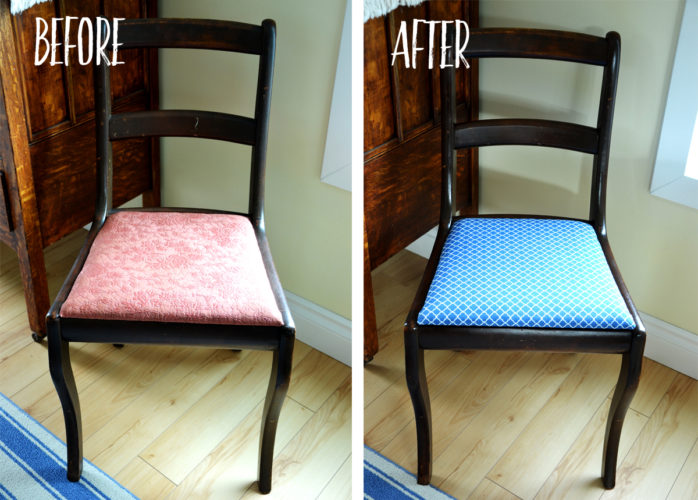
Nothing ruins a beautiful dining chair or window bench like a hard, uncomfortable seat. But instead of settling for stiff seating or overpaying for store-bought cushions, you can make a custom pillow seat that fits perfectly, feels luxurious, and matches your decor exactly. Whether you’re a beginner with a hot glue gun or an experienced sewer aiming for hotel-quality finishes, making a pillow seat is a simple, cost-effective DIY project that transforms your space. With just a few materials foam, fabric, and basic tools you can create durable, washable, and overstuffed cushions that last for years. This guide walks you through every method from no-sew wraps to professional three-piece covers with crowned edges and down-wrapped comfort.
Choose the Right Foam for Your Pillow Seat

The foundation of any pillow seat is the foam. Using high-density polyurethane foam ensures your cushion maintains its shape for years, while low-density craft foam compresses quickly and flattens within months. Thickness options vary based on your seating type and comfort needs.
Pick Foam Thickness Based on Use
The thickness you choose directly impacts comfort and seat height. Consider these options:
- 1″ foam: Best for occasional-use dining chairs where minimal padding is needed
- 2″ foam: Ideal for everyday dining or accent chairs, offering comfortable support without altering seat height significantly
- 4″ foam: Perfect for benches, window seats, or reading nooks requiring deep, plush support
Cut Foam to Exact Seat Dimensions
Accurate cutting ensures a snug fit. Trace your chair seat onto the foam using a cardboard template, adding no extra inches since foam should match actual seat dimensions exactly. Use a serrated knife or electric carving knife for clean, smooth cuts, sawing gently in one direction to prevent tearing. If your seat is larger than standard foam rolls typically 24″ wide, glue two pieces together with spray adhesive, clamp them, and let dry completely before wrapping.
Select Durable, Washable Fabric
Fabric choice determines both appearance and longevity. Upholstery-grade materials resist pilling, fading, and wear from daily use, while thin quilting cotton tears easily under pressure.
Use Upholstery-Grade Material
Choose heavy-duty cotton blends, linen, canvas, or performance fabrics designed for furniture. For dining chairs, prioritize stain-resistant or washable fabrics labeled “easy clean” or “performance weave.” Avoid quilting cotton entirely for seat cushions.
Calculate Yardage and Plan Pattern Matching
A typical dining chair cushion requires ½ to ¾ yard of fabric. For multiple seats or large benches, buy 3.5 yards to allow for pattern repeats and mistakes. If using a print or stripe, lay the fabric flat and mark orientation with chalk before cutting. Cut all pieces in the same direction to keep patterns aligned. Add a 1″ seam allowance to all sides when cutting fabric for sewn covers.
Build a Cushion Insert with Overstuffed Comfort
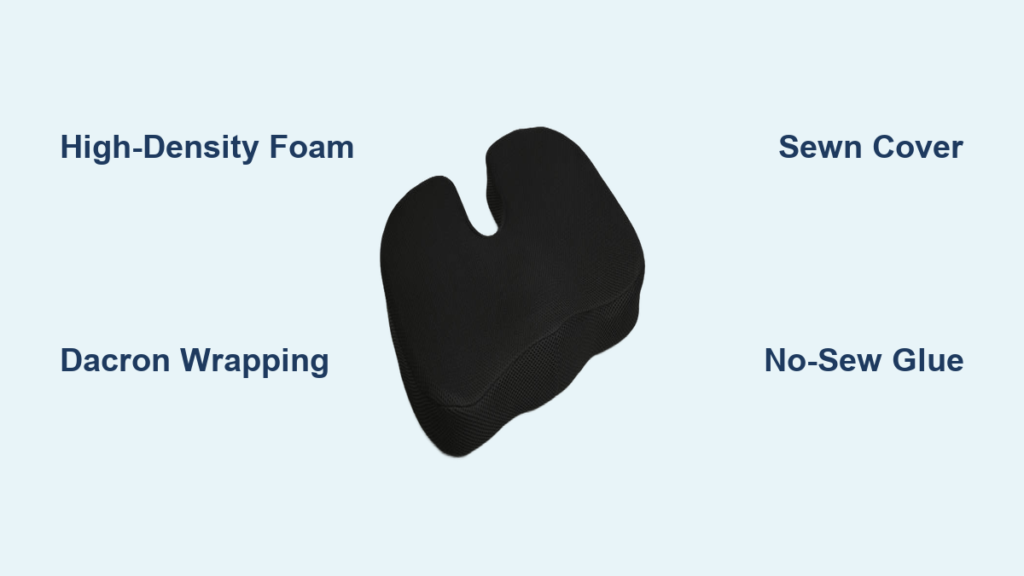
The difference between a flat pad and a luxurious cushion lies in the wrapping layers. Dacron and batting transform basic foam into a professional-looking seat with crowned edges.
Wrap Foam in Dacron for Crowned Edges
Dacron polyester fiber wrap gives your cushion smooth, rounded corners just like professional upholstery. Unroll a single layer and wrap the entire foam block, pulling tightly to create tension. Staple the Dacron edges together underneath the cushion using a desktop stapler, then trim excess. This creates a “crown” a slight dome at the edges that prevents sharp lines and adds luxury. Even if using a no-sew cover, Dacron wrapping improves the final look significantly.
Add Polyester Batting for Extra Volume
For an overstuffed feel, wrap the Dacron-covered foam in 2 to 4 layers of polyester quilt batting. Wrap once around the long sides, staple, then wrap again. Repeat for a total of four layers. Smooth each layer by hand to avoid lumps, especially at corners, and staple the end securely. This stuffing method keeps the cushion firm yet plush and prevents flattening over time.
Make a Sewn Cushion Cover
A removable, washable cover extends the life of your cushion and makes cleaning simple. The three-piece gusseted construction works best for cushions over 2″ thick.
Cut Three-Piece Cover for Thick Pads
For thick cushions, use a gusseted cover consisting of top and bottom panels plus a side strip. Cut top and bottom panels to match foam size plus seam allowance. The side panel should have a height equal to cushion thickness plus ½”, with a length equal to the perimeter of the seat. Lay fabric right side down, pin the side panel to the top piece with right sides together, and sew with a ½” seam. Repeat for the bottom, leaving one back seam open for zipper installation.
Install an Invisible Zipper
An invisible zipper allows easy removal for washing. Use a zipper foot on your sewing machine for precision. First, baste the back edges of the top and bottom fabric together. Place the closed zipper face-down on the seam and sew one side of the zipper tape to the top fabric. Flip, align the other side, and sew to the bottom fabric. Remove basting stitches and test the zipper. Watch a 5-minute zipper tutorial before starting this step intimidates beginners but is easy with practice. If zippers feel too advanced, leave a 12″ opening in the back seam, insert the cushion, then hand-stitch closed for a permanent cover.
Try the No-Sew Hot Glue Method
No sewing machine? No problem. The hot glue method delivers clean, professional-looking results for beginners.
Wrap Cushion with Fabric and Hot Glue
Cut fabric 4 to 6″ larger than the cushion on all sides. Lay fabric face-up, place cushion in the center, and pull one short edge tightly over the top, gluing the seam to the batting underneath. Move to a long side, pull tight, and glue in sections. Fold the final flaps, gluing the top layer over the bottom for a clean finish. Tuck and glue raw edges for a polished look. Use a high-temp glue gun and work in small sections, letting each glue spot set before moving on. This method is ideal for benches against walls where only three sides are visible.
Add Ties or Fasteners for Security
Prevent your cushion from sliding off chairs with proper fastening methods.
Sew Fabric Ties to Keep Cushion in Place
Cut four 1″ × 36″ fabric strips, fold each long edge toward the center, press with an iron, then fold in half lengthwise. Sew down the center to create a ¼” wide tie. Attach ties to the upper back corners of the cushion cover before final assembly. These ties wrap around the chair back and knot for a cottage-style look. For dining chairs, 36″ length ensures easy tying even on tall backs.
Use Alternatives: Velcro or Leather Straps
If ties do not suit your style, consider Velcro straps sewn narrow underneath the cushion or leather straps attached with rivets for a modern, durable option. Avoid slippery fabrics without backing. Add white flannel lining to the bottom to prevent sliding on smooth chairs.
Upgrade to Down-Wrapped Comfort
For hotel-like softness, wrap your foam in down or feather fill before adding the outer cover.
Create a Soft Outer Layer Around Foam
Cut an old duvet or pillow into a large envelope shape and sew three sides shut with right sides together, then turn right side out. Insert the foam and hand-stitch the final side closed. The down compresses slightly under weight, giving a plush, responsive feel. Repurpose old bedding instead of buying new down to save money and reduce waste.
Insert Into Removable Outer Cover
Place the down-wrapped foam into a zippered three-piece cover for washability. Use coordinating fabric so the outer cover complements the softness within. This method is ideal for window seats or reading benches where comfort is the priority.
Prevent Common Mistakes
Avoid these frequent issues to ensure your pillow seat turns out right the first time.
Avoid Lumps and Uneven Edges
Lumps happen when Dacron or batting is not pulled tight. Smooth each layer as you wrap, working from the center outward, especially on corners. Trim excess material before gluing or sewing.
Fix a Cover That Is Too Tight
If the fabric resists insertion, you likely did not allow enough seam allowance. Next time, add ½” extra to all sides. To fix now, unzip partially, stretch the fabric gently, and insert foam slowly.
Stop Cushions from Slipping
Use non-slip solutions like white flannel lining, anti-slip mesh from craft stores, or textured or rubber-backed fabrics. Never skip lining on smooth chairs sliding cushions create a tripping hazard.
Optimize for Long-Term Use
Proper maintenance keeps your pillow seat looking new for years.
Extend Cushion Lifespan
Rotate cushions monthly if used daily, spot clean spills immediately, machine wash zippered covers on gentle cycle and air dry, and fluff overstuffed cushions every few weeks. Replace foam every 3 to 5 years depending on use.
Design for Easy Maintenance
Always build with removable, washable covers if possible. Even in no-sew versions, consider wrapping the insert separately so you can swap covers seasonally. Label cushions with fabric tags if making multiple helps with rotation and cleaning.
Test Fit Before Final Assembly
Never skip the test fit step it saves materials and prevents wasted work.
Check Height and Stability
Thick padding raises seat height. For dining chairs, ensure users can rest feet flat on the floor. Test with a temporary foam mock-up before cutting final materials. For tall users, 4″ foam works well. For children or shorter adults, stick to 1″ or 2″.
Verify Tie Function and Fit
Place the cushion on the chair and wrap ties. Are they long enough to knot securely? If ties are too short, make future ones at least 24″ long, with 36″ being better for deep chairs. Ensure the cushion sits flush with no overhang or wobbling.
Compare DIY vs Store-Bought Cushions
DIY pillow seats outperform commercial options in several key areas. The cost ranges from $20 to $50 per cushion compared to $75 to $150 or more for store-bought. DIY allows perfect custom fit, unlimited fabric choices, and standard zippered covers for washability. Comfort is adjustable through thickness and stuffing options, while durability is high with proper materials. Store-bought cushions often use low-density foam that flattens quickly and typically cannot be washed.
Key Takeaways for Making Your Own Pillow Seat
Making a pillow seat is a rewarding project that saves money while delivering better results than store-bought options. Start with high-density foam in the appropriate thickness for your use case, wrap it in Dacron and multiple batting layers for that professional overstuffed look, and choose upholstery-grade fabric that matches your decor. Whether you use the beginner-friendly hot glue method or tackle invisible zippers for removable covers, the techniques in this guide produce cushions that last years. Remember to test fit before final assembly, add non-slip lining to prevent sliding, and build removable covers for easy washing. With quality materials and careful construction, your handmade pillow seats will provide comfort and style that commercial products simply cannot match.
Frequently Asked Questions About Making Pillow Seats
What is the best foam thickness for dining chair cushions?
For everyday dining chairs, 2″ high-density foam provides the best balance of comfort and practicality. Use 1″ for occasional use or 4″ for benches and window seats where deeper cushioning is desired.
Can I make a pillow seat without sewing?
Yes. The hot glue method works well for beginners. Cut fabric larger than the cushion, place the cushion in the center, pull fabric tight over each side, and secure with high-temp hot glue. This works especially well for benches against walls where only three sides show.
How do I keep my cushion from sliding off the chair?
Add white flannel lining to the bottom of the cushion, use anti-slip mesh, or choose textured fabrics with natural grip. Fabric ties attached to the chair back also help secure the cushion in place.
How long do DIY pillow seats last?
With quality materials high-density foam, Dacron wrapping, and multiple batting layers pillow seats last 3 to 5 years with daily use. Removable covers extend lifespan by allowing washing and foam replacement.
Is it cheaper to make your own cushion or buy one?
DIY costs $20 to $50 per cushion compared to $75 to $150 or more for store-bought. You also get custom fit, better materials, and washable covers that commercial options rarely provide.


