
Have you ever wanted to create a soft, stylish, and completely handmade pillow without needing knitting needles or advanced skills? With just a few yards of bulky yarn and your hands, you can craft a cozy, washable pillow in under an hour. Making a pillow out of yarn is a beginner-friendly DIY project that results in a plush, textured accent perfect for your couch, bed, or as a thoughtful handmade gift.
You will learn how to finger knit a square cover, create a round pouf-style pillow, or use loop yarn for a no-stress build. All methods require no needles, minimal tools, and are ideal for crafters of all ages and skill levels. Let’s get started.
Choose the Right Yarn for Your Pillow
Selecting the correct yarn is the foundation of a successful pillow project. The right choice affects texture, durability, and how quickly your project comes together.
Pick a Jumbo or Loop Yarn
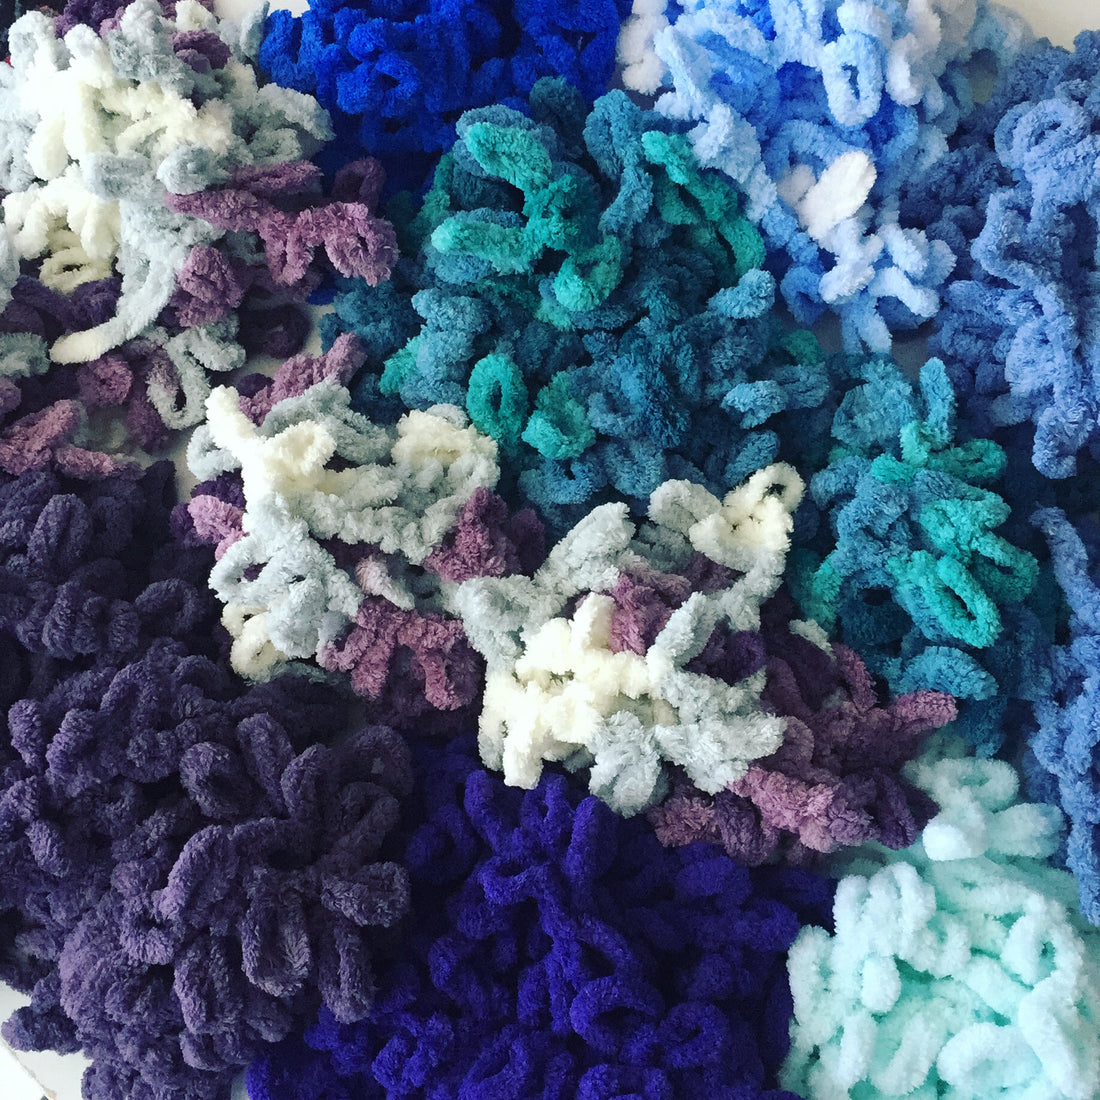
The key to a quick, soft pillow is using bulky or jumbo-weight yarn (size 6-7). These thick fibers knit up fast and create a plush, squishy texture. Three types dominate this craft.
Jumbo polyester yarn like Bernat Blanket Big offers ultra-soft texture and excellent washability. Loop yarn such as Bernat Alize Blanket EZ or Lion Brand Off the Hook features pre-formed loops that thread together easily. Chunky chenille yarn provides a 2-inch diameter with an ultra-soft, velvety finish. All are 100% polyester, making them durable, colorfast, and machine washable.
Compare Top Yarn Brands
Different brands offer varying skein sizes and characteristics. Bernat Blanket Big works well for square or round pillows with approximately 233 yards per 500g skein. One skein typically creates one 16×16 inch pillow. Bernat Alize Blanket EZ provides extra large skeins with more yardage, ideal for 20-inch throw pillows. Lion Brand Off the Hook offers budget-friendly options but may require 3+ skeins for larger projects.
Bernat Blanket Big remains the top choice for beginners due to its softness, ease of use, and wide availability at craft stores.
Estimate Yarn Quantity
Planning your yarn needs prevents mid-project store runs. A 16×16 inch square pillow requires one skein of Bernat Blanket Big. A 10-inch round pillow needs one skein. A 20-inch throw pillow using loop yarn requires 3 skeins of Bernat Alize. Large or oversized pillows benefit from using 2 skeins joined mid-project with a secure square knot. Always leave 18-inch tails when starting or switching skeins.
Gather Essential Tools
You need minimal supplies for this project, making it perfect for beginners or crafters with limited workspace.
Basic Supplies You Will Need
Gather these essentials before starting. You will need one or more skeins of jumbo or loop yarn, polyester fiberfill for stuffing, sharp scissors, and a yarn needle for weaving in ends. A contrasting scrap yarn serves as a stitch marker, and a flat surface like a picture book provides stability while knitting.
Avoid overstuffing your pillow. Too much fiberfill stretches stitches, creates gaps, and may expose the filling during use.
Optional Add-Ons
Enhance your finished pillow with decorative elements. Consider adding buttons for closures, pom-poms or tassels for flair, or a fabric-covered stuffing ball for a neater interior that makes cleaning easier.
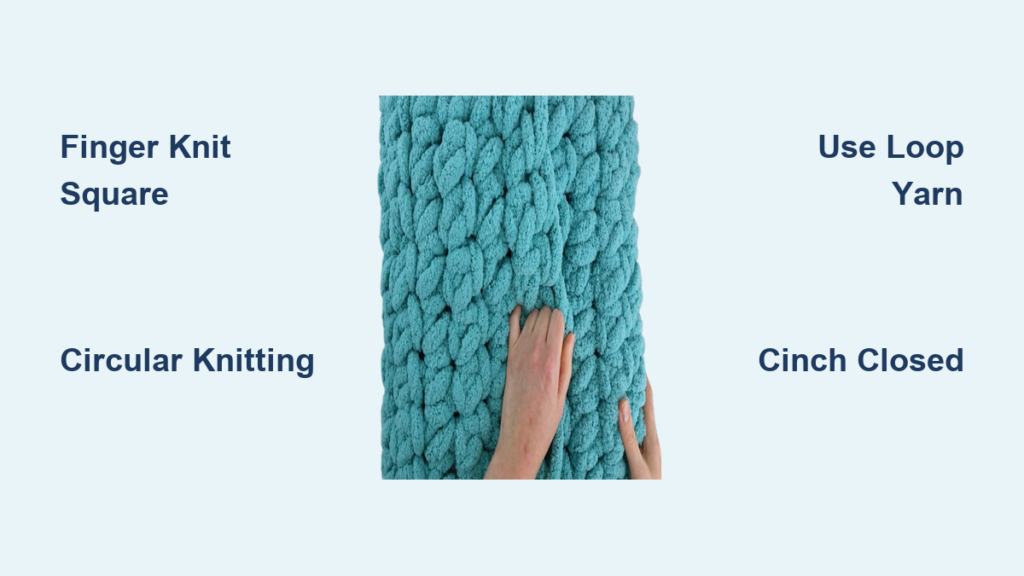
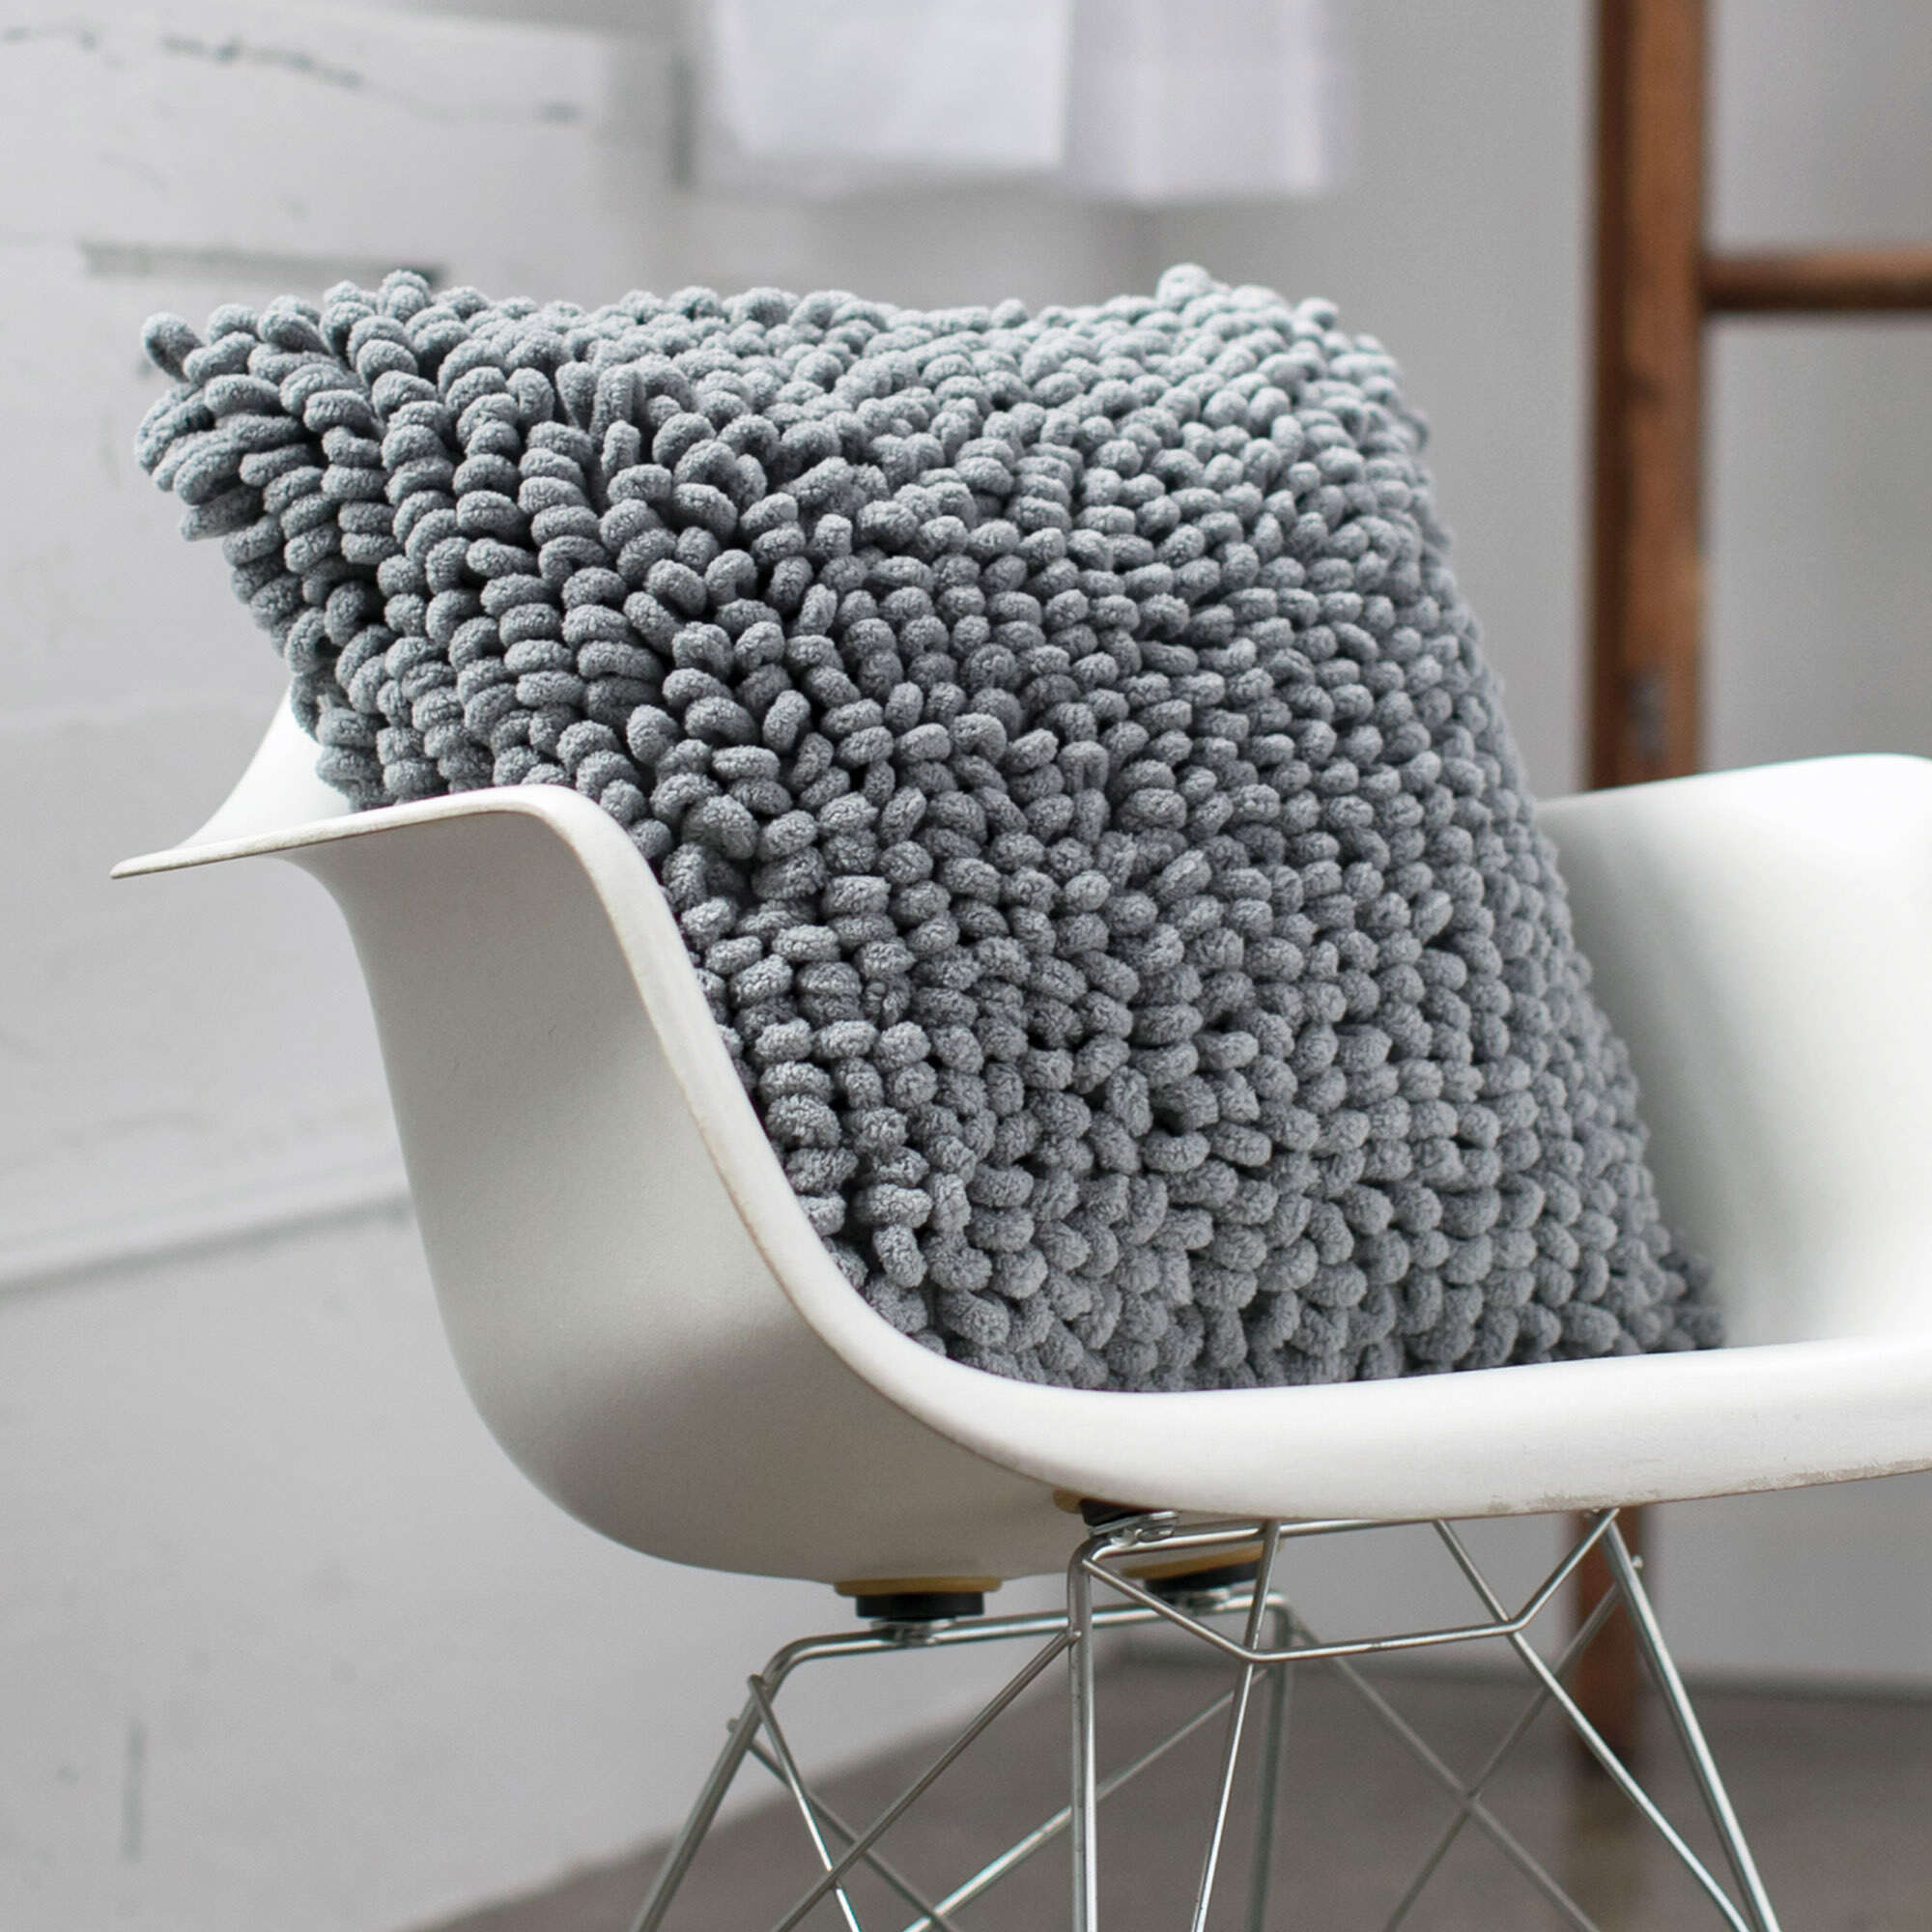
Make a Square Pillow with Flat Finger Knitting
The square pillow method creates a classic, versatile design that fits standard pillow inserts perfectly.
Start with a Slip Knot
Begin by creating a foundation for your knitting. Make a slip knot and place it on your index finger. Pull the tail through to tighten this becomes your foundation chain. Create 9 initial loops, adjusting if you want a wider base. Keep loops 1.5-2 inches tall for even tension throughout your project.
Tip: Make early loops slightly looser because beginners often tighten them too much as they learn.
Finger Knit 28-30 Rows
Now build the body of your pillow. Insert your finger into the first loop from the previous row and pull a new loop of yarn through. Repeat across the entire row. At the end, switch the yarn to your opposite hand to start the next row.
Continue until you have knitted 28-30 rows, or until the piece wraps snugly around a 16×16 inch pillow insert. Lay the panel flat periodically to check that edges remain straight and loops stay uniform.
Seam the Edges Closed
The criss-cross seaming method creates a strong, invisible closure. Cut a yarn length approximately twice the side length and thread the tail onto a yarn needle. Insert the needle into a loop on one edge, then the corresponding loop on the opposite edge. Pull and repeat, weaving in a zig-zag pattern. Gently tighten as you go without pulling too hard.
Avoid over-tightening seams because they will pucker and restrict fabric movement during washing.
Insert Pillow and Finish
Slide in a 16×16 inch insert or stuff with fiberfill to your desired firmness. Weave in all loose ends inside the pillow, hiding them within the stitching. Optional: Sew buttons on one edge for a decorative closure that allows insert removal.
Machine wash in cold water using a gentle cycle. Tumble dry on low heat with no shrinkage or fading reported.
Craft a Round Pillow with Circular Finger Knitting
Round pillows offer a modern, boho aesthetic that stands out as a floor pouf or accent cushion.
Form a Foundation Circle
Start by making a slip knot and leaving an 18-inch tail (this tail will later close one end). Chain 16 loops, each about 2 inches long. Arrange the chain into a circle ensuring it is not twisted. Overlap the last loop over the first to close the ring. Insert fingers through both loops of the overlap and pull a new loop through this becomes Row 1, Stitch 1. Insert a contrasting scrap yarn into this loop as a stitch marker.
Common mistake: Twisting the chain creates a Möbius effect. Lay it flat and check alignment before proceeding.
Knit Rows 1-3 (Build the Base)
Remove the stitch marker and pull a new loop through each chain around the circle. Replace the marker in the new first loop. You will have 15 stitches after joining due to the overlap. Keep loop height consistent to avoid gaps in your finished piece.
Knit Rows 4-12 (Increase Height)
Fold the piece in half with the marked stitch at the far right. Work across the front half, then flip and continue on the back half. Repeat this back-and-forth pattern for 12 total rows. Slight looseness is better than tight loops because tight knitting makes closing difficult later.
Close the First End (Cinching)
Cut the yarn, leaving a long tail of 12-18 inches. Thread it through the last live stitch using a yarn needle. Pull the tail through each loop around the open edge, then pass through the first loop again to secure. Gently pull the tail to cinch the hole closed without snapping the yarn. Feed the tail down into the center, flip the pillow, and tie a knot around an inner loop. Leave the end inside to prevent unraveling.
Warning: Do not pull too hard because polyester yarn can snap under excessive force.
Stuff with Fiberfill
Fill with polyester fiberfill but do not overstuff. The pillow should feel soft and slightly squishy because overfilling strains stitches and distorts the shape. Optional: Insert a fabric-covered stuffing ball. Cut a 20-inch fabric circle, sew a running stitch around the edge, pull the thread to gather into a ball after stuffing, then insert into the knitted cover for a cleaner interior.
Close the Second End
Retrieve the 18-inch tail from the foundation chain. Use it to whip-stitch around the remaining open edge. After every 3-4 stitches, gently pull to cinch gradually. At the end, pull tightly to fully close. Thread the tail into the center, push out through a side hole using a crochet hook or blunt needle, and tie a knot inside. Tuck all ends into the core.
Use Loop Yarn for Zero-Stress Knitting
Loop yarn offers the easiest entry point for anyone new to yarn crafts.
Start Knitting in Minutes
Loop yarn like Bernat Alize Blanket EZ is perfect for kids, seniors, or anyone with limited dexterity. It is made of pre-formed loops that you simply thread one through the next using your fingers. Cut open the last loop to create a tail. Place a loop over your index finger and pull the next loop through the first. Repeat until the piece reaches your desired width.
Free patterns for 20-inch loop yarn pillows are available at Yarnspirations.com.
Manage Multiple Skeins
When you run out of yarn, cut the end loop of both old and new skeins. Tie the tails together securely with a square knot and continue knitting. Weave in ends after completion. Note that Bernat Alize has more yardage while Lion Brand may require 3+ skeins for the same size pillow.
Finish and Close
Once both front and back panels are done (if making a two-sided pillow), place them together. Use the tail yarn to whip-stitch the edges closed. Stuff with poly-fill before closing the last few inches. Weave in all ends. The backside has tighter seams, so place it face-down for a cleaner look.
Customize Your Pillow
Make your pillow unique by choosing different shapes, closures, and sizes.
Choose Your Shape
Square or rectangular pillows work best for standard inserts and use the criss-cross seaming method. Round or circular pillows provide a modern, boho look and close with drawstring-style cinching. Cylindrical pouf or bolster pillows offer great lumbar support and knit continuously in the round.
Pick a Closure Style
The criss-cross seam provides strength and invisibility, ideal for square pillows. Cinched ends create a fast, no-sew look perfect for round designs. Whip-stitch offers simple hand-sewn closure for loop yarn projects. Button closures add decoration while allowing insert removal for washing.
Scale the Size
Reduce chains and rows proportionally for small 6-8 inch pillows. Start with 20+ chains and knit 40+ rows for large floor poufs. Use two skeins joined mid-row for oversized ottoman covers.
Pro Tips for Success
Master these techniques for professional-looking results every time.
Join yarn mid-project using a square knot for polyester yarn. Weave ends into adjacent loops on both sides and hide joins at seams or edges. Maintain even tension by using your fingers as a loop height guide and resting hands periodically to avoid fatigue. Remember that slight looseness produces better results than tight, stiff knitting.
Use contrasting scrap yarn as a stitch marker. Thread it through the first stitch, remove and reinsert at the start of each row to prevent miscounting and accidental increases. Finish cleanly by threading tails through edge loops before cinching, avoiding bulky knots by tying securely inside the pillow, and trimming only after confirming the knot will not slip.
Care and Longevity
Your handmade yarn pillow is designed to last with proper care.
Wash and Dry Safely
Machine washable: Yes, using gentle cycle with cold or warm water (maximum 86°F / 30°C) and mild detergent. Dryer safe: Yes, on low heat for 30-60 minutes. Air dry option: Lay flat on a towel away from direct sunlight.
User feedback confirms no pilling, fading, or deformation after 5+ washes.
Expected Lifespan
With regular use and proper care, expect 2+ years of durability. No manufacturer warranty exists, but the construction is highly durable. Repairs are possible by re-tightening seams, re-cinching ends, or re-stuffing as needed.
Frequently Asked Questions About Making a Pillow Out of Yarn
How long does it take to make a yarn pillow?
A round pillow takes 15-30 minutes while a square or loop yarn pillow takes 1-2 hours. Time varies based on experience level and pillow size.
Do I need knitting needles for this project?
No. All methods use finger knitting techniques that require only your hands. Loop yarn is even easier, requiring only finger threading motions.
What type of yarn is best for beginners?
Bernat Blanket Big jumbo-weight polyester yarn is best for beginners. It is soft, easy to work with, widely available, and creates forgiving stitches that hide minor unevenness.
Can I wash my yarn pillow in the washing machine?
Yes. All recommended yarns are 100% polyester and machine washable. Use gentle cycle with cold or warm water and tumble dry on low heat.
How do I close the pillow without visible seams?
Use the criss-cross seaming method for square pillows. Thread yarn through corresponding loops on opposite edges in a zig-zag pattern, then gently tighten. This creates an invisible closure.
Can I use a regular pillow insert instead of fiberfill?
Yes. Standard pillow inserts work perfectly with finger-knit covers. Use a 16×16 inch insert for square pillows or similar-sized inserts for custom sizes.
Key Takeaways for Making Your Own Yarn Pillow
Making a pillow out of yarn is more than a craft project. It is a fast, satisfying way to create something beautiful with your hands. Whether you choose a cozy square, chic round pouf, or kid-friendly loop design, your handmade pillow will be soft, durable, and uniquely yours.
The best yarn for beginners is Bernat Blanket Big because it offers excellent washability, softness, and availability. Always leave 18-inch tails for cinching and seaming because short ends make finishing difficult. Test fit your pillow form as you knit to make early adjustments easier.
With just one skein and an hour of time, you will have a washable, stylish accent that looks store-bought but feels like home. Start with a small project to build confidence, then scale up to larger pillows and more complex designs as your skills grow.


