

Neck pain when you wake up? You are not alone. Millions of people suffer from stiffness, cricks, and discomfort caused by poor sleep posture. The solution might be simpler than you think: how to make a cervical pillow at home. A cervical pillow supports the natural curve of your neck, aligning your spine whether you sleep on your back or side. Unlike expensive store-bought versions, homemade cervical rolls are affordable, customizable, and effective using just a towel, fabric, or even a sock.
This guide walks you through three proven methods to create your own cervical pillow. You will learn exactly how to shape, position, and use each type for maximum comfort and spinal support. Whether you are testing the concept or building a long-term solution, you will find clear, step-by-step instructions with expert tips to avoid common mistakes.
Choose the Right Cervical Pillow Method for Your Needs
Not all cervical pillows are the same. Your choice depends on your specific needs: quick relief, long-term use, or pain therapy. Each method offers unique benefits that match different situations and comfort preferences.
Towel Roll for Immediate Relief
The fastest way to test cervical support is the towel roll method. It requires no tools, no cost, and delivers results the same night you try it.
Why Use a Towel Roll
A towel roll provides instant support for neck alignment. It offers adjustable firmness and height, making it ideal for first-time users who want to try cervical support before committing to a permanent version. This method perfects for anyone testing whether cervical support actually helps their neck pain.
What You Need
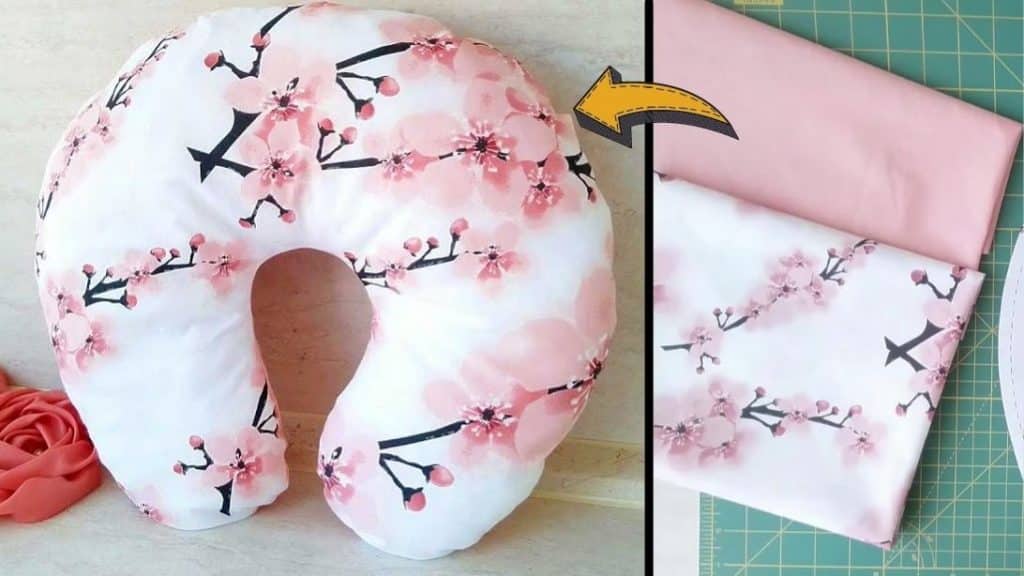
A thick bath towel works best for firmer support. Fold it in half lengthwise before rolling to increase density. You will also need one standard pillowcase to hold the roll in place. This method uses items you already have in your home, costing nothing extra.
Sewn Fabric Pillow for Long-Term Use
If you like the towel roll but want something durable and washable, sew your own cervical pillow. This version lasts for years with proper care.
Benefits of a Sewn Roll
A sewn roll offers customizable shape and firmness. It is machine-washable when using proper filling. You can include aromatherapy by adding lavender or essential oils for added relaxation benefits. This creates a long-term solution that outperforms temporary methods.
Materials Required
You will need soft fabric such as cotton, flannel, or fleece cut to 20 inches by 12 inches. The filling options include polyester fiberfill, memory foam strips, or buckwheat hulls. You will also need a sewing machine or needle and thread, plus scissors, pins, and optional lavender for scent.
Rice-Filled Pillow for Heat or Cold Therapy
Need more than just support? A rice-filled cervical roll doubles as a heating pad or cold pack for muscle tension and pain relief.
Ideal For
This type of pillow works best for neck stiffness and spasms. It aids post-workout recovery and helps with stress-related tension. It also provides temporary pain relief during flare-ups, making it versatile for multiple uses.
Supplies Needed
Gather 2 to 3 cups of uncooked rice. You will need a cotton fabric piece or clean tube sock. Essential oils like lavender or peppermint are optional. Dried herbs such as lavender or mint add scent and therapeutic benefits.
Build a No-Sew Towel Cervical Pillow in Minutes
You can make an effective cervical roll in under 2 minutes using just a towel and pillowcase. This quick method delivers immediate relief without any sewing or special tools.
Roll the Towel Tightly
Lay a bath towel flat on a clean surface. Fold it in half lengthwise to double the thickness. Starting from one end, roll it tightly into a firm cylinder. The roll should be about 3 to 4 inches in diameter, thick enough to support your neck without tilting your chin down.
Insert Into Pillowcase Correctly
Place the rolled towel into the lower third of your pillowcase. Push it all the way in so it sits just below where your head will rest. Tuck the ends fully to prevent slipping during the night. If the roll still shifts, secure the towel end with masking tape or a rubber band before inserting.
Test and Adjust Height
Lie down on your back to test the roll. It should support the base of your neck, not your head. Your head should rest naturally on the pillow above the roll. Your ears should align with your shoulders. If it feels too high, use a hand towel or roll less tightly. If it feels too flat, add a second towel or roll tighter.
Sew a Custom Cervical Pillow for Long-Term Use
For a professional, long-lasting cervical roll, sewing gives you full control over size, shape, and comfort. This method produces a durable pillow that lasts for years.
Cut and Prepare Fabric
Cut two pieces of fabric to 20 inches by 12 inches. Place them right sides together. Pin or clip the edges to hold them in place while sewing. Use breathable cotton for summer months and flannel for winter warmth. Avoid stiff materials that might feel uncomfortable against your neck.
Sew Three Sides Securely
Sew along three edges with a 1/4 to 1/2 inch seam allowance. Clip small notches near corners to reduce bulk when turning. Turn the fabric right-side out through the open end. If hand-sewing, use a backstitch for strength and knot tightly at start and end.
Fill With Supportive Material
Choose your filling based on preferred firmness. Polyester fiberfill provides soft, moldable support and is machine-washable. Memory foam strips offer firm, shape-retaining support for medical-grade comfort. Buckwheat hulls provide firm, breathable support that contours to your neck. Add 1/4 cup of dried lavender or 10 to 15 drops of essential oil for aromatherapy benefits.
Close the Opening Neatly
Fold the raw edge inward by 1/2 to 5/8 inch. Hand-stitch or machine-sew the opening closed. Use backstitch if using a machine for durability. As an alternative, repurpose an old t-shirt or pillowcase by cutting to size and sewing like above.
Make a Rice-Filled Therapeutic Neck Roll
This version is not just a pillow. It is a heating pad and neck support in one, providing both structural alignment and thermal therapy for sore muscles.
Use a Sock for No-Sew Option
Choose a crew or knee-high cotton sock, avoiding ankle socks which are too small. Fill with 2 to 3 cups of uncooked rice, leaving 2 to 3 inches empty at the top. Add 10 to 15 drops of essential oil or 1/4 cup of dried herbs. Mix well to distribute the scent. Fold the top down twice or tie securely with string, ribbon, or a hair tie. Label clearly with a permanent marker: “Do Not Eat.”
Sew a Rice Pillow for Durability
Follow the sewn pillow method above but fill with rice instead of fiberfill. Use tight stitches and backstitch at the ends to ensure no rice can leak through the fabric weave. Choose tightly woven cotton or muslin for best results.
Heat Safely in Microwave
Microwave in 1-minute intervals only. Shake gently between sessions to distribute heat evenly. Test temperature on your wrist before applying to your neck. Use for 10 to 20 minutes maximum. Never overheat as this creates risk of fire or burns. Stop immediately if you smell anything scorched.
Chill for Cold Therapy
Place in the freezer for 15 to 30 minutes or in the refrigerator for 1 to 2 hours. Wrap in a thin cloth to protect your skin from cold burns. Apply to your neck for 15 minutes at a time. Never apply directly to skin without a barrier cloth.
Position the Cervical Pillow Correctly
Even the best pillow fails if placed wrong. Proper positioning ensures real spinal alignment and maximizes the therapeutic benefits of your cervical roll.
Support the Neck, Not the Head
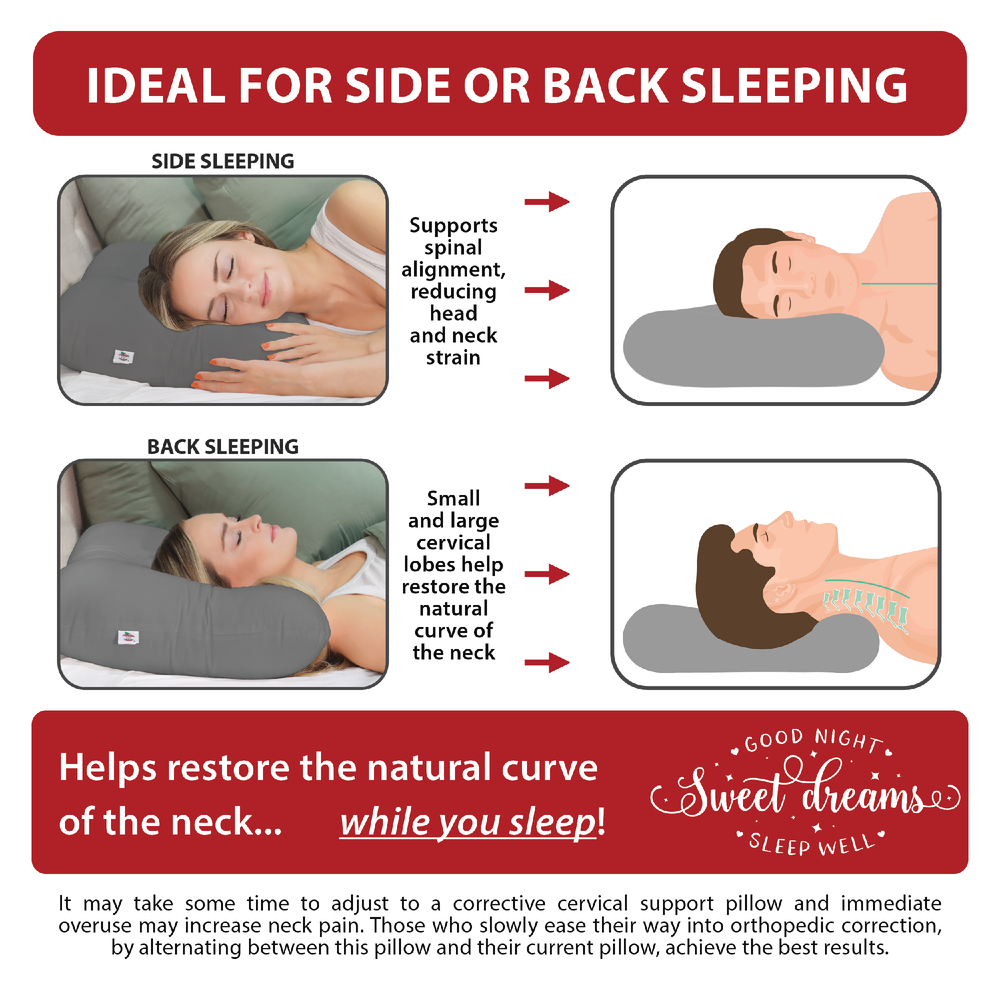
The roll goes under your neck where the curve begins. Your head rests on the pillow above, not on the roll itself. Your chin should stay level, not tucked or lifted. This positioning maintains the natural curve of your cervical spine.
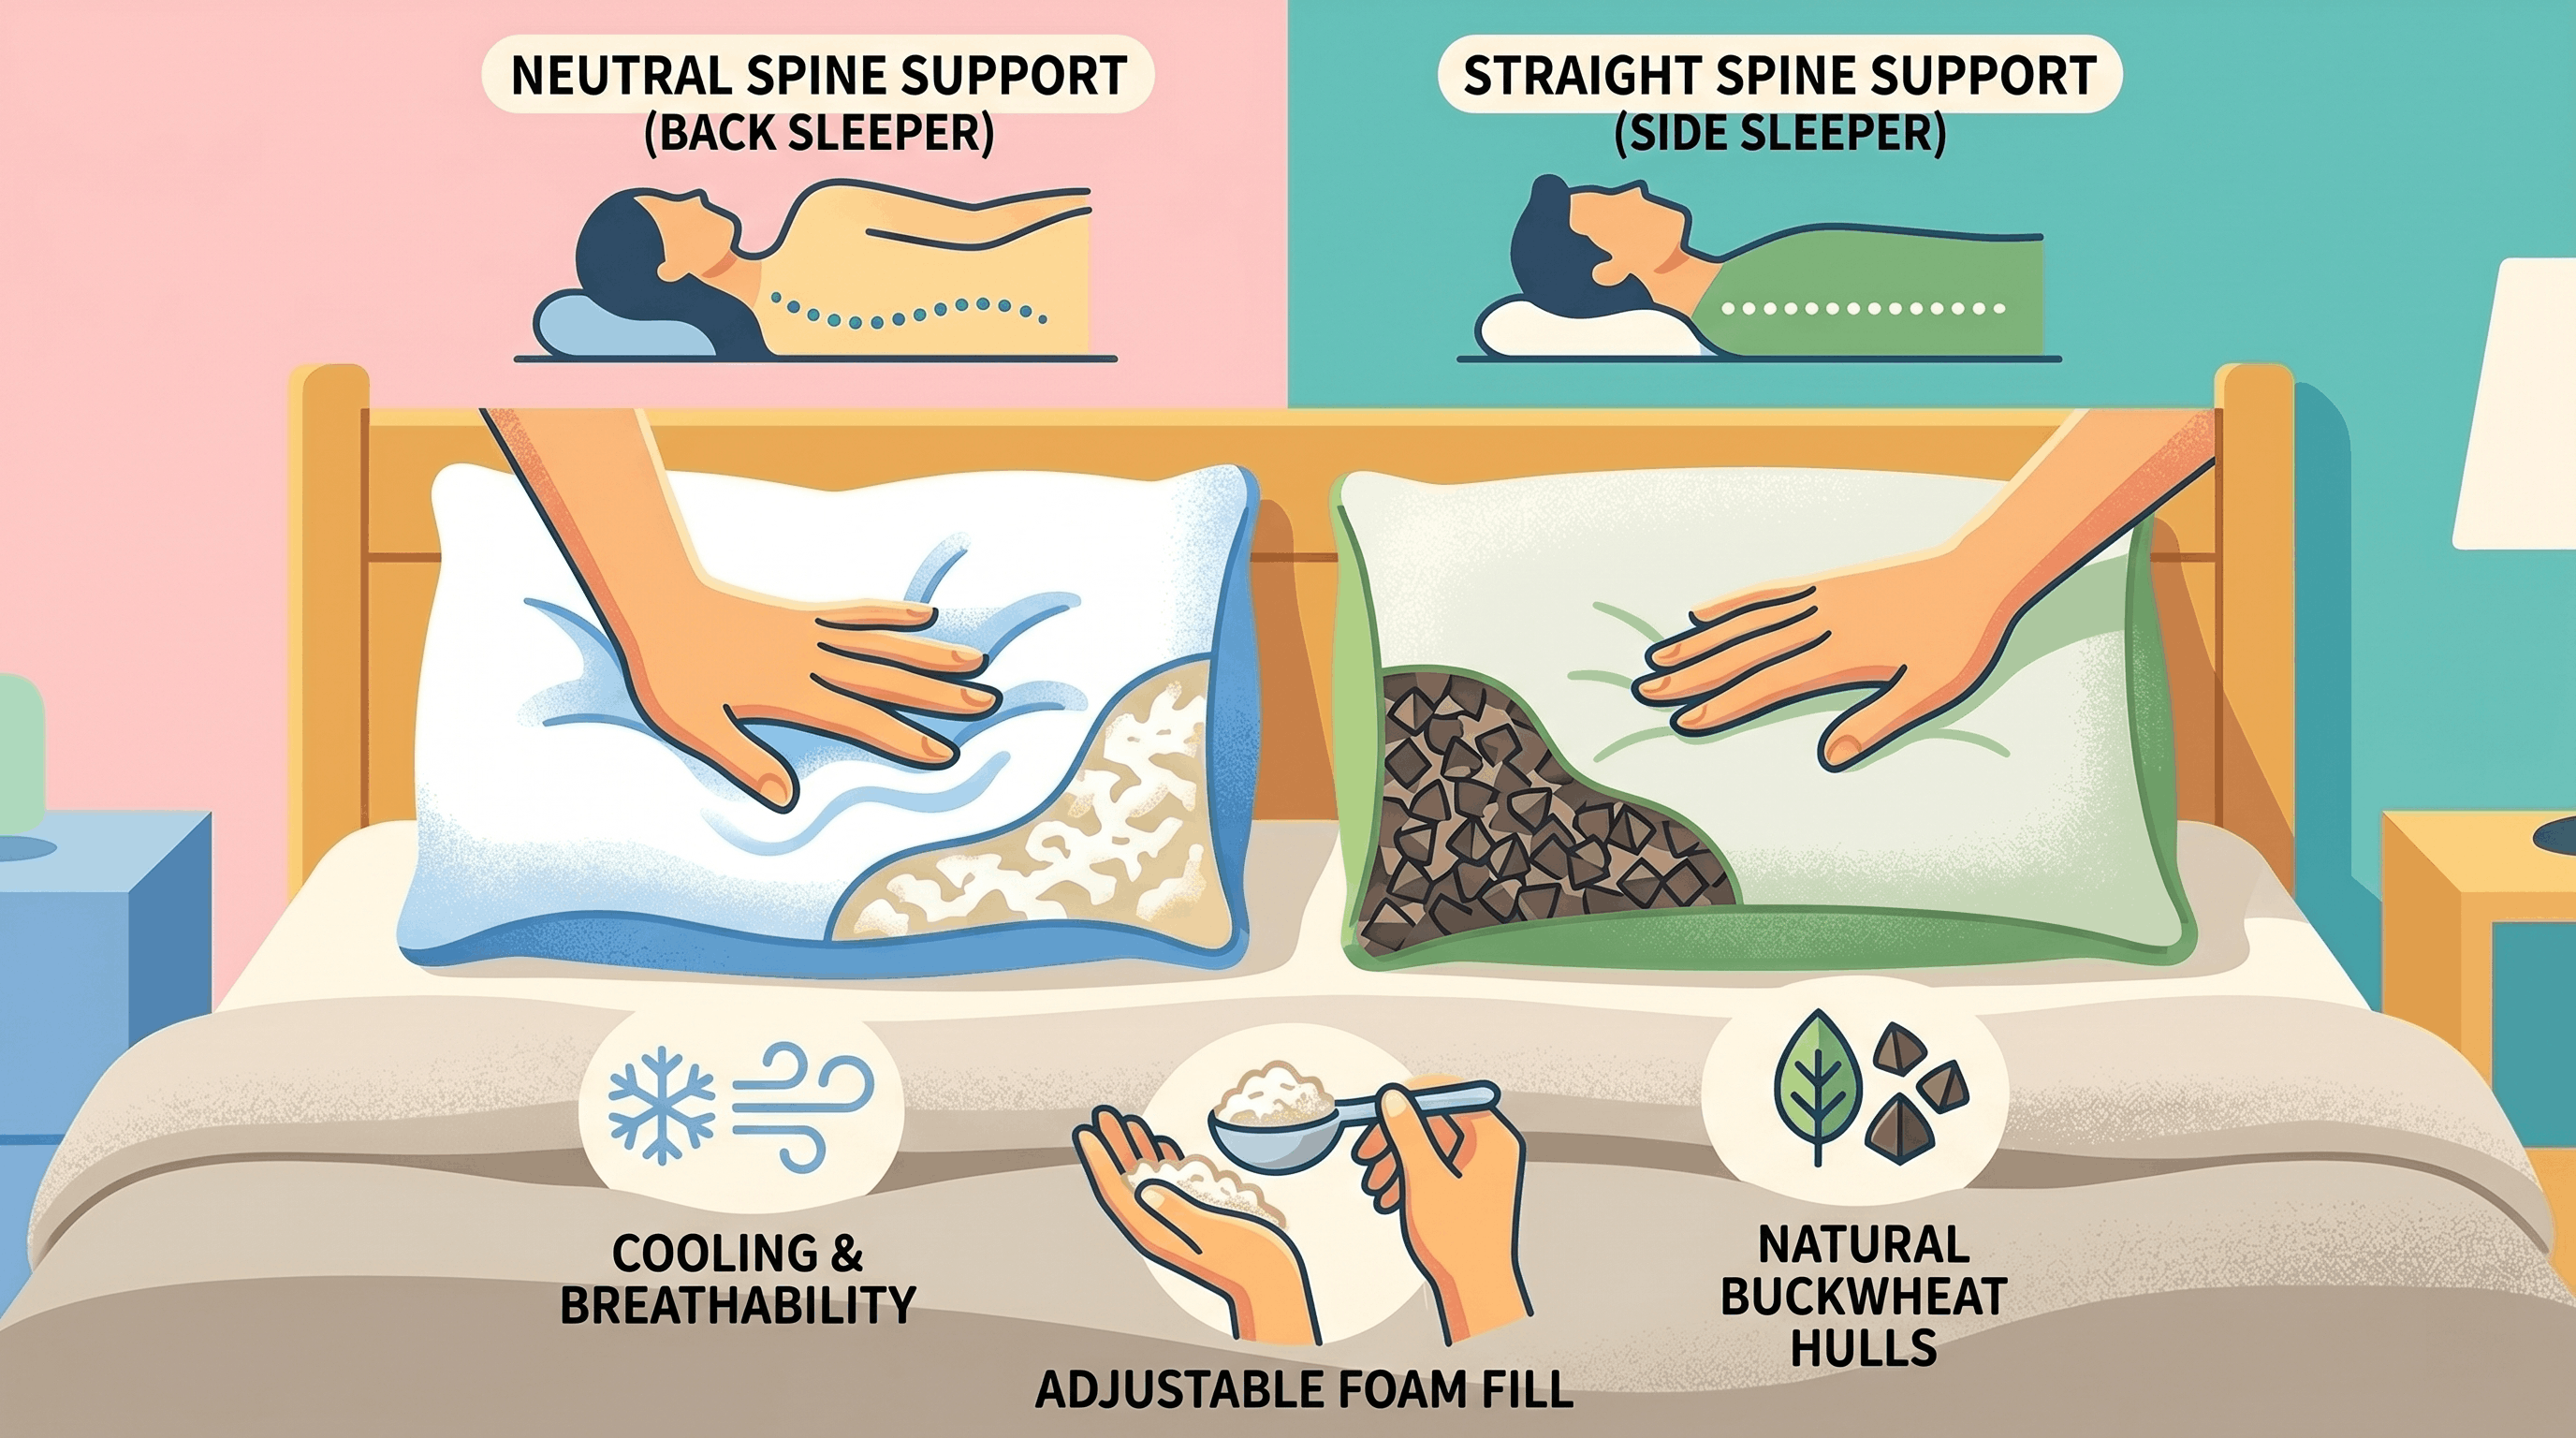
For Back Sleepers
Place the roll in the lower third of your pillow. Lie back so the base of your skull rests just above the roll. Your shoulders and head stay flat. Your ears align with your shoulders. Ask someone to take a side photo to check that your spine is straight from neck to lower back.
For Side Sleepers
The roll fills the gap between your neck and shoulder. Keep your spine straight without tilting forward or backward. Your top shoulder should not hunch toward your ear. If you feel pressure on your neck, the roll is too high and needs adjustment.
Avoid Common Mistakes
Never place the roll under your head instead of your neck, as this loses the support benefit. Avoid using a roll that is too tall, as it causes chin tuck and defeats the purpose. Prevent slippage by sewing the roll into a pillowcase or using a non-slip mat underneath.
Choose the Best Filling Material for Your Needs
Your filling determines firmness, longevity, and care needs. Understanding each option helps you choose the right material for your specific situation.
Soft Support: Polyester Fiberfill
Polyester fiberfill feels moldable and plush. It works best for daily use in sewn pillows. Care involves machine washing after removing scent additives. Expect a lifespan of 1 to 3 years. Fluff regularly to maintain shape.
Firm Support: Memory Foam
Memory foam feels dense and shape-retaining. It works best for medical-grade support needs. Care involves spot cleaning only. Expect a lifespan of 2 to 5 years. Cut strips to fit before inserting.
Contouring Support: Buckwheat Hulls
Buckwheat hulls feel firm and breathable with slight shifting. They work best for adjustable support and hot sleepers. Care involves airing out without washing. Expect a lifespan of 1 to 2 years. Note that rustling sounds are normal.
Therapeutic: Uncooked Rice
Uncooked rice feels medium-firm and warmable. It works best for heat and cold therapy applications. Care involves spot cleaning only. Never let it get wet. Store in a dry place. Expect a lifespan of 6 months to 2 years. Replace if rice becomes damp or develops mold.
Maximize Results With Posture and Daily Habits
A cervical pillow works best when combined with healthy habits throughout the day. Supportive sleep accessories paired with good daytime practices deliver lasting results.
Improve Daytime Posture
Avoid “text neck” by holding phones at eye level. Set up an ergonomic workstation that keeps your screen at proper height. Take breaks every 30 minutes to stretch and move. Set a phone reminder to check your posture hourly.
Stretch and Strengthen Daily
Perform neck stretches by gently tilting your head side to side. Do shoulder rolls forward and backward for 1 minute each. Practice chin tucks by sitting tall and pulling your chin straight back. Deep neck flexor exercises build long-term support. Consider consulting a physical therapist for personalized exercises.
Clean and Maintain Your Pillow
Wash towel rolls weekly. Spot clean sewn pillows or hand wash and air dry. Wipe rice rolls with a damp cloth but never submerge them. Replace your pillow when fabric wears, filling clumps, or odors develop.
Key Takeaways for Making Your Own Cervical Pillow
Making a cervical pillow at home is a safe, effective, and low-cost way to improve neck support and sleep quality. Whether you use a towel, sew a custom roll, or create a therapeutic rice pillow, the goal remains the same: maintain your neck’s natural curve to reduce strain on spinal discs and nerves.
Start with the towel roll method if you want to test whether cervical support helps your specific pain. Upgrade to a sewn version for long-term use with customizable firmness. Add rice filling for versatile heat and cold therapy benefits. Position the roll under your neck, not your head, and adjust the height until your spine aligns naturally.
Combine proper pillow use with good daytime posture and daily stretching for lasting relief. Most people notice improvement in morning stiffness within a few days of consistent use. If pain persists beyond two weeks or includes arm numbness, tingling, or weakness, consult a healthcare provider.
Frequently Asked Questions About Making a Cervical Pillow
What is the simplest way to make a cervical pillow at home?
The simplest method uses a bath towel folded in half lengthwise and rolled tightly into a cylinder. Insert this roll into the lower third of a pillowcase. Position it under your neck, not your head, when sleeping. This takes under 2 minutes and requires no special tools or sewing.
How do I know if my cervical pillow is positioned correctly?
Your cervical roll should support the base of your neck, not your head. When lying on your back, your head should rest naturally on the pillow above the roll. Your ears should align with your shoulders. Your chin should stay level, neither tucked down nor lifted up.
What filling material lasts the longest for a sewn cervical pillow?
Memory foam offers the longest lifespan at 2 to 5 years while maintaining its shape. Polyester fiberfill lasts 1 to 3 years but requires regular fluffing. Buckwheat hulls last 1 to 2 years but cannot be washed. Rice filling lasts 6 months to 2 years and must stay dry.
Can I use a cervical pillow if I sleep on my stomach?
Stomach sleeping is generally not recommended when using a cervical pillow. This position often exacerbates neck strain even with a cervical roll. If you must sleep on your stomach, skip the cervical roll and use a flat pillow instead to minimize neck twisting.
How do I clean a rice-filled cervical pillow?
Never wash a rice-filled pillow as the rice will absorb water and develop mold. Wipe the exterior with a damp cloth and mild soap if needed. Allow it to air dry completely before using. Replace the rice if it becomes damp, develops odors, or clumps together.
Is it safe to heat a rice cervical pillow in the microwave?
Yes, it is safe when done properly. Microwave in 1-minute intervals only, shaking gently between each interval. Test the temperature on your wrist before applying to your neck. Never microwave longer than 2 to 3 minutes total. Stop immediately if you smell burning.


