
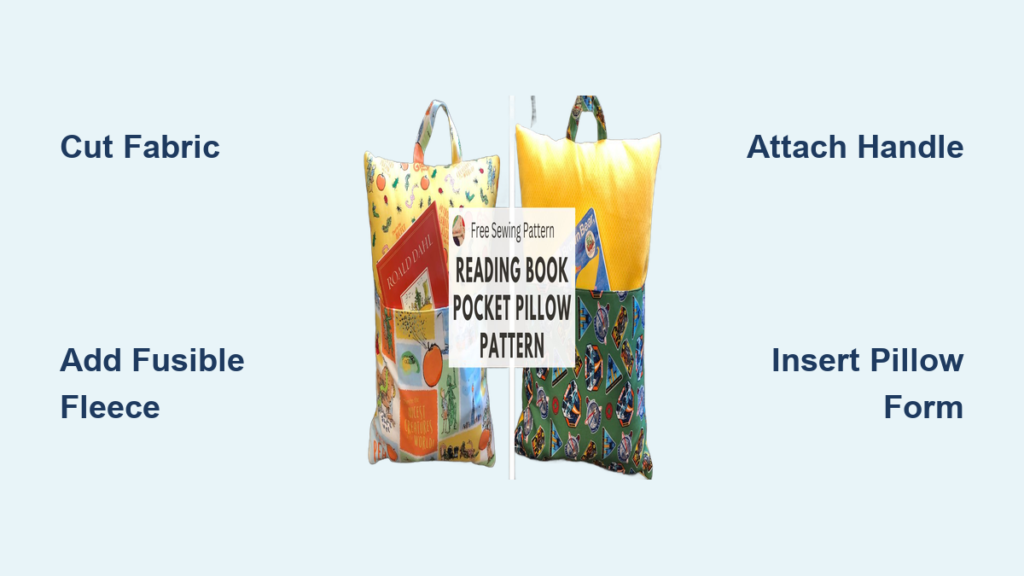
You love reading in bed, but propping up a book while balancing a flashlight and trying not to drop everything gets old fast. What if you could hold your book securely, stay comfy, and carry it all in one cozy package? Enter the book pillow, a clever sewing project that combines a supportive backrest with a front book pocket and carrying handle. Whether you’re making it for a child who adores bedtime stories, a student needing a study buddy, or yourself as a reading retreat upgrade, this DIY pillow is functional, washable, and fully customizable. In this guide, you’ll learn exactly how to make a book pillow step by step, from choosing fabric to inserting the pillow form, with pro tips for durability, personalization, and beginner-friendly success.
Choose Your Pillow Size
Selecting the right size ensures your book pillow fits standard inserts and holds reading materials securely. Three common sizes are used for book pillows, each offering different benefits depending on your needs.
The 16″ square size works well for kids or travel since it’s compact and lightweight. The 18″ square provides a balanced option suitable for most users and book sizes. For adults who want extra room or plan to hold larger books and tablets, the 20″ square offers the most spacious fit.
Each size requires a corresponding pre-made pillow form, typically filled with polyester fiberfill or foam. Match your fabric cuts to the appropriate size chart before cutting.
Cut All Fabric Pieces
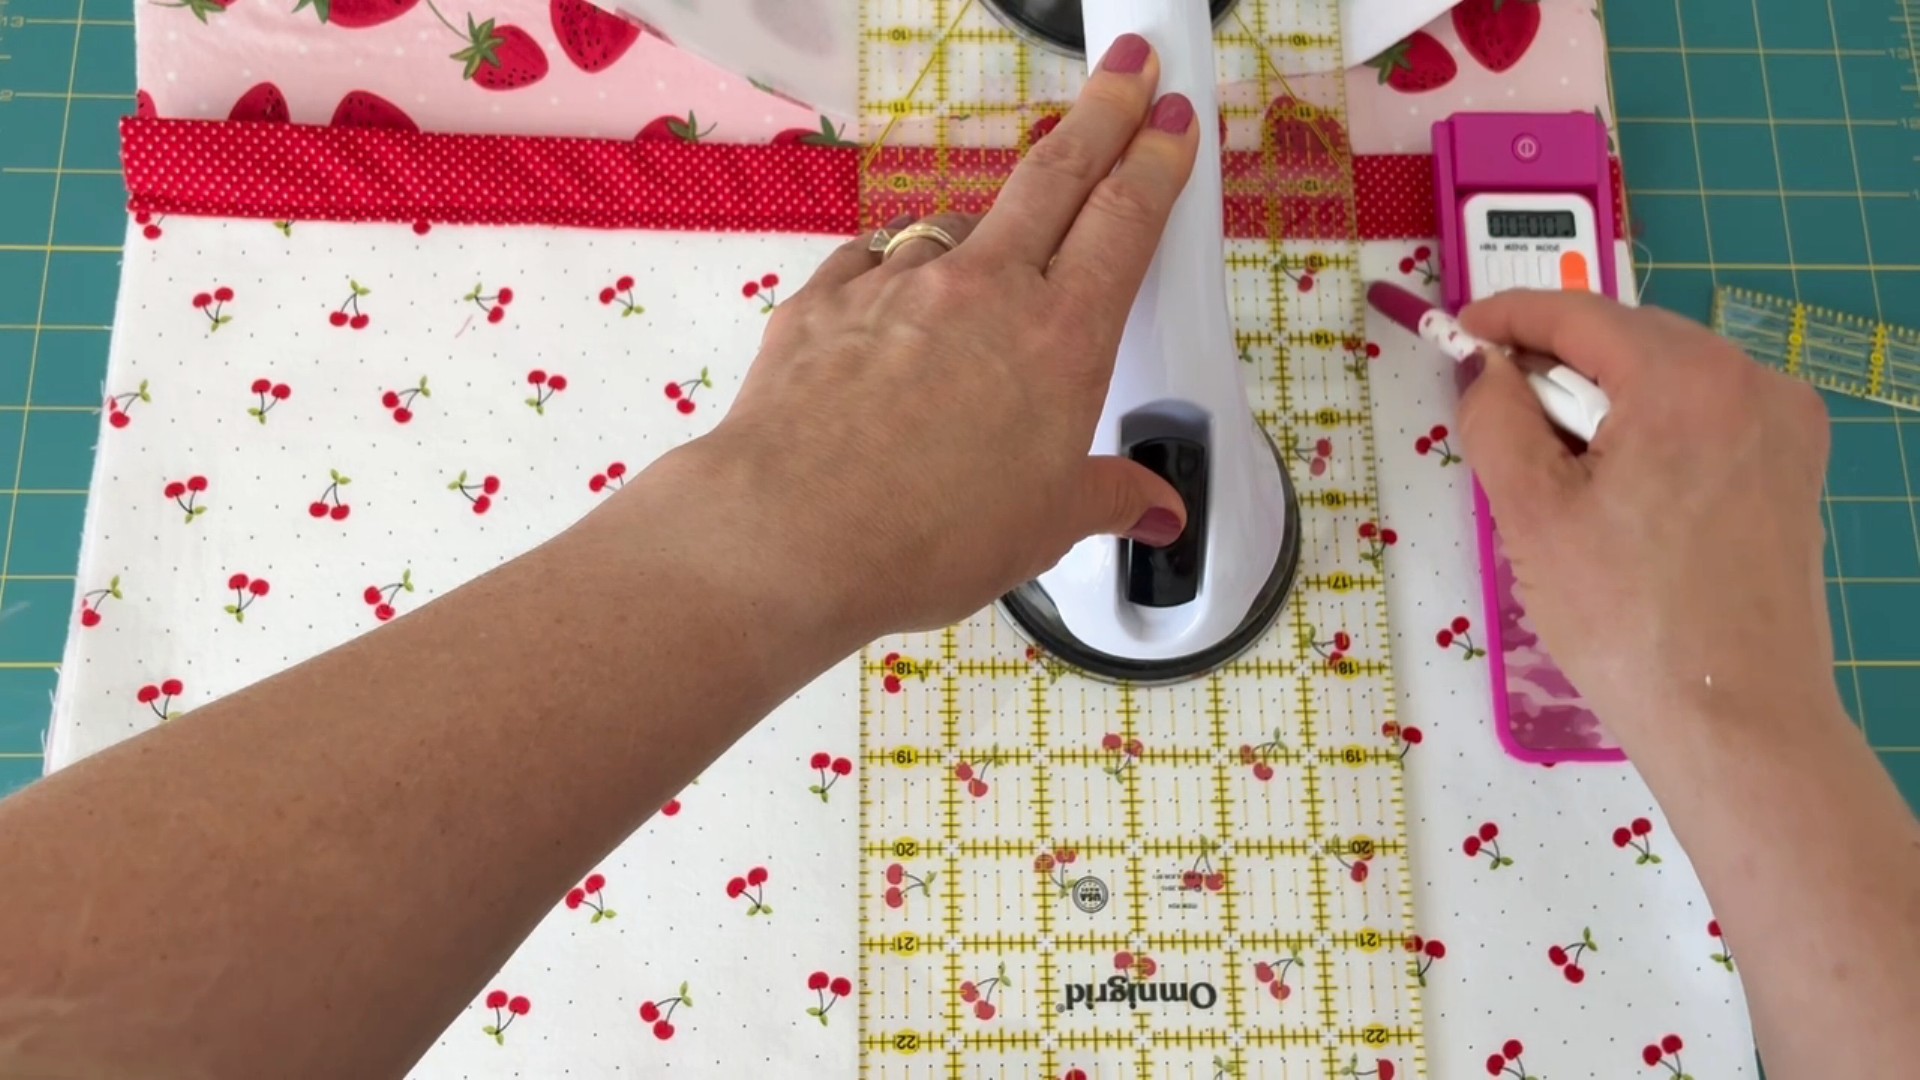
Precision cutting prevents misalignment later in the construction process. Use a rotary cutter, self-healing mat, and acrylic ruler for clean, accurate edges.
Cutting Guide by Size
Use the following measurements to cut all fabric pieces for your chosen pillow size.
For a 16″ pillow, cut the front panel at 16″ × 16″, pocket front at 11″ × 16″, pocket lining at 11.5″ × 16″, upper back panel at 12″ × 16″, lower back panel at 9″ × 16″, and handle fabric at 4″ × 10″.
For an 18″ pillow, cut the front panel at 18″ × 18″, pocket front at 11″ × 18″, pocket lining at 11.5″ × 18″, upper back panel at 13″ × 18″, lower back panel at 10″ × 18″, and handle fabric at 4″ × 10″.
For a 20″ pillow, cut the front panel at 20″ × 20″, pocket front at 12″ × 20″, pocket lining at 12.5″ × 20″, upper back panel at 14″ × 20″, lower back panel at 11″ × 20″, and handle fabric at 4″ × 9″.
Label each piece with tape or chalk to keep track during assembly. Pre-wash your fabrics to prevent shrinkage after the pillow is complete.
Apply Fusible Fleece for Structure
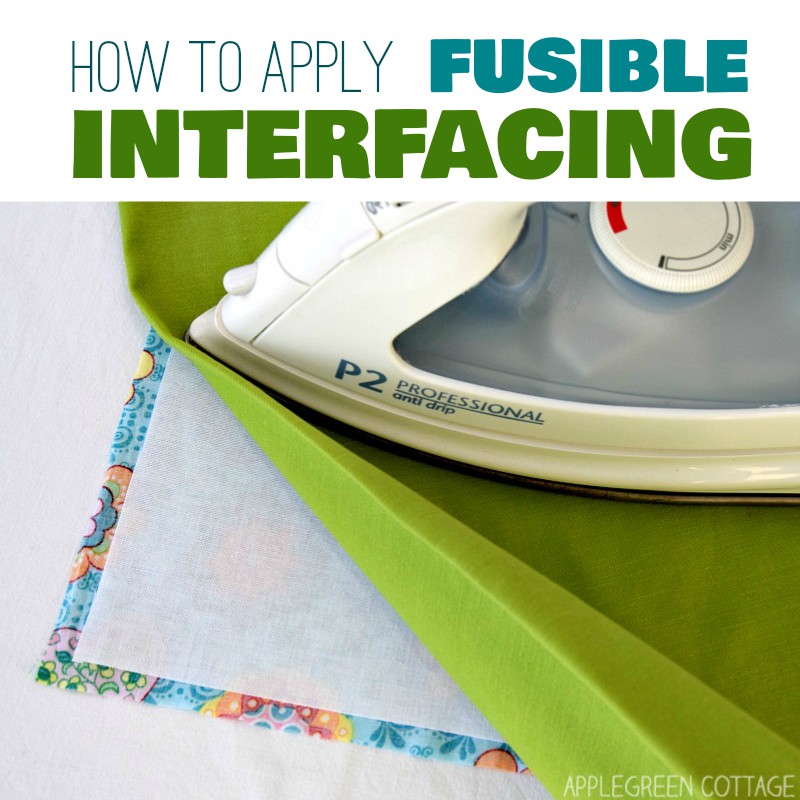
Fusible fleece adds soft padding and prevents the pocket from sagging under the weight of books. This reinforcement gives the pillow body and makes it more durable for daily use.
Apply fusible fleece to the front panel and pocket front using these steps.
Cut one piece of fleece to match the front panel dimensions. Cut a second piece to match the pocket front. Following the manufacturer instructions, iron the fleece to the wrong side of both pieces, pressing thoroughly to ensure full adhesion.
Customize the Pocket Front
This is where your book pillow becomes uniquely yours. Add names, quotes, or themed designs before assembling the pocket. Complete any embroidery or applique before attaching the pocket lining.
Monogram with Heat Transfer Vinyl
Use a Cricut or Silhouette machine to cut letters from flocked HTV, which feels like felt. Position the design ½” to 1″ above the pocket’s raw edge. Iron on with firm pressure. No sewing is required.
Machine Embroidery
Hoop the pocket front with cut-away stabilizer. Stitch a name, quote like “Reading is Magic,” or a character motif. Remove the stabilizer backing after stitching.
Raw-Edge Applique
Iron fusible web to the back of contrast fabric. Cut out shapes like letters, animals, or books and apply them to the pocket. Zigzag stitch around edges to secure.
Construct the Book Pocket
A clean, reinforced pocket keeps books upright and prevents fraying. Follow these steps to create a durable pocket.
Place the pocket front and pocket lining right sides together. Sew along the top edge with a ½” seam allowance. Press the seam open or toward the lining. Turn right-side out and use a chopstick to push out corners cleanly. Press flat, folding the lining down slightly to create a neat band. Topstitch ¼” from the top edge to secure.
Optional: Sew a vertical seam down the center to create dual compartments, one for books and one for crayons or bookmarks.
Make a Durable Handle
The handle should withstand daily use. Choose between a fabric handle for maximum security or a ribbon handle for quick assembly.
Fabric Handle Method
Cut a 4″ × 10″ strip of fabric. Fold it lengthwise with wrong sides together and press. Unfold, then fold both long edges to meet the center crease and press. Fold in half again and press. Topstitch 1/8″ from each edge for a four-layer, 1″ wide strap.
Ribbon Handle Method
Use 1″ wide grosgrain ribbon cut to 10″ to 13″ long. Apply Fray Check to both ends to prevent fraying. Center the ribbon on the front panel, about 2″ from each edge. Stitch close to each edge. Add a box stitch for extra strength.
Avoid ribbon handles for children under 3 due to choking hazard.
Attach Pocket and Handle
Proper alignment ensures functionality and visual balance. Follow these steps to attach both components.
Line up the bottom edge of the pocket with the bottom edge of the front panel. Pin or clip in place. Baste along both sides using a long stitch of 3.5 to 4 mm. Center the handle 5″ from each side, or about 2″ from the edge. Sew the ends with a ½” seam allowance and backstitch 3 to 4 times for security.
Check that the handle isn’t twisted and faces the correct direction before sewing.
Hem the Back Panels
The envelope closure allows easy removal of the pillow insert for washing. The lower panel overlaps the upper by about 6″, creating a snug but removable fit.
Take the upper back panel and fold one long edge ½”, press. Fold again ½” to hide the raw edge and press. Topstitch close to the inner fold. Repeat this process for the lower back panel.
Optional Step: Round the Corners
For a modern, polished look, trace a bowl or plate with a 1.5″ to 2″ radius on all corners. Cut the front panel, pocket, and back panels to match the rounded corners. Clip the curves when assembling to reduce bulk.
Assemble the Pillow Cover
Now everything comes together. Follow these steps carefully for a professional result.
Place the front panel right side up. Lay the upper back panel right side down, aligning with the top edge. Place the lower back panel right side down, aligning with the bottom edge, creating an overlap in the center. Pin all around, paying extra attention to the handle attachments, pocket corners, overlapping back seams, and corners.
Sew around the entire perimeter with a ½” seam allowance. Backstitch at the start, end, and all stress points. Trim corners at 45° to reduce bulk. Optional: Zigzag stitch or serge the raw edges to prevent fraying.
Use a walking foot if sewing through thick layers to prevent shifting.
Turn, Press, and Finish
Turn the cover right-side out through the envelope opening. Use a Clover point turner or chopstick to push out corners neatly. Press the entire cover, focusing on sharp edges and seams.
Optional: Sew ¼” around the entire pillow for a professional finish and added seam security.
Insert Pillow and Test
Slide in the corresponding pillow form, either 16″, 18″, or 20″ depending on your size. Fold the lower back over the upper to close. Place a book, tablet, or magazine in the pocket. Add extras like a flashlight, bookmark, or crayons.
Test the fit with your favorite book before final use to ensure it sits comfortably.
Closure Options Compared
Envelope Back
This method is recommended for beginners. It requires no zipper or buttons, making it easy to sew and wash. It’s secure enough for daily use and best for first-time makers.
Zipper Back
This option requires a zipper foot and more precision. It provides a fully enclosed closure with no risk of the pillow slipping out. It’s ideal for heavier inserts or frequent machine washing.
Stick with the envelope back unless you’re experienced with zippers.
Customization Ideas That Pop
Make your book pillow stand out with creative upgrades.
Choose themed fabrics like Harry Potter prints for young wizards, classic literature motifs for teens, or animal or nature themes for gender-neutral gifts.
Apply design upgrades like quilting the back with batting and stitching 1″ grid lines. Use contrast topstitching with bright thread for visual interest. Apply a 3″ binding strip around the pocket for a framed look. Try rag-quilt style by leaving seams raw and letting them fray intentionally.
Pair the pillow with a matching bookmark or mini flashlight for a complete reading kit gift.
Durability and Washability Tips
A well-made book pillow lasts years, even with daily use. Boost longevity by backstitching at all high-stress points like the handle and back seams. Use strong polyester thread. Reinforce the handle with an X-stitch or box stitch. Serge or zigzag seam allowances.
For care instructions, remove the pillow form before washing. Machine wash in cold water with mild detergent. Tumble dry low or air dry. Avoid ironing over HTV or vinyl areas.
Who Should Make This
This project is perfect for beginner sewers since it uses only straight seams. Parents creating reading routines will love it. Teachers building classroom reading kits benefit greatly. It’s ideal for gift-givers at birthdays, baby showers, and holidays. Youth groups like 4-H and scouts find it engaging.
Let children choose the fabric. Ownership increases usage.
Time and Skill Estimate
Plan for 45 minutes for a basic version to 3 hours if adding embroidery or complex embellishments. The skill level is beginner since it uses straight seams and no zippers. The difficulty is easy to moderate. It’s best for weekend projects, gift-making, and involving kids.
Frequently Asked Questions About Making a Book Pillow
What size pillow form do I need for a book pillow?
The most common sizes are 16″, 18″, and 20″ square pillow forms. Choose based on the reader’s age and the types of books they read. A smaller size works well for children and picture books, while larger sizes accommodate textbooks and tablets.
Can I wash a book pillow?
Yes, the envelope-style back closure allows you to remove the pillow form and machine wash the cover. Wash in cold water with mild detergent and either tumble dry low or air dry. Avoid ironing directly over any vinyl or heat transfer designs.
Do I need a sewing machine to make a book pillow?
A sewing machine makes the project much faster and produces sturdier results, but it is possible to hand-sew the entire project. However, a machine is recommended for the handle attachments and long seams.
How do I personalize a book pillow?
You can add names or quotes using heat transfer vinyl, machine embroidery, or raw-edge applique. These decorations are best applied before assembling the pocket. Position designs ½” to 1″ above the pocket’s top edge.
What fabric is best for a book pillow?
Use 100% cotton quilting fabric for ease of cutting and sewing. Choose themed prints that match the recipient’s interests. Pre-wash all fabrics to prevent shrinkage after construction.
How do I prevent the pocket from sagging?
Apply fusible fleece to the wrong side of the pocket front before assembling. This adds structure and prevents the pocket from stretching under the weight of books. You can also add a vertical seam to create dual compartments for added support.
Key Takeaways for Making a Book Pillow
Making a book pillow is a rewarding project that combines comfort with functionality. Choose your size based on the user’s needs, cutting all fabric pieces precisely according to the size chart. Apply fusible fleece to the front panel and pocket for structure that lasts. Personalize with names, quotes, or themed fabrics to make it special. The envelope back closure makes washing easy while keeping the pillow form removable.
This beginner-friendly project uses straight seams and requires no zippers, making it accessible to sewers of all skill levels. Whether you’re making one for a child, a classroom, or yourself, follow these steps to create a cozy reading companion that gets used again and again. Gather your materials, choose your fabric, and start sewing your way to better reading comfort today.


