
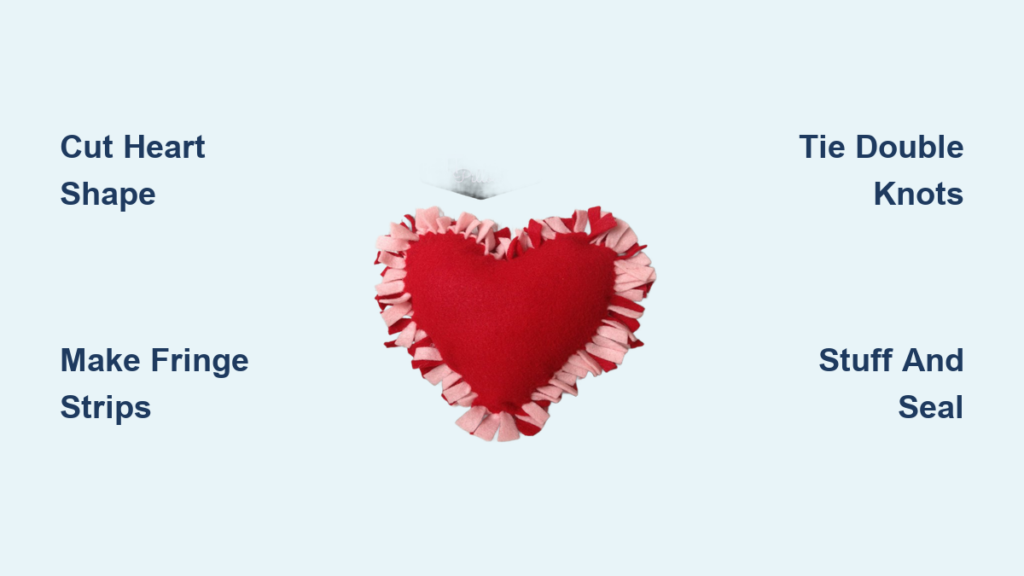
Nothing says “handmade with love” quite like a soft, plush heart pillow, especially when it’s created without threading a single needle. The no-sew heart pillow has become a beloved DIY project for crafters of all skill levels because it delivers big charm with minimal effort and zero sewing experience required. Whether you’re looking for a fun Valentine’s Day activity with kids, a thoughtful handmade gift, or a cozy addition to your home décor, this project checks all the boxes.
In this guide, you’ll discover exactly how to make a no-sew heart pillow using two proven methods: the durable fringe-tied technique and the quicker adhesive-bonded approach. I’ll walk you through every step, from gathering materials and cutting the perfect heart shape to stuffing, sealing, and customizing your creation. You’ll also find tips to avoid common mistakes, creative ways to personalize your pillow, and answers to frequently asked questions.
Choose Your No-Sew Method: Fringe-Tied vs. Adhesive
Before diving into the project, selecting the right construction method sets you up for success. Both approaches work well, but they produce different results and require different skill levels.
Why the Fringe-Tied Method Works Best
The fringe-tied technique uses knotted fabric strips around the edge to seal the pillow, creating a textured, playful look that stands up to regular use. This method is ideal if you want something durable enough for kids to cuddle, toss around, or give as a gift that will last. The tying process also provides excellent fine motor skill practice for children learning to tie knots.
The fringe method requires only basic supplies: sharp scissors, fleece fabric, and polyester stuffing. Plan for approximately 30 to 60 minutes to complete a standard-sized pillow. The knots hold securely over time, making this the more resilient option for long-term use.
When to Choose the Adhesive Method
The adhesive-bonded method skips the knots entirely, using fabric tape or hot glue to create a smooth, polished edge. This approach is faster, typically taking 20 to 40 minutes, and produces a sleeker appearance that works well for decorative pillows or projects where you plan to add embellishments to the front.
However, adhesive versions have limitations. The glue or tape may weaken over time, especially with handling, and these pillows cannot be machine washed. Use this method when you need a quick project or want a clean canvas for decorations like fabric paint or appliqué designs.
Pro Tip: Choose the fringe method if durability matters. Choose adhesive if you’re short on time or want a smooth surface for decorations.
Gather Your Materials
Having everything ready before you start makes the crafting process smooth and enjoyable. Most supplies are inexpensive and easy to find at craft stores, dollar stores, or even around your home.
Essential Supplies List
You need just a handful of items to create your no-sew heart pillow. The exact quantities depend on how many pillows you plan to make and what size you want.
- Fleece fabric in two matching pieces, at least 9″ x 9″ for a standard pillow
- Sharp fabric scissors for clean cuts
- Chalk or fabric marker for tracing the heart shape
- A heart template or stencil
- Polyester fiberfill for stuffing
- Ruler or measuring tape for accurate spacing
Optional Materials That Add Character
While not required, these extras can elevate your pillow from simple to special.
- Pinking shears to prevent fraying and add decorative zigzag edges
- Dried lavender to mix into stuffing for a calming scent
- Fabric tape or double-sided adhesive sheets for the glued version
- Hot glue gun for stronger bonding
- Contrasting fabric for layered heart designs or monograms
Budget Hack: Use old sweaters, fabric scraps from previous projects, or stuffing from a worn-out pillow to save money and reduce waste.
Cut the Perfect Heart Shape
The foundation of a beautiful pillow is an accurately cut heart shape. Taking your time here prevents problems later and ensures a professional-looking result.
Create and Trace Your Template
Start by drawing a heart shape on paper or printing one from a template. For a standard pillow, aim for a heart that is 6 to 7 inches tall. You can use a silicone mold, cookie cutter, or even a folded piece of paper as a stencil.
Place your template on the fleece and trace around it with chalk or a fabric marker. Use light pressure to avoid scoring the fabric.
Cut Two Matching Hearts
For the most symmetrical result, fold your fleece in half first, place the heart template on the fold, and cut through both layers at once. This technique guarantees perfectly matched halves and eliminates the bottom seam entirely.
If using two separate pieces instead, cut the first heart, then place it on the second piece of fabric and trace around it before cutting. Take care to match the grain of the fabric on both pieces.
Make Fringe Strips the Right Way
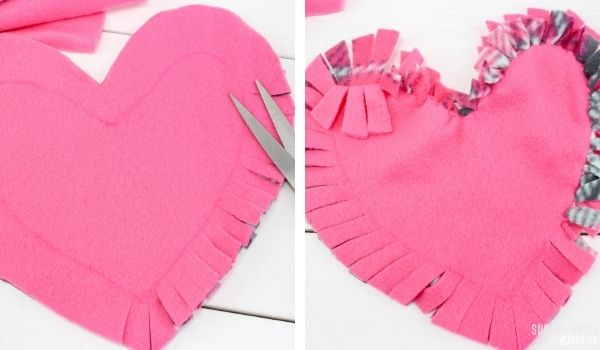
The fringe-tied method requires cutting strips from the outer edge of the heart down to an inner guideline. Getting this step right determines how well your knots hold and how full your pillow looks.
Draw Your Inner Heart Guide
On the top heart piece, draw a smaller heart inside the outer outline, keeping it about 1.5 inches smaller than the edge. This inner line is your cutting boundary. Do not cut past it, or you’ll weaken the structure and risk tearing when you tie the knots.
Cut Even Vertical Strips
Starting at the bottom tip of the heart, cut strips that are ¼ inch to ½ inch wide, extending from the outer edge up to the inner heart line. Work your way around the entire perimeter, alternating sides as you go to maintain balance.
On curved edges, the strips will naturally appear slightly triangular. This is normal and actually helps the pillow maintain its shape when tied.
Beginner Tip: Use ½-inch strips. They’re significantly easier to tie and more durable than narrower strips that tend to break.
Leave Your Stuffing Opening
Stop cutting before you complete the full circle. Leave a 2 to 4 inch section uncut, preferably on one side or near the top. This opening allows you to stuff the pillow before sealing it closed.
Tie Secure Knots That Last
Now comes the satisfying part: transforming loose fringe strips into a sealed pillow. The knot-tying process is simple but requires attention to detail to ensure your pillow holds up over time.
Anchor the Shape First
Begin tying at the top center and bottom center points. Take one strip from the front of the pillow and one from the back directly across from each other. Tie them together using a double knot, just like tying shoelaces.
These center anchor knots establish the overall shape and prevent the pillow from stretching or lopsidedness as you work around the edges.
Work Around the Perimeter
Continue tying opposite pairs of strips all the way around the heart. Pull each knot tight to close gaps and prevent stuffing from escaping later. Rotate the pillow as you go so you can always reach the strips comfortably.
Double-Knot Rule: Always tie each pair twice. Single knots work loose over time, especially with handling.
Stop Before Closing Completely
Leave your 2 to 4 inch stuffing gap open. You’ll insert the filling through this space before tying the final remaining strips.
Stuff and Seal Your Pillow
With the knots tied, you’re ready to bring your pillow to life. Proper stuffing technique ensures your pillow looks full and maintains its shape.
Add the Stuffing
Pull apart clumps of polyester fiberfill to create even distribution. Use your fingers or a blunt tool like a chopstick to push filling into the corners and curves of the heart. For a scented pillow, mix in dried lavender at this stage.
For a 6 to 8 inch heart, use approximately 1 to 2 handfuls of stuffing. Adjust based on your desired firmness.
Adjust for Desired Firmness
For a soft, squishy pillow that invites hugging, use less stuffing. For a plumper, more supportive pillow that holds its shape firmly, pack the filling more densely. Avoid overstuffing, which distorts the heart shape and makes tying the final knots difficult.
Pro Tip: Slightly overstuff your pillow. The filling compresses after tying, so adding a little extra ensures your pillow stays full over time.
Close the Final Opening
Once filled to your satisfaction, tie the remaining strip pairs with tight double knots. Check all knots by gently tugging to ensure they’re secure. Trim any excessively long or uneven fringe for a clean, polished edge. Fluff and reshape the pillow by hand to distribute the filling evenly.
Use Glue or Tape Instead

If you prefer the adhesive method, the process differs slightly but remains straightforward. This approach creates a smooth edge without the textured fringe look.
Prepare Two Heart Pieces
Cut two identical hearts from your chosen fabric, leaving a ½-inch border around the edge for seam allowance. Use pinking shears if available to reduce fraying.
Apply Adhesive Along the Edges
Lay one heart piece with the wrong side facing up. Apply fabric tape or run a thin bead of hot glue along the edge, leaving a 1-inch gap unsealed. Too much glue seeps out and creates stiff spots.
Seal and Stuff Through the Gap
Place the second heart piece on top with right sides facing outward and fabric undersides together. Press firmly to bond the edges. Insert stuffing through the 1-inch opening, then seal it closed with a small piece of fabric tape or another dab of hot glue.
Durability Note: Adhesive versions are not washable and may weaken with heavy use. They’re best suited for decorative purposes or light handling.
Customize Your Heart Pillow
This is where you can let your creativity shine. The no-sew heart pillow offers endless possibilities for personalization.
Select Fabrics That Match Your Style
Classic red or pink fleece works beautifully for Valentine’s Day, but don’t limit yourself. Glitter fleece adds sparkle, sherpa fleece creates extra softness, and patterned prints like polka dots or animals bring personality. For a reversible pillow, use contrasting colors for the front and back.
Add Sensory and Aromatherapy Benefits
Mix dried lavender into the stuffing to create a calming pillow perfect for relaxation, sleep, or anxiety relief. The scent lingers for months and makes this an especially thoughtful gift for teachers, stressed friends, or anyone who could use a comforting touch.
Embellish With Decorations
Before sealing your pillow, consider adding fabric paint for names or messages, iron-on patches for fun symbols, glitter glue for sparkle accents, or adhesive rhinestones for a touch of glamour. These decorations work best on the adhesive method’s smooth surface, but you can also embellish the center of a fringe-tied pillow.
Scale the Size to Your Needs
No-sew heart pillows work in any size. Mini hearts of 4 to 6 inches make adorable party favors or stocking stuffers. Standard 8 to 10 inch pillows suit most gifting situations. Large hearts of 12 inches or more create striking décor pieces or cozy snuggle pillows.
Avoid Common Crafting Mistakes
Even simple projects can go wrong. Here’s how to prevent and fix the most frequent issues.
Fringe Strips That Are Too Narrow
Problem: Strips narrower than ¼ inch tear easily and prove nearly impossible to tie. Fix: Use ½-inch strips and a ruler to maintain consistent width throughout.
Pillows That Lose Their Shape
Problem: The heart looks lopsided or flat after stuffing. Fix: Ensure your inner heart guide is not too large, stuff evenly throughout, and tie knots tightly.
Knots That Come Loose
Problem: Gaps appear and stuffing leaks out over time. Fix: Always double-knot every strip pair and pull each knot tight during the tying process.
Asymmetrical Hearts
Problem: One side appears larger or differently shaped than the other. Fix: Use the folded fabric method where you cut through both layers at once for perfect symmetry.
Adhesive Failure
Problem: Edges peel open after brief use. Fix: Use hot glue instead of tape for a stronger bond, apply thin beads, and press firmly when joining the layers.
Final Check: Wipe off any visible chalk marks before tying your final knots. Some chalk doesn’t disappear after the project is complete.
Creative Uses for Your Finished Pillow
Your no-sew heart pillow isn’t just cute, it’s genuinely useful. Here are the most popular ways to put it to work.
Heartfelt Gifts for Every Occasion
Valentine’s Day is the obvious choice, but these pillows work year-round. Teachers appreciate them, children love them, and partners cherish the handmade effort. Add a handwritten note like “You have my heart” for extra sentiment.
Classroom and Group Craft Projects
The no-sew heart pillow is excellent for developing fine motor skills in children ages 6 and up. Kids practice cutting, following multi-step instructions, and knot-tying while creating something tangible. Teachers use them for holiday parties, scout activities, and Galentine celebrations.
Comfort and Sensory Tools
The soft texture provides sensory comfort for children or adults with anxiety. Scented versions with lavender aid relaxation and sleep. The tactile nature makes them wonderful comfort items for neurodiverse individuals.
Home Décor Accents
Toss these pillows on beds, sofas, or shelves to add a cozy, romantic touch to any room. Large hearts work particularly well as accent pillows that change the feel of a space without overwhelming it.
Care and Maintenance
Proper care extends the life of your handmade pillow significantly.
Cleaning Guidelines
Spot clean only using mild soap and a damp cloth. Air dry flat rather than using heat. Avoid submerging the pillow in water, which damages both knots and adhesive bonds and causes the stuffing to clump.
Proper Storage
Keep your pillow in a cool, dry place away from pets and sharp objects that could snag the fabric. Fluff it occasionally to maintain the shape and prevent the filling from settling in one area.
Frequently Asked Questions About No-Sew Heart Pillows
Can I make a no-sew heart pillow without a pattern?
Yes. You can freehand draw a heart, trace around household items like silicone molds or cookie cutters, or print a template from online. No purchased pattern is required.
How much fabric do I need for one pillow?
A 12×12 inch piece of fabric yields an 8 to 10 inch heart comfortably. Two pieces of this size are sufficient for a standard pillow.
How much stuffing should I use?
For a 6 to 8 inch heart, 1 to 2 handfuls of polyester fiberfill, approximately 1 to 2 cups, provides good fullness. Adjust quantities up for larger pillows.
Can I wash the finished pillow?
No. Both fringe-tied and adhesive methods are spot-clean only. Machine washing damages the knots or adhesive and causes the stuffing to shift or clump.
What age is appropriate for this craft?
Children ages 6 and up can participate with adult supervision for cutting. The tying step helps develop fine motor skills and hand coordination.
Can I make the pillow scented?
Absolutely. Adding dried lavender to the stuffing creates a calming, aromatherapy pillow perfect for sleep or relaxation.
Do I have to use fleece fabric?
Fleece works best for the fringe-tied method because it doesn’t fray and holds knots well. However, you can use cotton, knit fabric, or felt, particularly for the adhesive method.
Final Thoughts on Making Your No-Sew Heart Pillow
The no-sew heart pillow stands as proof that meaningful, beautiful crafts don’t require expensive supplies or advanced skills. With just fleece, scissors, and stuffing, you can create a huggable gift that carries genuine sentiment. The two methods give you flexibility: the fringe-tied version offers durability and tactile appeal, while the adhesive method delivers speed and smooth aesthetics.
This project adapts to any occasion, from Valentine’s Day gifts to classroom activities to cozy home décor. You can customize size, color, scent, and embellishments to match your vision perfectly. The simple knot-tying technique builds real skills, especially for children, making this as educational as it is enjoyable.
Pick your method, gather your materials, and start crafting. Your perfect heart pillow is waiting to be made.


