
Burlap pillows bring warm, natural charm to any space, perfect for farmhouse décor, seasonal displays, or wedding accents. If you have ever wondered how to sew a burlap pillow, you are in the right place. This rugged yet stylish fabric is surprisingly simple to work with once you know the tricks: how to cut without fraying, prevent shedding, and choose the best closure method.
Whether you are a beginner using a no-sew envelope cover or an intermediate crafter installing a hidden zipper, this guide walks you step by step through every technique. You will learn how to prep burlap properly, avoid common mistakes like scorched fabric from ironing, and enhance durability with lining and stabilizing edges.
Prepare Burlap Fabric Correctly
Burlap requires special handling due to its loose jute weave. Taking time to prepare the fabric properly prevents frustration during assembly and extends the life of your finished pillow.
Stabilize Edges Before Cutting
Burlap frays easily because of its coarse, open weave. Before cutting, apply masking tape or clear fabric tape along the perimeter of your fabric piece. This keeps fibers intact during handling and sewing. If you plan to paint or stencil, place cardboard inside the burlap layer to prevent bleed-through and make surface work cleaner.
Cut With Sharp Scissors
Always use sharp fabric scissors on a flat surface. Dull blades tug at the coarse fibers, causing jagged edges. Replace blades frequently because burlap dulls them fast. Cut your pieces one-half inch larger than the final size to allow for seam allowances. For example, for a 14×14 inch pillow insert, cut burlap to 15×15 inches.
Press With Caution
Never iron burlap directly. Use a low heat setting and always place a pressing cloth like cotton muslin between the iron and fabric. Alternatively, press from the reverse side to avoid scorching the natural fibers. Lightly misting the back with water before pressing helps remove wrinkles and pre-shrink slightly, reducing future shedding.
Choose the Right Pillow Construction Method
Several construction styles exist, each suited to different skill levels and end uses. Select the method that matches your experience and desired outcome.
No-Sew Envelope Cover
This method is perfect for beginners or quick seasonal swaps because it slides over an existing pillow insert with no machine required.
Steps for envelope cover:
1. Cut burlap four to five inches wider than your pillow width.
2. Fold one long edge one-half inch inward and secure with hot glue or hand stitching.
3. On the opposite side, cut a diagonal notch just past the corner to allow clean folding.
4. Overlap the second flap behind the first to create a closure.
5. Optional: Sew both sides with a straight stitch for added durability.
Slide in your pillow form and the overlapping back hides the insert perfectly. Use red or off-white cotton lining on the inside flap for a polished look when folded.
Fully Sewn Pillow With Stuffing
Make a custom-sized pillow from scratch using just two burlap panels and polyfill.
Steps for sewn pillow:
1. Cut two identical rectangles, such as nine by 13 inches.
2. Place them right sides together.
3. Pin around all edges, leaving one short end open.
4. Sew along three sides using a 3.0 mm stitch length, backstitching at start and end.
5. Turn right side out using a knitting needle or chopstick to push out corners.
6. Stuff firmly with polyfill, avoiding overstuffing.
7. Fold raw edges inward and hand-stitch closed with a ladder invisible stitch.
This method works best for outdoor throw pillows when using UV-resistant polyfill and weather-safe fabric.
Zipped Slipcover Pillow
This version features a concealed zipper for removable covers, ideal for long-term use and easy cleaning.
Steps for zipper installation:
1. Cut two burlap and two lining pieces to pillow size plus one-half inch per side.
2. Place one burlap and one lining piece right sides together along the bottom edge.
3. Sew with a basting stitch longest setting and press seam open.
4. Position a zipper face-down over the seam, aligning teeth with stitching line.
5. Use a zipper foot to sew close to the teeth.
6. Rip out basting stitches beneath the zipper to open the seam.
7. Repeat on the other half, then sew remaining three sides with right sides together.
Watch a zipper tutorial video if you are new to this method because it makes installation much easier.
Burlap Ring Bearer Pillow
Create a small, elegant pillow for weddings or special occasions.
Steps for ring pillow:
1. Cut one nine by 13 inch piece of burlap.
2. Fold all edges one-half inch inward and press or pin.
3. Fold in half lengthwise right sides together.
4. Sew along one long edge and one short end.
5. Turn right side out and lightly stuff with polyfill.
6. Hand-stitch the open end closed.
7. Thread jute twine through a large needle and insert one inch apart in the center to form a loop.
8. Tie a knot and finish with a twine bow.
Add a stenciled monogram or tiny fabric flower for personalization.
No-Seam Sack Conversion
Turn an old burlap bean bag into a rustic pillow, great for kids or fast crafts.
Steps for sack conversion:
1. Cut open the sack and remove beans.
2. Insert a clean pillow form with non-print side facing out this becomes the back.
3. Thread twine onto a yarn needle and knot one end.
4. Use a whip stitch to sew three sides shut.
5. Insert the pillow fully.
6. Close the last side with the same stitch.
Imperfect stitches add character, so embrace the handmade look.
Decorate With Ribbon, Paint, or Stencils
Add personality and color to your burlap pillow with these decorative techniques.
Weave a Red Ribbon Heart
Create a standout focal point with woven ribbon.
Steps for ribbon heart:
1. Trace a heart shape onto burlap using a template.
2. Mark tick points every inch along the outline.
3. Thread seven-eighths inch red grosgrain ribbon through a size 16 tapestry needle.
4. Start at the bottom and weave through tick marks.
5. Wiggle the needle gently to pass through the coarse weave.
6. Leave 12 inches of ribbon at both ends and tie into a bow after assembly.
7. Tape ribbon tails to the heart center before sewing to avoid stitching into them.
Use gold, black, or burlap-toned twine for different themes.
Paint or Stencil Designs
Add color and personality with acrylics or outdoor-grade fabric paint.
Steps for painting:
1. Place cardboard inside the burlap to block paint bleed.
2. Use painter’s tape to create stripes, chevrons, or geometric patterns.
3. Dab acrylic paint with a foam brush for even coverage.
4. For monograms, print letters on cardstock, cut out to make a stencil, tape in place, and dab paint through openings.
5. Let dry six to eight hours before handling.
6. For outdoor use, apply a fabric sealant to protect against UV fading.
Stamp fruit motifs like lemons or blueberries using the end of a foam brush.
Reinforce Seams and Prevent Fraying
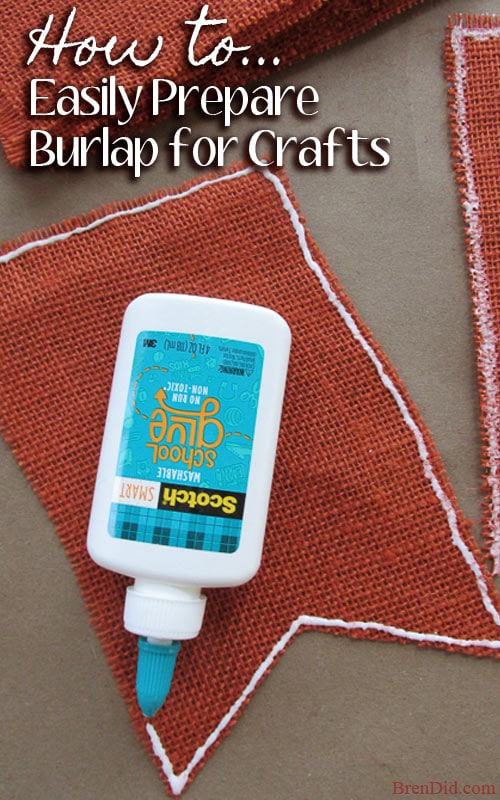
Raw burlap edges unravel quickly. Apply a thin line of fabric glue or clear tape along each edge before sewing to hold fibers in place. Alternatively, stitch a narrow zigzag or overlock stitch around all raw edges if your machine allows.
Use a walking foot if your sewing machine has one because it feeds thick, slippery layers evenly and prevents shifting. Always backstitch at the beginning and end of each seam because burlap coarse texture can cause stitches to pop under stress without secure anchoring.
Choose the Best Closure Type
Select the closure that matches your skill level and intended use.
| Feature | Envelope Flap | Concealed Zipper |
|---|---|---|
| Skill Level | Beginner | Intermediate |
| Washability | Spot clean only | Cover removable |
| Reusability | High easy swaps | High |
| Tools Needed | Scissors, glue | Sewing machine, zipper foot |
| Best Use | Seasonal décor | Daily-use pillows |
Choose envelope style for fast, no-machine projects. Pick zipper for durability and washable covers.
Add Lining for Durability and Opacity
Burlap is semi-transparent. Without lining, stuffing or the inner pillow shows through. A lining also reduces shedding, adds structure, extends lifespan, and enables reversible designs.
Best lining fabrics include cotton broadcloth for softness and breathability, cotton canvas for sturdiness and shape retention, and red or off-white cotton for classic contrast in farmhouse style.
Add lining by cutting fabric to match burlap size, placing right sides together with burlap, and sewing around three sides for open-top envelopes or all four for zipped covers. Turn right side out and press lightly. Use red lining on the back of a heart pillow for a pop of color when flipped.
Customize Shape, Color, and Theme
Try popular variations like hearts for Valentine is Day or weddings, monograms for personalized gifts, fruit motifs for kitchen or patio, stripes or polka dots for modern rustic, and holiday themes like pumpkins in fall or trees in winter.
Mix and match fabrics by pairing burlap front with gingham, plaid, or faux fur back. Use black-and-white ribbon for vintage feel or make reversible pillows with two different prints. Add piping, lace, or jute braid along edges for a polished finish.
Follow Essential Sewing Best Practices
Set your machine correctly for burlap projects. Use a stitch length of 3.0 to 3.5 mm because longer stitches reduce fabric stress. Choose a universal size 90/14 needle or denim needle. Use a walking foot or standard foot with a zipper foot for zippers. Use all-purpose polyester thread for strength.
Replace needles after every two to three projects because burlap dulls them fast. For hand-sewing, use a tapestry needle size 16 for smooth passage through the weave. Wax your thread by running it through beeswax to reduce tangling. Use ladder stitch for invisible closures on stuffed pillows.
Maintain and Store Properly
Clean burlap pillows by spot cleaning only with a damp cloth and mild detergent. Never machine wash because burlap can disintegrate or shrink. Air dry flat away from direct sunlight and use a soft brush to remove dust and loose fibers.
Store in a cool, dry place. Fold or roll loosely in a breathable cotton bag. Avoid plastic bins because trapped moisture can lead to mold. With proper care, burlap pillows last two to five years as decorative pieces.
Pick the Right Project for Your Skill Level
| Project | Skill | Time | Best For |
|---|---|---|---|
| No-Sew Envelope | Beginner | 20-40 min | Fast décor swaps |
| Fully Sewn Pillow | Beginner | 1-2 hrs | Custom sizes |
| Zipped Cover | Intermediate | 1-1.5 hrs | Washable use |
| Painted Outdoor | Intermediate | 2-3 hrs | Personalized art |
| Ring Pillow | Intermediate | 1-1.5 hrs | Weddings |
| Ribbon Heart | Intermediate | 1.5-2 hrs | Gifts, décor |
All projects are adaptable, so start simple and build confidence with each pillow.
Frequently Asked Questions About Sewing a Burlap Pillow
What is the best way to prevent burlap from fraying when cutting?
Apply masking tape or clear fabric tape along the perimeter before cutting. Use sharp fabric scissors and cut on a flat surface. Cut slightly larger than needed to account for fraying during construction.
Can I use a regular sewing needle for burlap?
Use a universal size 90/14 needle or a denim needle because burlap is coarse and quickly dulls standard needles. Replace needles after every two to three projects.
How do I keep paint from bleeding through burlap?
Place cardboard inside the burlap layers before painting. Use painter is tape for clean lines and apply paint with a foam brush using dabbing motions rather than sweeping strokes.
Is burlap safe for outdoor pillows?
Burlap is not naturally weather-resistant. Use outdoor-grade fabric paint and apply a UV-resistant fabric sealant. Spot clean only and store indoors when not in use.
What closure method is easiest for beginners?
The envelope-style cover is easiest for beginners because it requires no machine. Simply cut burlap larger than the pillow, fold and secure edges with hot glue or hand stitching, and slide the insert in place.
Key Takeaways for Sewing Burlap Pillows
Now that you know how to sew a burlap pillow, you can craft rustic, eye-catching décor for any occasion. Remember to prepare the fabric first by stabilizing edges and pressing with low heat to prevent damage. Use lining to prevent show-through and extend the life of your pillow.
Whether you are weaving a red ribbon heart, stenciling a monogram, or sewing a ring bearer pillow, embrace the natural imperfections because frayed edges and visible stitches are part of burlap is charm. With the right tools, techniques, and a little creativity, your handmade burlap pillow will add warmth and character to your home for years to come. Grab your scissors, fire up your sewing machine, and start crafting today.



