
Adding a zipper to a pillow isn’t just a finishing touch, it’s a game-changer for your home decor projects. Whether you’re making decorative throw pillows, outdoor cushions, or custom upholstery covers, installing a zipper allows for easy removal, machine washing, and seasonal style swaps. Without a zipper, your beautiful pillow becomes a permanent, hard-to-clean item. This guide walks you through every method, from beginner-friendly centered zippers to advanced invisible and cording-integrated techniques, so your result looks store-bought, not handmade.
Choose the Right Zipper Type
The type of zipper you choose determines both function and appearance. Selecting the right one for your project ensures professional results and long-lasting durability.
Match Zipper to Design Goal
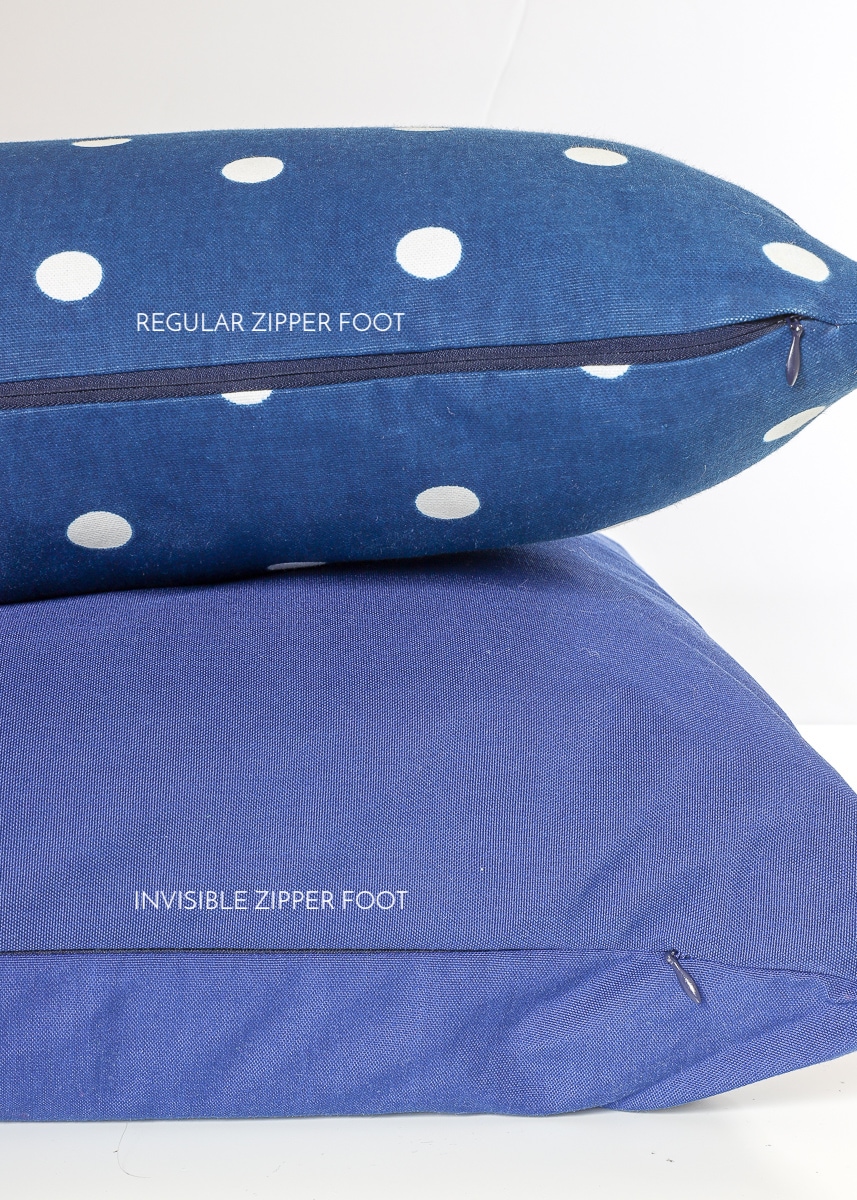
Invisible zippers disappear into the seam, ideal for high-end or modern pillows where clean lines matter. They require a special sewing foot but deliver a seamless look. Standard nylon or metal zippers are durable and easy to install, perfect for casual, industrial, or outdoor styles. If you’re working with thick fabrics like velvet or faux leather, consider wider-tape zippers, often used in handbags, as they’re sturdier and easier to sew with a regular presser foot.
Cut and Secure Oversized Zippers
Most pillows use 12 to 24 inch zippers. If your zipper is too long, trim it carefully past the last tooth. Then reinforce the new end by stitching a bar tack, which is back-and-forth stitching, or hand-sew a few strong stitches across the tape. Never leave a cut zipper end unprotected because it will unravel. Use matching or contrasting thread depending on whether you want the zipper hidden or featured.
Position for Easy Access
Place the zipper along the bottom edge for reversible pillows since it stays hidden when the pillow is in use. For decorative designs, consider side or diagonal placement, which adds visual interest but requires more precise alignment. Always ensure the pull tab faces upward during installation so it’s accessible after sewing.
Prepare Fabric and Pillow Form
Proper preparation prevents mistakes during assembly and ensures a professional finish. Taking time here saves frustration later.
Cut Fabric With Correct Seam Allowance
Start by measuring your pillow form. For an 18-inch square insert, cut two 19-inch squares, adding half-inch seam allowance on each side. Use 5/8 inch for thick fabrics like denim or upholstery material to prevent a tight fit. If the form is soft and forgiving like synthetic fiberfill, you can skip seam allowance for a snug, overstuffed look. For reversible or quilted pillows, pre-wash fabric to avoid shrinkage later.
Use Clips Instead of Pins Near Zippers
Pins can snag or distort fabric, especially near zipper teeth. Clover Wonder Clips hold layers securely without shifting and are safer to sew over. They’re ideal for keeping zipper tape aligned with the seam line. For invisible zippers, pins are acceptable before pressing, but clips reduce slippage during stitching.
Press Seams as You Go
Pressing isn’t optional, it’s essential. After every seam, use an iron and pressing cloth to flatten the fabric. This ensures crisp edges, accurate alignment, and professional results. For synthetic fabrics, use low heat to avoid melting. Pressing the seam open before attaching the zipper makes it easier to stitch close to the teeth.
Install a Centered Zipper (Beginner Method)
The centered zipper method is the most common approach and perfect for beginners. It creates a clean, reversible cover with minimal specialized tools.
Mark and Baste the Zipper Zone
Place fabric pieces right sides together. On the bottom edge, mark 2.5 inches from each end with a fabric pen. Sew a half-inch seam from each end to the mark, using a basting stitch in the center gap. Backstitch at the start and end. This temporary seam holds the fabric while leaving space for the zipper.
Attach Zipper With a Zipper Foot
Place the zipper face down on the basted seam, teeth aligned with the seam line. Center it between the marks and secure with clips. Use a zipper foot to stitch close to the teeth, about half-inch away. When you reach the pull tab, stop with the needle down, lift the presser foot, slide the tab out of the way, then continue sewing. Repeat for the other side. Remove basting stitches afterward with a seam ripper.
Create a Hidden Fabric Flap
The gap between your stitching and the zipper teeth forms a natural fabric flap that conceals the pull. This makes the zipper functional yet discreet. After sewing both sides, press the seam flat. When the pillow is turned right side out, the zipper blends into the edge.
Sew an Invisible Zipper (Pro Finish)
The invisible zipper technique delivers a seamless, high-end finish that hides the zipper completely within the seam. This method requires practice but produces stunning results.
Align Coil With Raw Edge
Open the zipper halfway. With right sides together, align the coil, not the tape, with the raw edge of one fabric piece. Pin or clip in place. Use an invisible zipper foot, which wraps around the coil, letting the needle stitch directly beside it. Sew slowly, keeping the coil centered under the foot.
Sew Both Sides Before Closing
After attaching the first side, fold the zipper away and align the second fabric piece with the other coil. Sew in place. Once both sides are attached, press the seams open so the zipper nestles into the fold. The zipper should now be hidden when the fabric lies flat.
Complete the Pillow Enclosure
With the zipper still open, fold the pillow cover right sides together and sew the remaining three sides with a half-inch seam. Trim corners at 45 degrees to reduce bulk. Turn right side out through the zipper opening. Insert the form and zip closed. The result is a seamless, high-end finish with no visible stitching.
Build a Hidden Flap (Fully Concealed Zipper)
The hidden flap method provides maximum concealment and added durability. It’s ideal for decorative or gift pillows where you want zero visibility of the zipper.
Cut and Fold the Fabric Flap
For maximum concealment, cut a four-inch tall strip of fabric, same width as the back panel. Fold it wrong sides together and press. This folded edge will become the bottom of the pillow. This flap hides the entire zipper behind a clean fabric layer.
Sew the Four-Layer Sandwich
Place the top back panel right side up. Add the folded flap, aligning raw edges. Place the zipper face down, teeth aligned with the flap’s folded edge. Sew through all four layers with a quarter-inch seam. Repeat for the bottom back panel, sewing it to the other side of the zipper. Press and topstitch to secure.
Attach Front Panel and Finish
Trim the back assembly to match the front. Pin the front fabric to the back, right sides together. Sew around all edges with a half-inch seam. Turn right side out, insert the form, and zip closed. The zipper is completely hidden, perfect for decorative or gift pillows.
Add a Zipper With Cording (Luxury Detail)
Adding cording creates a tailored, high-end look that frames your pillow like a designer piece. This method combines decorative piping with functional closure.
Apply Piping Before Zipper
Cut cording to length and use a cording or zipper foot to sew it around the entire edge of the front fabric. Clip the braid at corners and ease the fabric to turn smoothly. This adds a tailored look. Then finish all raw edges with a serger or zigzag stitch.
Install Zipper Over Cording
Mark a 2-inch gap on the bottom edge. Sew from each end to the mark, leaving the center open. Place the zipper face down over the cording, teeth aligned with the seam. Sew into place, keeping the pull tab up and partially open. Attach the second side, then fold the back fabric down to create a clean placket along the cording.
Complete the Enclosure
With right sides together, sew the remaining three sides. Turn right side out through the zipper. The cording frames the pillow like a designer piece, ideal for statement decor.
Avoid Common Zipper Mistakes
Learning what not to do prevents frustration and wasted materials. These mistakes catch many beginners, but they’re easily avoided.
Never Sew With Zipper Fully Closed
If you forget to open the zipper halfway before sewing the final three sides, you won’t be able to turn the pillow right side out. This is the number one mistake. Always leave it half open because it creates a hole for turning. After sewing, use a corner pusher or chopstick to fully extend the corners.
Prevent Puckering and Misalignment
Puckering happens when fabric shifts or tension is too tight. Use Wonder Clips, not pins, and check alignment at multiple points. Press the seam open before attaching the zipper. If using thick fabrics, reduce bulk by trimming corners at 45 degrees, but never cut the stitches.
Fix a Jammed Pull or Sewn-In Teeth
If the zipper won’t close, check if fabric is caught in the teeth. Never force it. Use a seam ripper to carefully remove stitches if needed. To avoid sewing over teeth, backstitch only at the ends, not through the center. If the pull jams during sewing, stop with the needle down, lift the foot, and reposition the tab.
Final Assembly and Care Tips
The final steps determine whether your pillow looks professional or homemade. Follow this checklist for perfect results every time.
Follow the Turn-Right-Side-Out Checklist
Open the zipper halfway. Sew remaining three sides with half-inch seam. Trim corners diagonally at 45 degrees. Turn right side out using a corner pusher. Insert pillow form. Zip closed. Fluff and adjust.
Skipping any step, especially leaving the zipper closed, ruins the project. Take your time because pressing and clipping make all the difference.
Maintain Your Zippered Pillow
Remove the form before washing. Machine wash the cover in cold water on gentle cycle. Air dry or tumble dry low. For stiff zippers, apply zipper wax or graphite, never oil. Pre-wash fabric before sewing to prevent shrinkage. Damaged zippers can be replaced by ripping out the old one and reinstalling using the same method.
Customize With Contrast and Texture
Make your pillow stand out. Use a bright-colored zipper for a modern pop, or contrast thread for topstitching. Combine textures, like velvet front and cotton back, or add diagonal seams for a contemporary look. Reversible covers double your styling options.
Frequently Asked Questions About Putting a Zipper in a Pillow
What type of zipper is best for beginners?
A standard nylon or metal zipper with a centered placement is best for beginners. These zippers are durable, easy to find, and work well with a standard zipper foot. The centered zipper method along the bottom edge requires no special invisible zipper foot and produces reliable results.
How do I know what size zipper to buy?
Measure your pillow form and add the seam allowance. For an 18-inch pillow, a 12 to 14-inch zipper works well. For larger pillows, use 18 to 24-inch zippers. It’s better to buy a longer zipper and trim it down because zippers that are too short won’t close properly.
Can I wash a pillow with a zipper in the washing machine?
Yes, but always remove the pillow form first. Machine wash the cover in cold water on gentle cycle. Air dry or tumble dry on low heat. This protects the inner form and prevents damage to the zipper teeth.
Why won’t my zipper close after sewing?
Fabric is likely caught in the teeth. Use a seam ripper to carefully check the seam line and remove any trapped fabric. Always backstitch only at the ends of zipper seams and avoid sewing directly over the teeth.
How do I make the zipper completely invisible?
Use an invisible zipper with the invisible zipper foot technique. The coil sews directly into the seam, hiding both the zipper tape and teeth. Press the seams open after attaching and the zipper becomes invisible when the pillow is right side up.
Key Takeaways for Putting a Zipper in a Pillow
Installing a zipper in a pillow is a foundational sewing skill that elevates any home decor project. Start with the centered zipper method if you’re a beginner, then progress to invisible zippers and cording techniques as your skills develop. The most critical step is opening the zipper halfway before sewing the final three sides, otherwise you won’t be able to turn the pillow right side out.
Choose your zipper type based on your design goals: invisible zippers for seamless finishes, standard zippers for durability and ease, and cording for luxury detail. Always prepare your fabric with proper seam allowances, use Wonder Clips instead of pins near zipper teeth, and press every seam as you go. With the right tools, precise measurements, and attention to detail, you can create durable, washable, and beautiful pillows that last for years.



