
Sewing a pillowcase is one of the most beginner-friendly projects you can tackle, and it delivers real, usable results in under 30 minutes. Whether you’re making bedding for your own bed, a thoughtful gift for a friend, or contributing to a charity drive like the One Million Pillowcase Challenge, knowing how to sew a pillowcase opens the door to creativity, customization, and confidence in your sewing skills.
This guide walks you through every essential step, from choosing the right fabric and cutting precise pieces to selecting the best method for your skill level and finishing with clean seams. You’ll learn how to avoid common mistakes like misaligned prints or bulky corners, and discover pro tips for a polished look that will impress everyone who sees your finished pillowcase.
Choose the Right Pillowcase Size for Your Pillow
Match Your Pillow Dimensions
Pillow sizes vary by brand and type. To ensure a snug yet easy fit, make your finished pillowcase 1 inch larger than the insert on both length and width. This allows room for fluffiness without sagging or tight stretching.
Use these standard U.S. pillow dimensions as a guide. Standard pillows measure 20 × 26 inches, queen pillows measure 20 × 30 inches, and king pillows measure 20 × 36 inches. For recommended finished case sizes, add 1 inch to each dimension.
Pro Tip: Always measure your actual pillow before cutting fabric, as some memory foam or luxury pillows run thicker or longer than standard sizes.
Plan for Special Pillow Sizes
Decorative throw pillows typically measure 18 inches. Make the cover 17 × 17 inches for a slightly overstuffed look. Deep-gusset or Euro pillows require adding 2 to 3 inches to width for full coverage. Kids’ pillows often measure 13 × 18 inches, so adjust your cutting dimensions accordingly.
Pick the Right Fabric and Calculate Yardage
Best Fabrics for Pillowcases
The fabric you choose affects durability, comfort, and ease of sewing. Here are the top recommendations.
Quilting cotton works best for beginners because it is stable, has wide print selections, and is easy to cut and sew. Linen offers breathable elegance and ages beautifully, making it ideal for beginner+ skill levels. Flannel provides soft, cozy warmth perfect for winter use, but you must pre-wash it to prevent shrinkage. Cotton blends resist wrinkles and hold their shape after washing, suitable for all skill levels. Minky and fleece feel ultra-soft and work great for kids because they do not fray.
Avoid loosely woven fabrics that fray easily unless you plan to use French seams or serged edges.
Calculate How Much Fabric You Need
Most pillowcases use less than 1 yard of fabric. However, if you’re working with directional prints like stripes, animals, or text, you will need extra yardage to align patterns correctly.
For one pillowcase using non-directional fabric, purchase 1 yard. For one pillowcase using directional fabric, purchase 1.5 yards to ensure pattern matching across layers. For two matching cases, you will need 1.25 to 1.75 yards depending on width and design.
Selvage Tip: Trim one-half inch off each side of quilting cotton to get a clean 43-inch usable width.
Gather Essential Sewing Tools
Must-Have Supplies for Pillowcase Sewing
You do not need fancy equipment to sew a pillowcase. Just gather these basics.
A sewing machine with adjustable stitch length handles the construction. Cotton-wrapped polyester thread is stronger than all-cotton thread. Use scissors or a rotary cutter with a self-healing mat and clear ruler for precise cutting. Pins or Wonder Clips hold layers together, with clips working better on thick seams. An iron and ironing board are essential because pressing is key to professional results. A measuring tape or seam gauge helps with accuracy. Keep a seam ripper nearby for small corrections.
Needle Guide: Use an 80/12 universal needle for cotton and linen. Use a 75/11 ballpoint needle for knits or stretchy fabrics. Use a microtex needle for silk or satin because its sharp point handles slippery fabrics better.
Cut Fabric to the Correct Dimensions
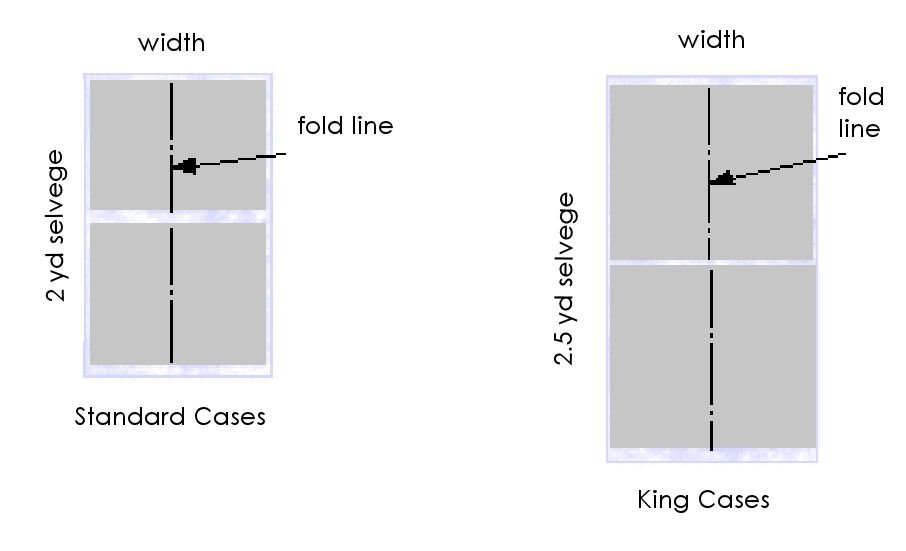
Simple Fold-Over Hem Method Cutting
This is the fastest way to make a pillowcase and perfect for beginners. For a 21″ × 27″ finished case that fits a 20″ × 26″ pillow, cut two rectangles at 21 inches wide by 29.5 inches long. The 3.5-inch fold creates a clean tunnel for easy pillow insertion while accounting for seam allowances on the sides and bottom.
French Seam with Cuff Cutting
For directional prints or a luxury interior finish, use this method. Cut the body fabric at 27 × 43 inches for standard or 36 × 43 inches for king size. Cut the cuff fabric at 11 × 43 inches. Cut accent trim at 2.5 × 43 inches. All pieces should be cut selvage-to-selvage, then trimmed to 43 inches usable width.
Envelope-Back Design Cutting
This design uses four pieces for easy access without zippers. For a standard pillow, cut the main front at 21.5 × 23 inches, the back panel at 35 × 23 inches, the border cuff at 15 × 23 inches, and accent trim at 2.5 × 23 inches. The back panel length equals the front length plus 14 inches for a 7-inch overlap on each side.
Sew a Simple Fold-Over Hem Pillowcase
Fastest Method for Beginners
This method takes about 15 minutes and works perfectly for first-time sewers or quick gifts.
Step 1 involves preparing the hem. Take one cut piece and fold 3.5 inches toward the wrong side on one long edge. Press with an iron. Repeat for the second piece. This becomes the opening with no raw edges exposed.
Step 2 requires stitching the hem. Sew along the inner edge of the fold, 3.5 inches from the raw edge. Use a straight stitch and backstitch at both ends. This creates a clean tunnel for inserting the pillow.
Step 3 is joining the two pieces. Place both pieces right sides together, aligning the three unhemmed edges along the sides and bottom. Pin or clip in place.
Step 4 involves sewing the body. Using a one-half inch seam allowance, sew around the three open sides. Backstitch at the start and end. Pro Tip: Trim diagonal corners before turning to reduce bulk.
Step 5 finishes the pillowcase. Turn right side out. Use a chopstick to gently push out corners. Press flat with an iron. Insert your pillow. You have made a functional, washable pillowcase in minutes.
Use the Burrito Method for French Seams
Enclose All Seams for a Professional Finish
This method is ideal for directional prints and creating professional-looking gifts. All raw edges stay hidden inside the construction.
Step 1 creates the burrito roll. Place main and cuff fabrics right sides together along one long edge. Pin and start rolling the main fabric tightly into a tube, leaving only the pinned edge exposed. Fold the free edge of the cuff over the roll, aligning all layers. Pin and sew a one-half inch seam along the exposed edge, but do not stitch into the roll itself.
Step 2 unrolls and opens the fabric. Unroll the fabric and turn right side out. The seam will be fully enclosed. Press flat.
Step 3 sews the bottom. Fold the case at the short end, wrong sides together. Sew with a one-fourth inch seam allowance. Press open. Reinforce with a second three-eighths inch seam.
Step 4 finishes the French seam on the side. Fold the open side wrong sides together. Sew a one-fourth inch seam to enclose raw edges. Turn right side out and press. Sew again with a three-eighths inch seam allowance, fully enclosing the first seam. The result is a smooth, durable interior with no serging needed.
Make a Zippered Pillowcase Cover

Reversible and Washable Cover
This approach works great for decorative pillows or luxury bedding where you want the cover to be removable for washing.
Step 1 cuts the fabric. For an 18-inch square insert, cut two squares at 19 × 19 inches, which adds the one-half inch seam allowance on each side. Purchase a zipper that is 3 to 5 inches shorter than the pillow side, such as a 14-inch zipper for an 18-inch pillow.
Step 2 bastes the bottom seam. With right sides together, baste the bottom edge of both pieces but leave one-half inch unsewn at corners. Press the seam open.
Step 3 attaches the zipper. Open the zipper. Pin the right side of the zipper tape to the wrong side of the basted seam. Center the teeth over the seam line. Mark where stitching should stop to avoid sewing into the zipper coil.
Step 4 topstitches in place. Using a zipper foot, topstitch close to the coil from the right side. Repeat on the other side of the zipper.
Step 5 removes the basting. Carefully remove the basting stitches between the two topstitched lines.
Step 6 completes the final assembly. Realign the fabric so right sides are together. Pin around all four sides, matching the bottom edges at the gap. Sew the perimeter with a one-half inch seam, overlapping the basted area.
Critical Warning: Unzip the zipper completely before sewing the final closure, or you will trap it inside and ruin your project.
Step 7 finishes the pillowcase. Clip corners if needed. Turn right side out. Press. Design Tip: Make the cover 2 inches smaller than the insert for a plump, overstuffed look.
Try the Envelope-Back Design
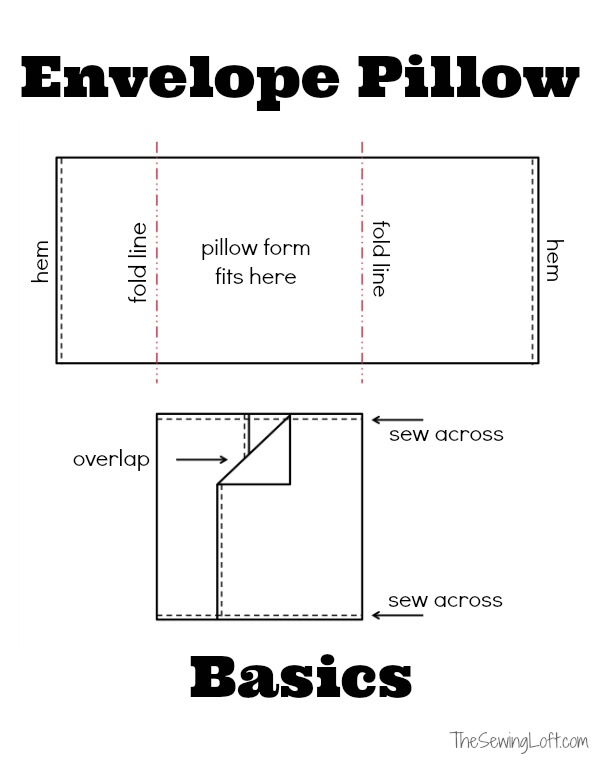
No Zipper Required for Easy Access
This design is perfect for guest rooms or kids’ beds because the cover removes easily for washing.
Step 1 hems the back panel. Take the larger back piece and fold one long edge one-half inch to the wrong side. Fold one-half inch again. Stitch three-eighths inch from the edge.
Step 2 creates the overlap. Fold 6 inches of fabric back onto itself to form the envelope flap.
Step 3 assembles the layers. Place the back piece right side down. Place the front piece right side up on top. The wrong sides face each other, which is intentional for the French seam method.
Step 4 completes the first French seam. Sew three sides with a one-half inch seam allowance. Trim the seam to one-fourth inch and clip corners.
Step 5 finishes the second French seam. Turn wrong side out and press flat. Sew again with a one-half inch seam allowance, enclosing the first seam.
Step 6 gives the final press. Turn right side out. Slide the pillow in through the envelope opening. The advantage here is no special tools are needed, and it is easy to remove and wash.
Finish Seams Like a Pro
Prevent Fraying and Add Durability
Raw edges weaken over time. Choose one of these finishes to make your pillowcase last.
French seams work best for lightweight fabrics. First, sew a one-fourth inch seam with right sides together. Trim to one-eighth inch and press flat. Fold so wrong sides together, enclosing the seam. Press, then sew a three-eighths inch seam. This fully encloses all raw edges.
A serger or overlock finishes edges quickly and professionally. It trims and finishes edges in one pass. Use this when available, especially for knits or flannel.
A zig-zag stitch serves as a good substitute for a serger. Use a narrow zig-zag along raw edges to prevent fraying on cotton.
Pinking shears cut a zig-zag edge that reduces fraying. This works best for low-stress seams or temporary use.
Bound edges use bias tape for a decorative, durable finish. This is great for kids’ cases or themed designs.
Customize Your Pillowcase
Add Style and Personality
Once you have mastered the basics, try these upgrades to make your pillowcase unique.
Reversible cases use two different fabrics, one for each side. Flip the case for a seasonal change without buying new pillows.
Contrasting cuffs add a pop of color with a 3 to 4-inch cuff in complementary fabric.
Embellishments take your pillowcase to the next level. Add appliques like hearts, stars, or initials. Try embroidery with a monogram, name, or date. Sew lace trim along the hem edge for vintage flair. Attach pom-poms or tassels to corners for playful detail.
Themed designs work well for specific needs. Kids love dinosaur, unicorn, or space themes. Seasonal options include florals for spring, plaids for fall, and snowflakes for winter. Luxury versions feature silk piping, satin stitching, or monogramming.
Avoid Common Mistakes
Fix Problems Before They Happen
Fabric puckering happens when you skip pressing or use the wrong needle. Use an 80/12 needle for cotton and press every seam thoroughly.
Misaligned seams result from insufficient pinning. Pin every 2 to 3 inches and match notches carefully.
Bulky corners come from leaving too much fabric at corners. Trim diagonally before turning and press well.
A hem that is too tight happens when you forget the 3.5-inch fold measurement. Double-check your measurements and adjust for thick pillows.
Cuff twisting occurs when layers shift during sewing. Pin at quarter points and baste before final sewing.
Print upside down ruins directional fabrics. Label the “top” on directional fabric before cutting.
Golden Rule: Pre-wash all fabric to prevent shrinkage after sewing.
Final Tips for Pillowcase Success
Keys to Professional Results
Press every seam. It makes the biggest difference in appearance.
Use quality thread. Cotton-wrapped polyester resists breaking better than all-cotton.
Label fabric pieces, especially when using multiple prints.
Test your stitch length on fabric scraps first before sewing the actual pillowcase.
Store extra fabric from your project. Use it for matching future repairs.
Sewing a pillowcase is not just practical. It is empowering. With this guide, you now have everything you need to create custom, long-lasting cases that reflect your style and skill. Whether you are making one for your bed or a hundred for charity, each stitch brings you closer to sewing mastery.
Now go cut, sew, and sleep easy on something you made yourself.
Frequently Asked Questions About Sewing Pillowcases
What is the easiest way to sew a pillowcase for beginners?
The fold-over hem method is the easiest approach for beginners. It uses two identical rectangles, folds one edge to create an opening, and sews three sides together. This method takes about 15 minutes and requires only basic straight stitches.
How much fabric do I need for one pillowcase?
You need approximately 1 yard of fabric for one standard pillowcase using non-directional prints. If using directional prints that require pattern matching, purchase 1.5 yards. For a pillowcase with a contrasting cuff, add one-third yard extra.
What is the best fabric for a beginner pillowcase project?
Quilting cotton is the best fabric for beginners. It is stable, easy to cut and sew, comes in wide print selections, and resists fraying. It also washes well and lasts for years with proper care.
How do I make sure my pillowcase fits my pillow correctly?
Measure your actual pillow before cutting fabric. Add 1 inch to both the length and width of your pillow dimensions for the finished pillowcase size. This allows room for fluffiness without the case sagging or stretching too tightly.
What is the difference between French seams and regular seams?
French seams enclose all raw edges inside the pillowcase for a clean interior that never frays. Regular seams leave raw edges visible on the inside. French seams take longer but create a more professional, durable finish, especially for lightweight fabrics.
Key Takeaways for How to Sew a Pillowcase
Sewing a pillowcase is an achievable beginner project that produces useful results in 15 to 45 minutes depending on the method chosen. The fold-over hem technique works best for starting out, while French seam methods create professional-quality finishes for gifts or directional prints. Always pre-wash fabric before cutting, press every seam for polished results, and choose quilting cotton for the easiest sewing experience. With your new skills, you can create custom pillowcases in any fabric, color, or style to match your home decor or give as thoughtful handmade gifts.



