
Nothing ruins a beautifully sewn pillow cover like a limp, overpriced store-bought insert. Too small, too flat, or just plain expensive, off-the-shelf options rarely deliver the plump, custom-tailored look you want. The solution is making your own throw pillow insert. With just a few basic materials and simple techniques, you can create a perfectly sized, luxuriously full insert for a fraction of the retail cost, often under $8, with some methods costing only $3.
Whether you are a seasoned sewer or a complete beginner, this guide walks you through every method. You will learn how to calculate exact sizes, choose the best fabric and filling, stuff for maximum fullness, and even repurpose old pillows to save money and reduce waste. From poly-fil to feather inserts, you will get professional results without the price tag.
Choose the Right Fabric for Your Insert
The fabric casing is the foundation of your insert. Since it holds constant pressure from stuffing, you need strong, tightly woven materials that resist fraying and tearing.
Pick a Durable, Tightly Woven Base
These fabrics work best for DIY inserts.
Poly-cotton lining fabric is lightweight, easy to sew, and ideal for beginners.
Canvas or drop cloth fabric is heavy-duty, inexpensive, and perfect for structured, long-lasting inserts.
Cotton fabric works well for small or decorative pillows, but avoid thin weaves.
Flannel is soft and pliable, often used in pet bed inserts.
Grain sacks or vintage textiles add rustic charm to upcycled designs.
Pro Tip: Always use light-colored fabric for the insert casing. It makes stuffing easier to see and helps prevent dark fibers from showing through light pillow covers.
Select the Best Filling Material
Your choice of filling determines the look, feel, and longevity of your insert. Here are the main options.
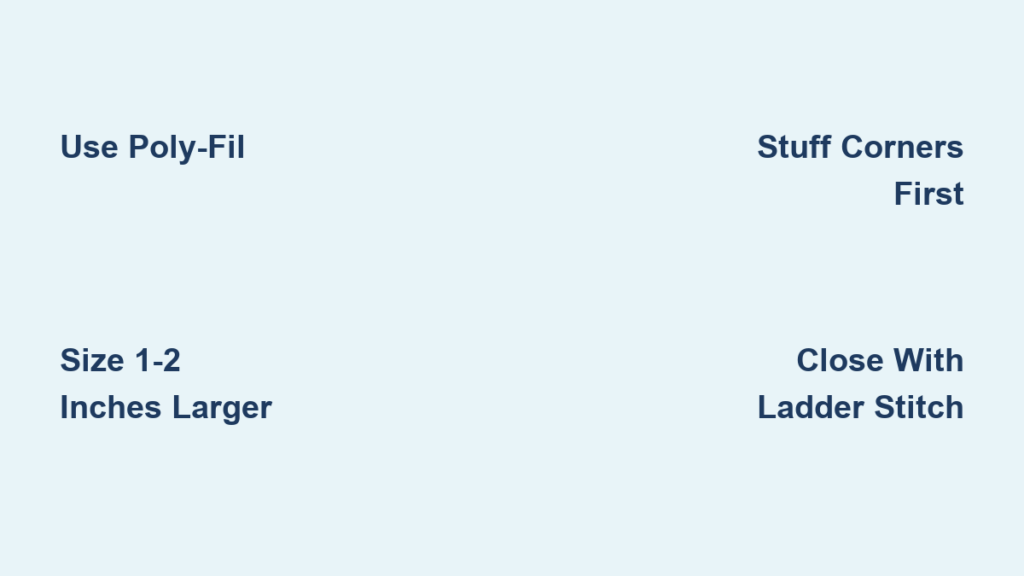
Use Poly-Fil for a Bounce-Back Finish
Polyester fiberfill like Fairfield Poly-Fil is the most popular choice for DIY inserts. It is lightweight, hypoallergenic, and holds its shape after compression.
Cost runs about $2 for 24 oz.
The feel is firm, springy, and moldable.
This filling is best for modern, overstuffed looks.
Performance stays strong when fluffed regularly.
How to use poly-fil: Fluff the filling before inserting. Break apart clumps by hand for even distribution. Start stuffing corners first to maintain sharp edges.
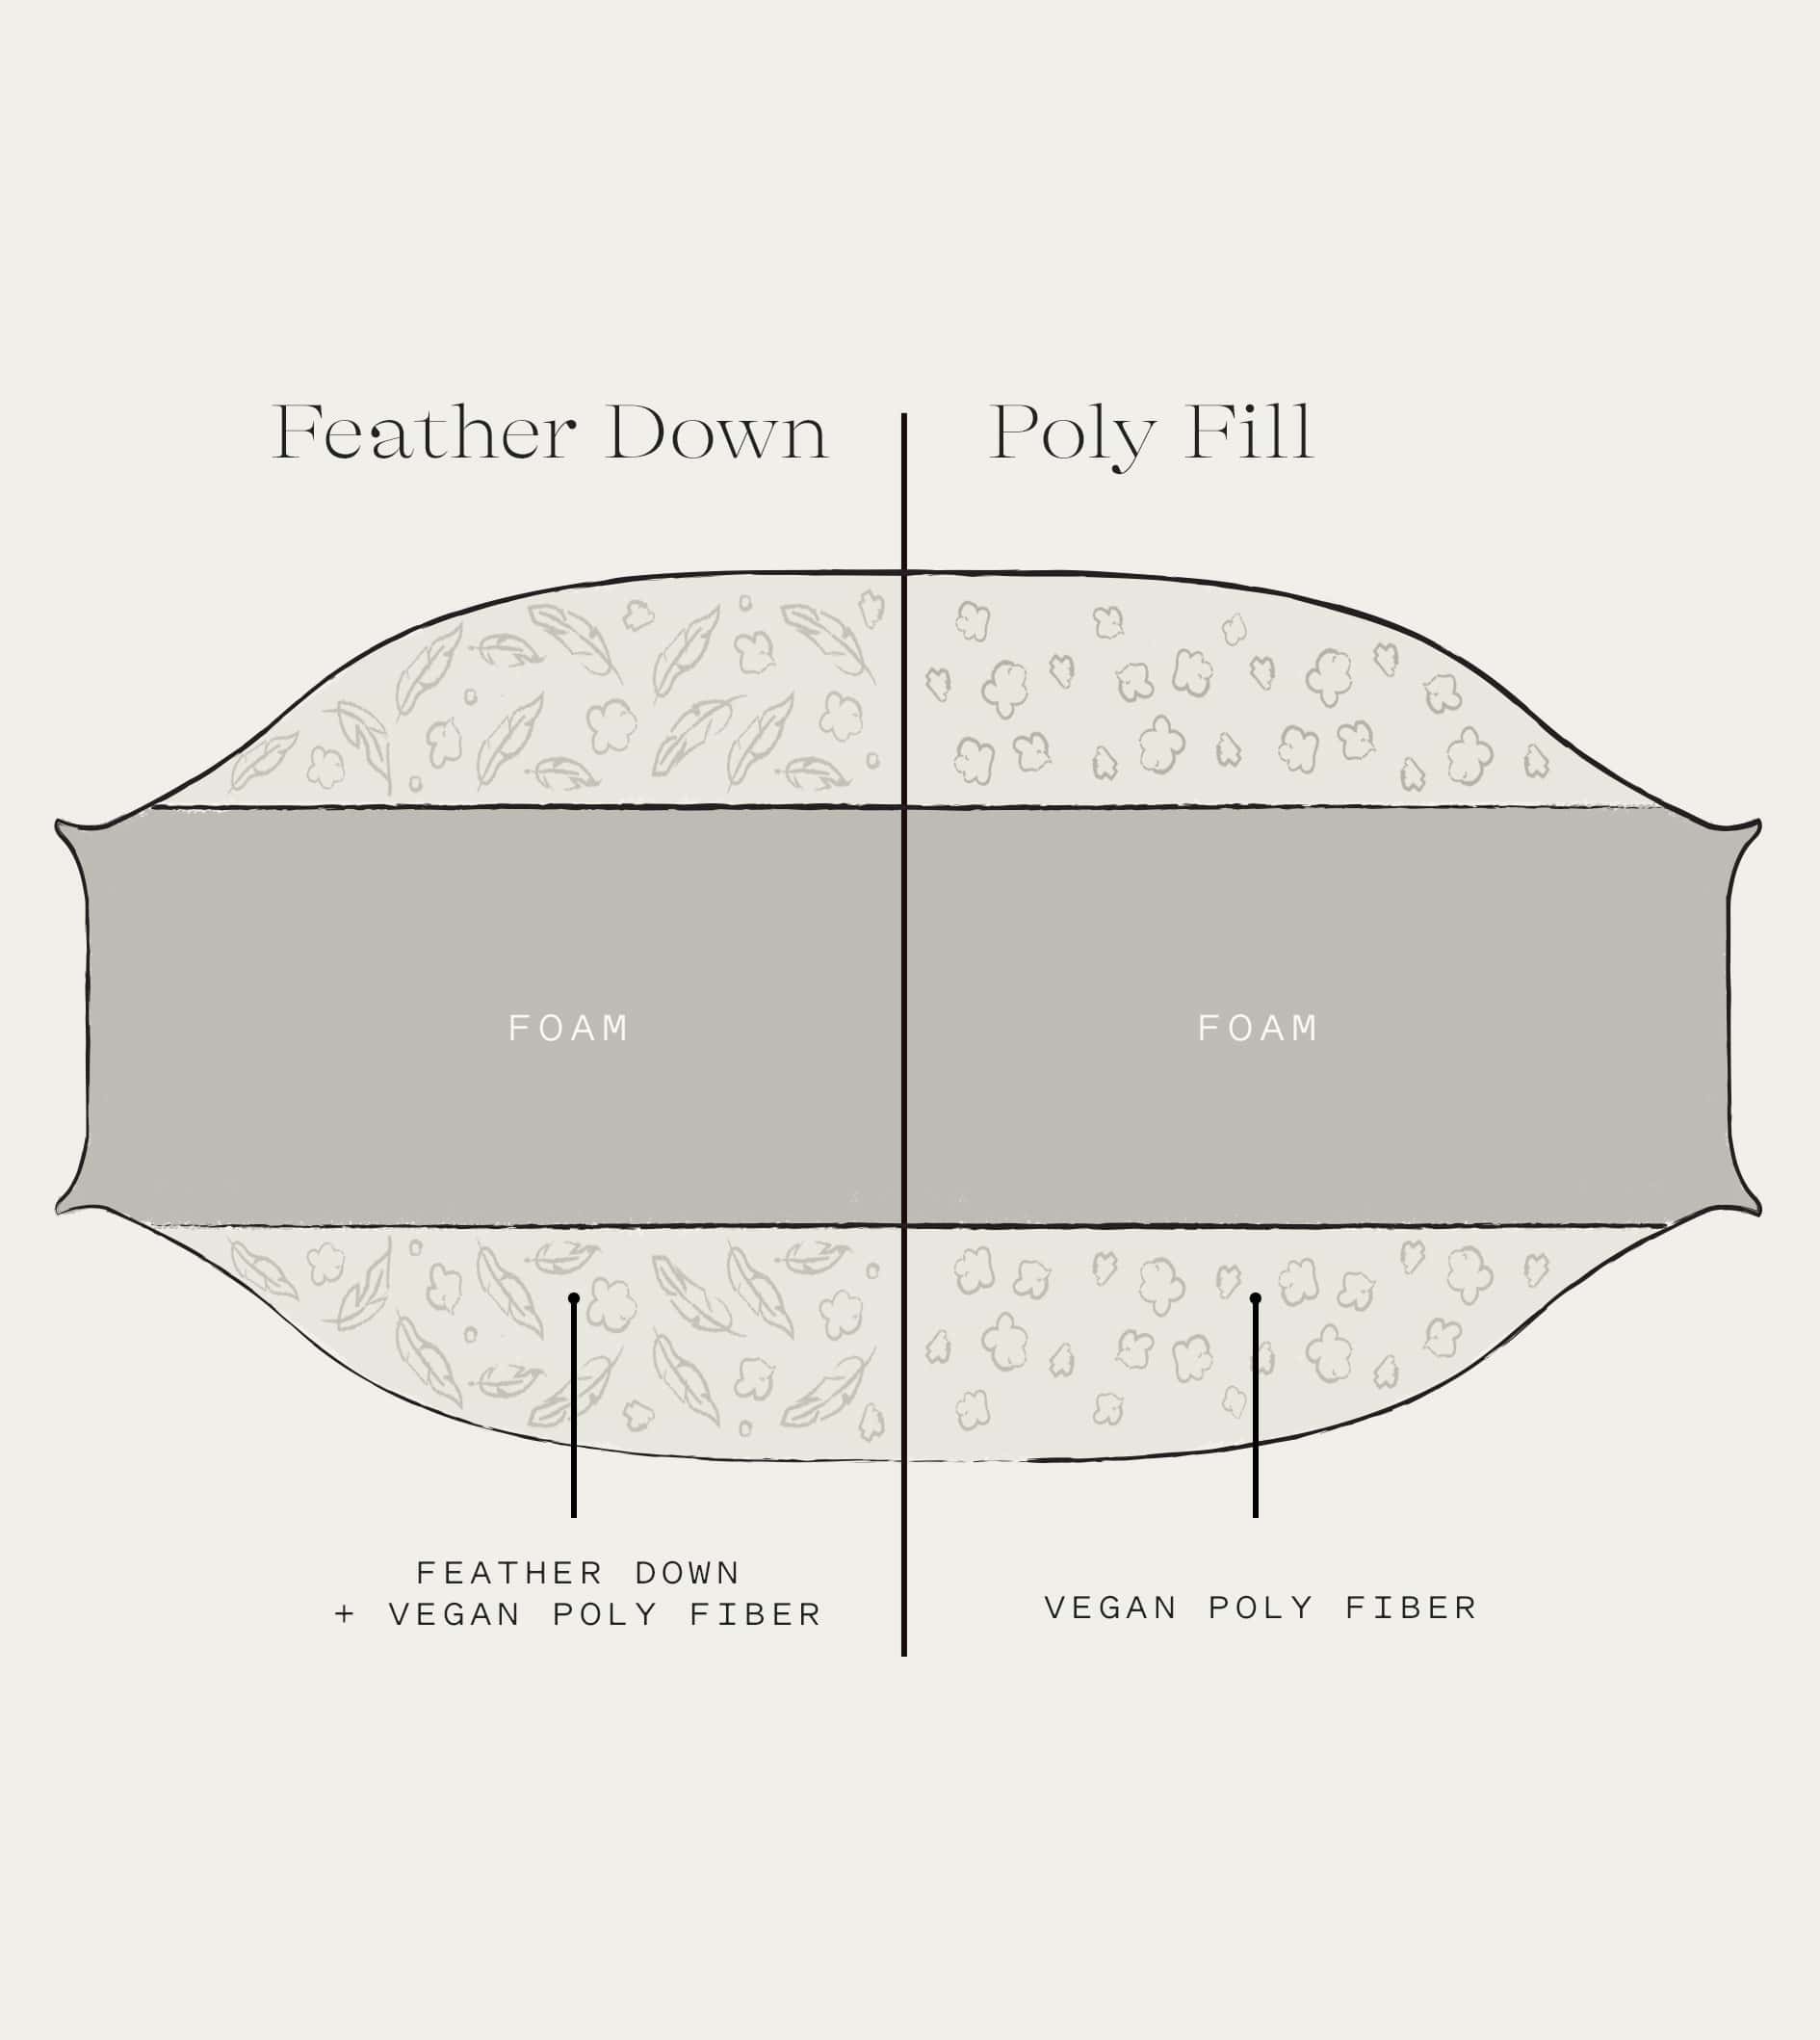
Repurpose Feather Inserts for Luxury Drape
Feathers offer a plush, high-end feel with natural loft and soft drape, ideal for living room decor.
Source feathers from IKEA FJÄDRAR inserts, old bed pillows, or thrifted throw pillows.
You need high-thread-count fabric to prevent quills from poking through.
Never wash feathers. Clean the outer shell before restuffing instead.
How to extract feathers: Use a seam ripper to open the pillow. Transfer feathers into a plastic bag to minimize mess. Use a lint roller or tape to remove stray quills.
Try Recycled Stuffing for Budget Projects
Some thrift store pillows contain synthetic stuffing similar to poly-fil but slightly less resilient over time. It costs as little as $2 for 24 oz.
Recycled stuffing from old pillows is another budget-friendly option.
Thrift store cost runs $0.50 to $1.50 per pillow.
Wash the pillow even if labeled dry clean only to remove odors and allergens.
Store unused stuffing in sealed containers for future projects.
Expert Note: Combine stuffing from multiple old pillows to create larger or firmer inserts, perfect for couch cushions or floor pillows.
Calculate the Perfect Insert Size

To avoid gaps or bulges, your insert must be properly sized relative to your cover.
Add the Right Amount for a Plump Fit
Your insert should be 1 to 2 inches larger than the pillow cover.
Measure the interior dimensions of your cover.
Add ½ inch seam allowance per side, which equals 1 inch total to both length and width.
Example: For an 18 inch by 18 inch cover, cut fabric to 19 inches by 19 inches.
For an overstuffed peek-out effect, add 2 inches total (1 inch per side). Example: 18 inch cover becomes a 20 inch by 20 inch insert.
Warning: Oversizing too much makes insertion difficult. Stick to 1 to 2 inches larger for best results.
Cut Fabric Using the Right Method
Use Two Separate Pieces (Standard Method)
Cut two identical squares or rectangles with seam allowances included.
Mark a 5 to 6 inch opening on one edge for turning.
This method is ideal for beginners and custom shapes.
Try the Tube Method (One-Piece Fold)
Cut one long piece with width equal to desired width plus 1 inch for seam allowance.
Length equals two times the desired length plus 10 inches.
Example: For a 20 inch by 20 inch pillow, cut 21 inches by 50 inches.
Fold in half (right sides together), sew both open sides.
Turn, stuff, then sew closed.
Advantage: Fewer seams, hidden closure, faster build.
Resize a Pre-Made Insert (Feather Hack)
Open an IKEA FJÄDRAR or thrifted insert with a seam ripper.
Transfer filling to a plastic bag.
Cut the fabric to your new size.
Resew with tighter seam allowance.
Restuff and close.
Pro Tip: Use double stitching (two rows 1/8 inch apart) to prevent feather escape.
Sew the Insert Shell
Build a Two-Piece Insert
Place fabric pieces right sides together.
Pin edges and mark a 4 to 6 inch opening for turning.
Sew around the perimeter with ½ inch seam allowance.
Backstitch at start and end to reinforce.
Trim corners diagonally (do not cut stitches) to reduce bulk.
Turn right-side out using a chopstick or blunt tool.
Press lightly if desired.
Construct a Tube-Style Insert
Fold fabric in half (right sides together).
Sew both open sides with ½ inch seam allowance.
Backstitch at ends.
Finish raw edges with serger or zig-zag stitch to prevent fraying.
Turn right-side out.
Stuff firmly.
Why it works: The folded edge becomes the bottom, eliminating one seam and creating a cleaner look.
Stuff for Maximum Fullness
Proper stuffing technique makes the difference between a flat pillow and a luxurious insert.
Fluff and Distribute Evenly
Fluff the stuffing before use to aerate and soften.
Break apart clumps by hand.
For feather inserts, work slowly and use a plastic bag barrier to contain quills.
Fill Corners First
Push stuffing into corners and edges before filling the center.
Use fingers or a chopstick to guide material into tight spots.
Maintain shape by distributing evenly and avoiding lumps.
Adjust Firmness to Your Preference
Soft and relaxed appearance comes from light stuffing and gentle drape.
Firm and luxury look comes from dense, overstuffed filling.
Test fullness before final closure using a temporary stitch or safety pins.
Rule of Thumb: Half a 24 oz bag (about 12 oz) fills a 26.5 inch by 14.5 inch insert.
Close the Insert Securely
Hand-Sew for an Invisible Finish
Fold raw edges inward (about ½ inch) to create a clean hem.
Use an invisible ladder stitch for seamless closure.
This method is ideal for high-visibility or frequently handled pillows.
Machine-Sew for Speed and Strength
For two-piece method, sew the opening shut with ½ inch seam and backstitching.
For tube method, compress the pillow near the needle and sew along a 5-inch line.
Trim excess fabric if needed.
Use Temporary Closure for Testing
Close with a running stitch or safety pins first.
Adjust stuffing as needed before permanent closure.
Pro Tip: Safety pins work excellently for no-sew methods and are small and discreet when hidden in seams.
No-Sew Method: The $3 Bed Pillow Hack
If you do not want to sew, this method takes minutes and costs only $3.
Turn a Walmart Pillow into a Custom Insert
Supplies needed include a $3 bed pillow (from Walmart or similar), scissors, and 3 small safety pins.
Insert the bed pillow into your throw cover.
Push it fully into the corners.
Cut open the top seam of the bed pillow.
Pull out excess stuffing to desired fullness.
Fold the open end under neatly.
Secure with 3 safety pins.
Advantages of this method include no sewing required, fully adjustable and reusable construction, and often fluffier results than retail inserts.
User Feedback: This hack consistently outperforms $15+ inserts in fullness and comfort.
Repurpose Old or Thrifted Pillows
Old or thrifted pillows are gold mines for DIY inserts.
Extract and Upgrade Discarded Stuffing
Source pillows from home or thrift stores, costing $0.50 to $1.50 each.
Wash the entire pillow (even dry clean only versions) to remove odors and allergens.
Cut open and extract stuffing.
Break apart clumps by hand.
Encase in new fabric for custom size.
Bonus: Combine stuffing from multiple pillows to build larger inserts, perfect for floor cushions or pet beds.
Resize IKEA FJÄDRAR for Luxury Feel
IKEA FJÄDRAR pillow is a favorite among DIYers for its high-quality feather fill.
Customize Feather Inserts
Use a seam ripper to open the seam.
Transfer feathers to a plastic bag.
Clean the shell with a lint roller or vacuum.
Cut fabric to new dimensions.
Resew with double stitching (second row 1/8 inch from first) to prevent quill escape.
Refill with feathers, pushing into corners.
Close with permanent or testable stitch.
Result: A custom-sized, luxury-feel insert at a fraction of the cost.
Build a DIY Pet Bed with Removable Inserts
Use the same techniques to make a pet bed with easy-to-clean inserts.
Create a Washable, Durable Pet Bed
Supplies needed are 2 by $3 bed pillows, 2 to 2.5 yards flannel or durable fabric, 1 zipper (about $3), sewing machine, thread, and pins.
Cut fabric to size (for example, 60 inches long).
Fold in half (inside-out) to get 30 inches by 42 inches.
Sew two short sides with backstitch reinforcement.
Turn right-side out.
Mark center line (for example, 20.5 inches from edge).
Backstitch down the middle (not end-to-end) to create two compartments.
Attach zipper to open side using clothespins to hold it in place.
Sew both sides with backstitch.
Sew ends where zipper meets fabric.
Insert the two $3 pillows.
Result: A washable, durable pet bed under $20. Pillows are removable for cleaning.
Maximize Durability and Longevity
Reinforce Seams and Edges
Backstitch at all seam starts and ends.
Use double stitching on high-stress areas.
Serge or zig-zag stitch raw edges to prevent fraying.
Use tight stitch length (for example, 2.0) for feather inserts.
Maintain Shape Over Time
Clip corners diagonally before turning to reduce bulk.
Push stuffing into corners during filling.
Use poly-fil for best bounce-back and long-term resilience.
Frequently Asked Questions About Making Throw Pillow Inserts
What is the best fabric for a DIY pillow insert?
Tightly woven fabrics work best. Poly-cotton lining is lightweight and beginner-friendly. Canvas or drop cloth offers durability at low cost. Avoid thin weaves that can tear under stuffing pressure.
How much bigger should an insert be than the cover?
The insert should be 1 to 2 inches larger than the pillow cover. This ensures a plump, luxurious look and prevents sagging or loose fabric.
Can I make a pillow insert without sewing?
Yes. Use a $3 bed pillow from a discount store. Insert it into your cover, cut open the top seam, adjust the stuffing, fold under the edge, and secure with safety pins.
What is the cheapest way to make a pillow insert?
Thrift store pillows cost $0.50 to $1.50 each. Cut them open, extract the stuffing, and reuse it in a new fabric shell. This method costs less than $2 per insert.
How do I prevent feathers from poking through the fabric?
Use high-thread-count fabric for feather inserts. Apply double stitching when reseaming, with the second row 1/8 inch from the first. This creates a barrier quills cannot escape through.
How do I know when the insert is full enough?
Test before final closure. Use temporary stitches or safety pins to hold the opening shut. Squeeze the pillow gently. If it looks flat, add more stuffing. If it bulges, remove some.
Key Takeaways for Making Your Own Throw Pillow Insert
Making your own throw pillow insert is not just cheaper, it is smarter. You control the size, firmness, and materials, ensuring a perfect match for every cover. The $3 no-sew method delivers results that rival $20 retail inserts, while sewing from scratch gives you complete customization over shape and fullness.
Start with one insert using the no-sew bed pillow hack if you want quick results. Graduate to sewing your own shell with poly-fil for better bounce-back. Repurpose old pillows and thrift store finds to save even more while reducing textile waste. Test fullness before final closure every time, and your inserts will look professionally made.
Whether you sew from scratch, resize a thrifted gem, or use a no-sew hack, you will save 70 to 90 percent compared to retail prices. Start with one insert, test the fullness, and soon you will be upgrading every pillow in the house.


