
Tired of pillow covers that gape open or slip off? Learning how to make a pillowcase with a zipper gives you a clean, secure fit that stays closed. Whether you’re refreshing your living room or crafting custom decor, a zippered pillowcase offers a professional finish with total design control. This guide walks you through every step, from choosing the right fabric to zipping up your first polished cover.
With just one yard of fabric and a $3 zipper, you can create a washable, durable cover tailored exactly to your pillow insert. No more settling for off-the-shelf sizes or mismatched styles. Follow these proven steps, avoid common mistakes, and make a pillowcase that looks store-bought but costs far less.
Cut Fabric to Size
Measure Your Pillow Insert
Start by measuring your pillow insert from seam to seam. Don’t rely on the labeled size because actual dimensions can vary. For a snug, slightly overstuffed look, cut the fabric ½ inch smaller than the insert on each side. For a plump, luxurious fit, cut panels 1 inch smaller than the insert.
Use a tape measure and mark dimensions with a disappearing ink pen or chalk. Always measure twice to avoid costly cutting errors. Pre-wash and dry your fabric if you plan to launder the pillowcase later.
Cut Two Matching Panels
For a standard 20-inch by 20-inch insert, cut two fabric pieces at 18½ inches by 19 inches (adding ½-inch seam allowance on all sides). If using directional prints like florals or stripes, align the pattern before cutting to ensure it faces the right direction on the front.
Use sharp fabric shears, a rotary cutter, or pinking shears for clean, fray-resistant edges. Always pre-wash your fabric to prevent shrinkage after the first wash.
Adjust for Thick or Bulky Fabrics
If using velvet, canvas, or upholstery fabric, increase the seam allowance to 5/8 inch to accommodate bulk. Thicker materials need extra room to lie flat when sewn. Press fabric first to remove wrinkles and ensure accurate cutting.
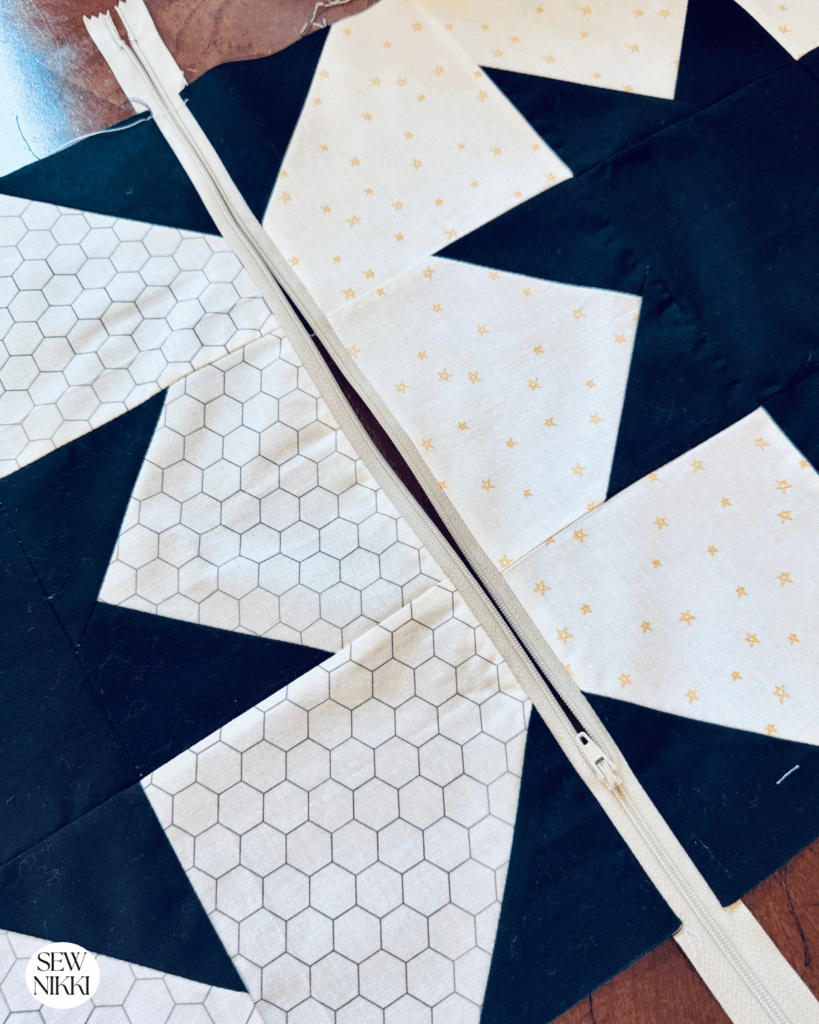
For pieced fronts like triangle designs, assemble and press the front panel before cutting to final size. Trim the completed unit to match the back panel exactly.
Choose the Right Zipper

Pick a Zipper 3–5 Inches Shorter
Select a zipper 3 to 5 inches shorter than the pillow’s side length. For a 20-inch pillow, a 14-inch to 16-inch zipper works perfectly. This ensures the zipper sits centered and doesn’t interfere with corners. A shorter zipper also creates a clean closure without excess hardware showing.
Experienced DIYers note that an 18-inch zipper for a 20-inch insert works, but a 14-inch zipper gives a more balanced, centered appearance.
Use Invisible or Standard Zippers
Invisible zippers hide the teeth within folded tape, creating a seamless finish. They require a special zipper foot and careful pressing but deliver a high-end result. These are ideal for silk, satin, or modern decor.
Standard nylon or metal zippers are easier for beginners. Choose a color that matches or contrasts boldly with your fabric for a design statement. Use a regular zipper foot to stitch close to the teeth.
Avoid zippers longer than needed. If necessary, shorten by sewing a reinforced thread stop with 5 to 6 rows of zigzag stitching, then trim excess below.
Press Zipper Teeth Flat
Before sewing, press the zipper teeth flat with a warm iron. This widens the sewing channel and helps the fabric lie smoothly. Place a pressing cloth over the zipper to protect it from heat damage, especially on nylon or plastic zippers.
Open the zipper halfway because it’s essential for turning the pillowcase later.
Baste the Bottom Seam
Sew Right Sides Together
Place the two fabric panels right sides together, aligning the edge where the zipper will go (usually the bottom). Pin or use fabric clips to secure, especially with slippery fabrics like silk or vegan leather.
Sew along the edge with a ½-inch seam allowance, using a basting stitch (long stitch length, about 4 to 5mm). Start and stop ½ inch to 2½ inches from each end, leaving the center section weak. Backstitch at both ends to lock stitches.
This temporary seam holds the layers together and creates a guide for zipper placement.
Press Seam Open
After basting, press the seam open with an iron. This flattens the fabric and makes it easier to align the zipper accurately. A flat, pressed seam prevents puckering and ensures a smooth finish.
Never skip pressing because each step builds on the last, and crisp seams are key to a professional look.
Mark and Install the Zipper
Mark Zipper Placement
On the wrong side of the basted seam, mark 2½ inches from each end. These points show where to remove basting stitches later. Alternatively, draw a line ½ inch from the edge and center the zipper over it.
Use a fabric marker or chalk so lines wash out cleanly.
Attach Zipper with Zipper Foot
Open the zipper halfway. Place the right side of the zipper face down on the wrong side of the fabric, aligning the teeth with the seam line. Pin or clip in place.
Switch to a zipper foot, which lets you stitch extremely close to the teeth. Adjust the needle position 1 to 2 spots left or right (about ½ inch from teeth) for a clean overlap.
Start sewing at one end, backstitching to secure. When you reach the pull, stop with needle down, raise the presser foot, slide the zipper pull down and out of the way, lower the foot, and continue sewing. Backstitch at the end.
Repeat on the other side, repositioning the foot as needed.
Use Glue or Clips for Slippery Fabrics
For minky, velvet, or PU leather, use a fabric glue stick to hold the zipper in place before sewing. Clips work better than pins on thick or sticky fabrics, preventing shifting and snags.
Optional: Sew perpendicular stitches across the bottom end of the tape (not the stopper) to reinforce the zipper base.
Remove Basting and Sew Sides
Unzip Before Removing Stitches
This is critical: always unzip the zipper fully before removing basting stitches. If you forget, you won’t be able to turn the pillowcase right side out.
Use a seam ripper or small snips to remove the basting between the 2½-inch marks. Work slowly to avoid cutting the fabric.
Sew Remaining Three Sides
With the zipper partially open, flip the fabric so right sides are together. Repin or clip all three remaining edges.
Sew around with a ½-inch seam allowance, starting and ending at the zipper ends. Overlap slightly with the previously stitched sections for durability. Backstitch at both ends.
Stop with the needle down at corners, lift the foot, pivot the fabric, then continue. This creates sharp, even corners.
Finish Edges and Trim Corners
Prevent Fraying with Edge Finishing
Raw edges will fray over time. Finish them before turning. You can use a zig-zag stitch along inner edges, serge with an overlock machine for a clean durable edge, use a French seam for sheer or delicate fabrics, or trim with pinking shears for low-use decorative pillows.
Avoid cutting near the zipper because only trim the three sewn sides.
Trim Corners to Reduce Bulk
Cut diagonally across each corner, about ¼ inch to ½ inch from the stitching. This reduces fabric bulk and helps corners lie flat when turned. Don’t cut too close because snipping the seam will weaken the structure.
For thick fabrics like canvas or velvet, grade the seam allowances by trimming one layer shorter than the other to minimize bulk.
Turn, Press, and Insert Pillow
Turn Right Side Out
Turn the pillowcase right side out through the open zipper. Use a chopstick, point turner, or blunt pencil to push out corners and edges gently. Work slowly to avoid poking holes.
Ensure the zipper lies flat and the seam lines are even.
Press for a Crisp Finish
Press the entire cover with an iron, using the appropriate heat setting for your fabric. Start from the center and move outward to smooth wrinkles. Avoid direct contact with zipper teeth, and use a pressing cloth if needed.
A well-pressed pillowcase looks professionally made and fits better.
Insert and Close
Open the zipper fully. Slide in your pillow insert (new, upcycled, or DIY-stuffed). For used inserts, dry on high heat for 30 minutes to sanitize.
Close the zipper completely. The cover should feel snug but not stretched. If it’s too tight, check your seam allowances. If too loose, consider reducing the next panel size by ½ inch.
Customize Your Design
Mix Fabrics and Textures
Create visual interest by pairing cotton front with velvet back, floral print with solid jewel tone, or smooth sateen with textured chenille. Use contrasting zippers like gold or black for a bold design element.
Add Embellishments
Before assembling, decorate the front panel with embroidery, appliqué, beadwork, or fabric paint. Keep embellishments away from edges to avoid interference with seams.
Make a Pieced Front
Cut one large light triangle (21 inches by 21 inches, cut diagonally) and two small contrasting triangles (from 21 inches by 21 inches cut into quarters). Sew small triangles together, then attach to the large one. Press seams open, trim to 20 inches by 20 inches, then assemble with the back panel.
Use clips instead of pins for thick or slippery pieces.
Avoid Common Mistakes
Forgot to Unzip? You Cannot Turn It
The number one mistake is sewing all sides with the zipper closed. Always keep the zipper open during final sewing. If you forget, you’ll have to cut a seam to turn it, ruining your work.
Set a reminder: “Unzip before sewing sides.”
Zipper Will Not Close? Check Alignment
If the zipper sticks or won’t zip, fabric may be caught in the teeth or the seam is misaligned. Carefully unpick a few stitches, re-pin, and sew closer to the teeth.
Use a longer zipper if the pull hits the seam.
Puckering or Bulky Corners?
Press every seam flat. Trim corners diagonally. Use clips for thick fabrics to prevent shifting.
If fabric puckers, check tension or switch to a denim needle for heavy materials.
Maintain and Care for Your Pillowcase
Wash and Dry Properly
Remove the insert. Machine wash on gentle cycle with mild detergent. Avoid bleach.
Air dry or tumble dry low to prevent shrinkage and zipper damage. High heat can melt nylon teeth or warp metal zippers.
Lubricate the Zipper
Rub a graphite pencil tip along the teeth occasionally to keep the slider smooth. Never use oil because it attracts dirt.
Store with Zipper Open
Store the cover with the zipper partially open to reduce stress on the teeth and fabric. Fold neatly to prevent creases.
Iron as needed, using a pressing cloth over delicate fabrics or zippers.
Frequently Asked Questions About Making a Pillowcase with a Zipper
What is the best zipper length for a 20-inch pillow?
For a 20-inch pillow insert, use a 14-inch to 18-inch zipper. The zipper should be 3 to 5 inches shorter than the pillow’s side length to ensure centered placement and clean corners.
Do I need a special foot to sew a zipper?
Yes, a zipper foot is essential for sewing close to the zipper teeth. It allows you to stitch precisely without the presser foot interfering with the zipper mechanism.
Can I use an invisible zipper for this project?
Yes, invisible zippers create a seamless finish but require a specialized invisible zipper foot and careful pressing. They work best for elegant decor projects with silk, satin, or high-end fabrics.
How do I prevent the zipper from fraying?
Finish all raw edges with a zig-zag stitch, serger, or French seam before turning the pillowcase right side out. This prevents fraying during washing and extends the life of your cover.
Why does my zipper won’t close after sewing?
The fabric may be caught in the teeth, or the seam allowance is misaligned. Carefully unpick a few stitches, re-pin the area, and sew closer to the zipper teeth.
Final Thoughts on Making Your Own Zippered Pillowcase
Making a pillowcase with a zipper is easier than it looks, and the results are worth every minute of effort. With precise cutting, a zipper foot, and one key rule (always unzip before final sewing), you will create custom covers that look high-end, stay closed, and survive repeated washing.
This skill gives you endless design freedom, significant cost savings compared to retail prices, and a polished finish you can be proud of. Whether you are making one cover or a seasonal set, you control the fabric, the color, and the fit.
Try it once, and you may never go back to envelope-style pillowcases again. The confidence you gain from this project will inspire you to tackle more advanced sewing challenges.


